How to Build a Concrete Base for a Greenhouse: A Simple DIY Guide
Key Takeaways
- ✅ A concrete base lasts 25+ years and provides the most stable, maintenance-free foundation for any greenhouse.
- 📏 100–150 mm depth for most greenhouses, plus 75–100 mm of compacted hardcore underneath.
- 💷 DIY cost: £150–£800 depending on size. Professional labour adds £300–£400 on top.
- ⏱️ Allow 2–3 days total: one day for prep and pouring, then 3–7 days curing before you build on it.
- 📐 5 mm matters: even a small levelling error across a 3 m base will stop greenhouse doors closing properly.
After 15 years helping over 150,000 customers at Greenhouse Stores, I'd say concrete bases cause fewer long-term problems than any other foundation type. They don't shift, they don't settle, and they don't rot. They're particularly important for lean-to greenhouses bolted to house walls and larger models like our Vitavia range. The trade-off is they're harder to build, cost more than paving slab bases, and they're permanent — so if you get the measurements wrong, you're chipping concrete. I built my first greenhouse base about eight years ago and made every mistake in the book. The second one was textbook perfect. That's what I'm sharing here.
Why Choose a Concrete Base?
Concrete is the strongest, most durable greenhouse foundation you can build — it won't shift, rot, or need re-levelling for 25+ years.
Look, I get it. You've just spent good money on a shiny new greenhouse and now someone's telling you to pour concrete? Can't you just plonk it on the grass?
Well, you could. But here's what I've seen happen: the frame twists, doors won't close, glass cracks, and within a year you're dealing with a wonky mess. A proper concrete base stops all that nonsense.
Concrete does three brilliant things:
- Keeps everything level — glass doesn't like movement, and concrete doesn't move.
- Blocks weeds and pests — no more rats setting up shop under your tomatoes.
- Lasts 25+ years — with zero maintenance once it's cured.
The downsides? It's the most expensive base option (£15–40/m² vs £8–12 for gravel), it takes 3–7 days to cure before you can build on it, and drainage is poor compared to paving slabs. If your greenhouse will be used for border planting directly into the soil, concrete isn't the right choice — you'd want a different base type. But for staging, container growing, and maximum long-term stability, concrete wins.
What You'll Need
Budget £200–£400 for a standard 8 × 6 ft base if you're doing it yourself, or £500–£800 with professional labour.
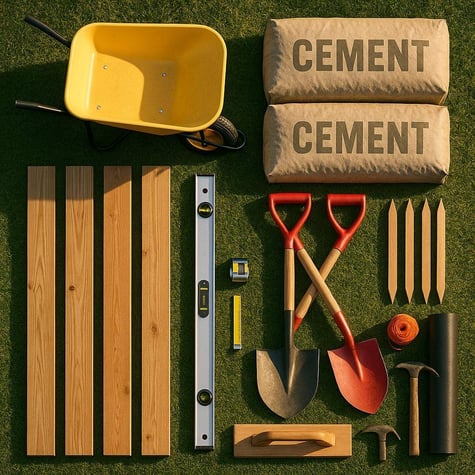
Materials
- Concrete mix — either ready-mix bags or separate cement, sharp sand, and gravel (1:2:3 ratio, or 1:5 ballast).
- Hardcore/MOT Type 1 — about 75–100 mm depth for the sub-base.
- Timber for formwork — 150 mm wide boards work well. Treated softwood is fine.
- DPC membrane — damp proof course sheeting to stop moisture rising through the slab.
- Wooden stakes — to hold your formwork in place. One every 600–800 mm.
Tools
- Spade and shovel
- Spirit level (get a long one — 1,200 mm minimum)
- Wheelbarrow
- Rake
- Wooden float or steel trowel
- Tape measure (5 m minimum)
- String line and pegs
- Hammer
- Vibrating plate compactor (hire for about £40/day)
Planning Your Base
Your concrete base must be 20–50 mm larger than the greenhouse base plinth on all sides — measure the actual dimensions from the manufacturer's spec sheet, not the name on the box.
⚠️ Don't eyeball it. The base plinth sits on top of the concrete, so you need a bit of extra room to make positioning easier. Too small is a nightmare — I once built a base 50 mm too narrow and had to chip away concrete and patch it. Don't do that.
Measure twice. Then measure again. A "6 × 8" greenhouse typically measures closer to 1,930 mm × 2,560 mm externally. A "10 × 8" can be 3,170 mm × 2,560 mm. Always check the spec sheet.
📞 Planning permission: Most domestic greenhouses don't need it, but if you're going near a boundary or you're in a conservation area, give your council a ring. Five-minute call now beats a five-figure enforcement notice later.
🔧 Matt's Installation Tip: Order Ready-Mix for Anything Over 1 m³
For a small 6 × 4 ft base (0.22 m³), ready-mix bags from a builders' merchant are fine — you'll need about 9–10 bags. But for anything 8 × 6 ft or larger, get a delivery from a ready-mix supplier. It costs roughly £65–85 per m³ delivered, which is only slightly more than buying bags, and it saves you an entire day of back-breaking mixing. Ring ahead and book a specific delivery window — you need to pour and level the concrete within about 2 hours of it arriving.
Size, Depth, and Cost Guide
| Greenhouse Size | Base Depth | Concrete Volume | Approx. DIY Cost | With Labour |
|---|---|---|---|---|
| 6 × 4 ft | 100 mm | 0.22 m³ | £150–£250 | £400–£550 |
| 8 × 6 ft | 100 mm | 0.45 m³ | £250–£400 | £500–£700 |
| 10 × 8 ft | 125 mm | 1.0 m³ | £400–£600 | £700–£900 |
| 12 × 10 ft | 150 mm | 1.8 m³ | £600–£800 | £900–£1,200 |
Costs are approximate and include hardcore, DPC, formwork timber, and concrete. Prices vary by region and supplier (2025/2026).
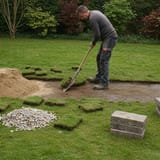
Step-by-Step: Building Your Concrete Greenhouse Base
The full process takes 1–2 days of active work, plus 3–7 days of curing time before you can build on it.
Step 1: Mark Out and Dig
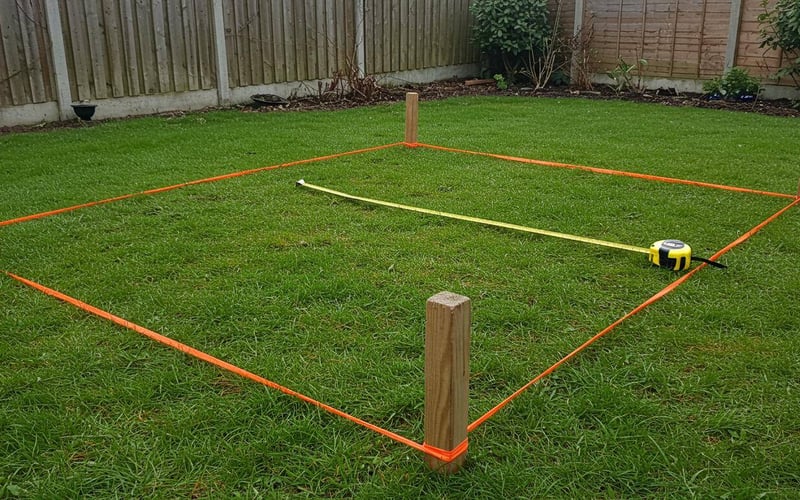
String lines are your best friend here. Mark your corners with pegs, run string between them, and check your diagonals are equal. If they're not, you've got a wonky rectangle — adjust until both diagonals match within 5 mm.
Dig out to about 200–250 mm deep total. That's roughly a spade depth plus a bit. You want 75–100 mm for hardcore, then 100–150 mm for concrete on top.
Keep the sides fairly straight. You're not digging the Channel Tunnel, but ragged edges make the formwork annoying to fit. Check for buried services (gas, water, electric) before you start — contact your utility providers if you're unsure.
Step 2: Compact Your Hardcore

Tip in your MOT Type 1 or hardcore and spread it level with a rake. This sub-base stops the concrete cracking and sinking into soft ground.
✅ Compact it properly. I once skipped the compacting step. Six months later, one corner had dropped 20 mm. Hire that plate compactor — your back will thank you, and your greenhouse won't look drunk.
Go over it three or four times until you can walk on it without leaving footprints. On clay or very soft soils, consider a 100 mm sub-base instead of 75 mm.
Step 3: Build Your Formwork
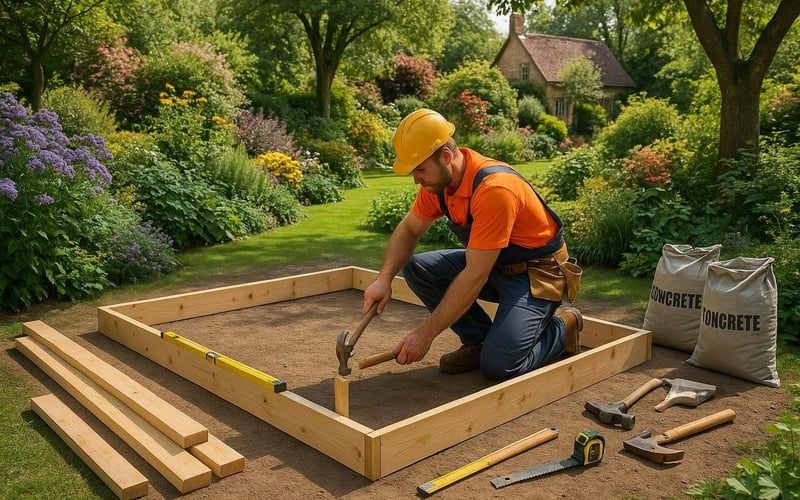
Nail together a rectangle from your timber boards. The inside measurements should match your base size exactly. Use stakes every 600–800 mm to hold it in place, driven into the ground outside the boards.
Get your spirit level out. Check every side. Check the diagonals. Check it all again. This is where "level" happens — once the concrete's in, you're stuck with what you've got.
💡 Pro tip: Brush a little old engine oil on the inside faces of your formwork boards — it makes them much easier to remove later without damaging the concrete edges.
Step 4: Lay Your DPC Membrane
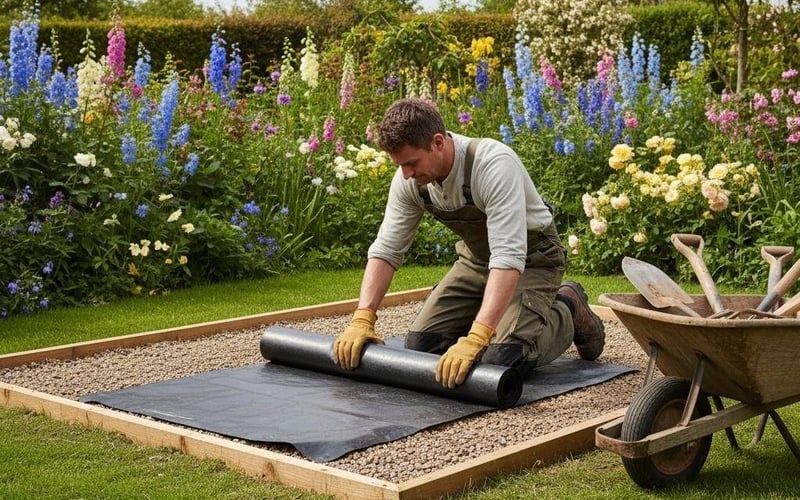
Roll out your damp proof membrane over the hardcore. Overlap joins by 150 mm minimum. Bring it up the inside edges of your formwork.
This stops moisture creeping up through the concrete into your greenhouse frame. Aluminium corrodes faster with constant ground moisture, and wooden base rails will rot within a few years without a DPC barrier.
Step 5: Mix and Pour Your Concrete
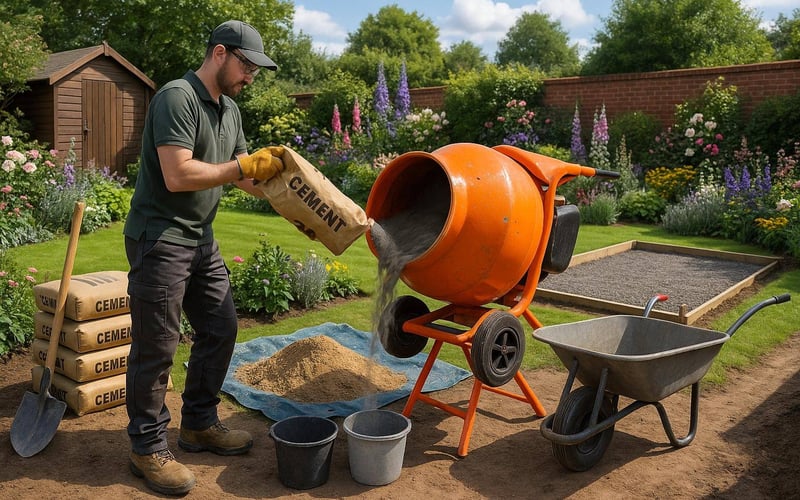
This is the big bit. If you're doing a small base (under 1 m³), ready-mix bags are manageable. Bigger than that? Get a concrete truck to deliver — it's not much more expensive and saves your entire weekend.
The mix: If you're mixing yourself, go with 1 part cement : 2 parts sharp sand : 3 parts gravel (or 1:5 ballast). Add water gradually until it's like thick porridge. Too wet and it'll be weak; too dry and you can't work it.
Pour it in, starting from one corner. Work it into the edges with your shovel. You want it roughly 20 mm higher than your final level — it'll settle as you screed it.
Step 6: Level and Finish
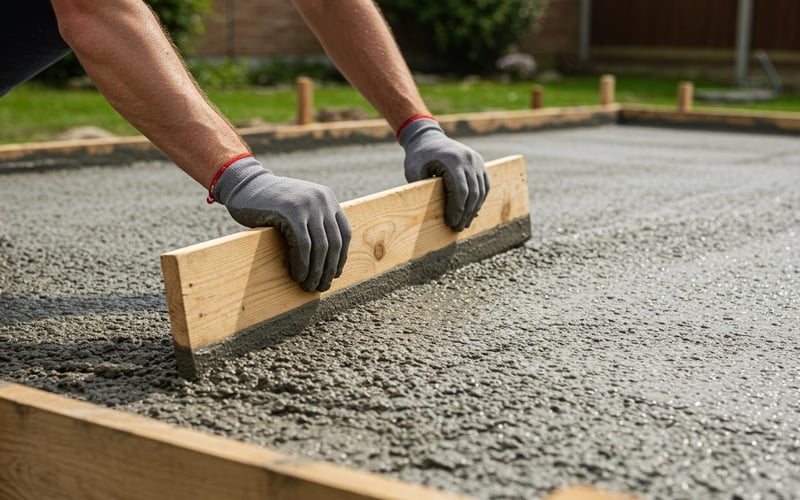
Here's where that long spirit level earns its keep. Drag a straight timber board (a "screed board") across the top of your formwork, sawing back and forth. This strikes off the excess and leaves you with a flat surface.
Fill any low spots and screed again. Check with your spirit level across different directions.
Once it's flat, smooth the surface with your wooden float. You don't want it mirror-smooth (that's slippery when wet), just reasonably even. A slightly textured finish is perfect for grip.
Step 7: Curing
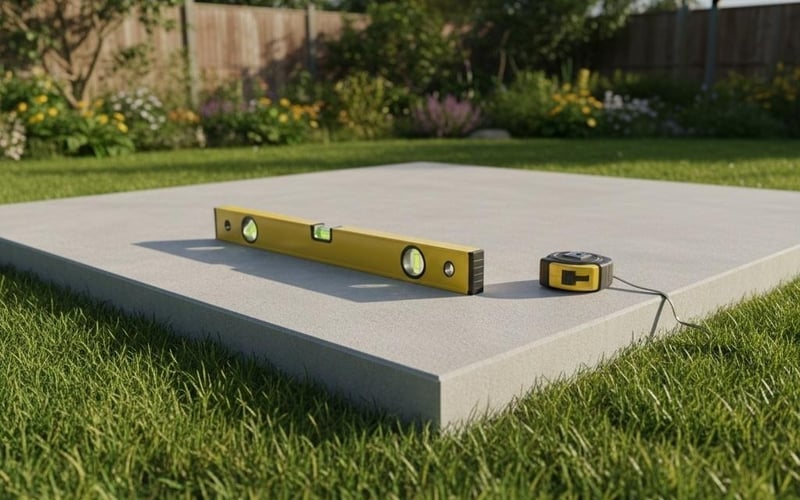
⚠️ Concrete doesn't "dry" — it cures. It needs moisture to cure properly. Concrete that dries too fast cracks.
Cover your base with plastic sheeting. Leave it alone for at least 3 days. A week is better. Yes, I know you're excited to build your greenhouse. Wait anyway.
In hot weather (above 20°C), lift the plastic and spray it with water once a day. After 7 days, you can build on it. Full strength takes 28 days, but seven is plenty for a greenhouse. Don't pour if temperatures are below 3°C or frost is forecast — cold-damaged concrete cracks and crumbles.
🌿 Building a Base? Browse Our Greenhouses
If you're preparing a concrete base, you're probably choosing a greenhouse too. For concrete foundations, we'd particularly recommend looking at our lean-to greenhouses (which need concrete bases for wall attachment) and large greenhouses (10 ft+ models that benefit most from the extra stability). Prices start from £395 with free UK delivery and optional professional installation.
Common Mistakes (I've Made Them So You Don't Have To)
Most concrete base failures come down to five avoidable errors — I've personally made three of these.
- Skipping the hardcore — concrete poured directly onto soft ground will crack and sink within 6–12 months. Always lay and compact a hardcore sub-base first.
- Not checking level — 5 mm out feels like nothing, but across a 3 m base your greenhouse door won't close. Check with a spirit level across every direction.
- Pouring in hot sun — concrete cures too fast in direct heat and cracks. Pour early morning or late afternoon in summer, and keep it damp under plastic sheeting.
- Wrong depth — too thin (under 75 mm) will crack under the weight of a loaded greenhouse; too thick wastes money and drying time.
- Forgetting expansion joints — for bases longer than 3 m in any direction, cut a 10 mm expansion joint across the slab. Concrete expands and contracts with temperature. Without a joint, it cracks instead.
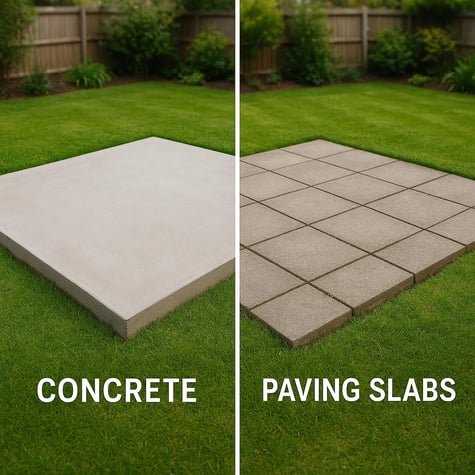
Concrete vs Other Base Types
Concrete is the best option for permanent greenhouses, lean-to models, and anything over 10 × 8 ft — but it's not always necessary for smaller structures.
| Base Type | Cost per m² | DIY Difficulty | Drainage | Durability | Best For |
|---|---|---|---|---|---|
| Compacted gravel | £8–12 | Easy | Excellent | 5–10 years | Budget/temporary setups |
| Paving slabs | £15–25 | Moderate | Very good | 20–30 years | Most greenhouses under 10 × 8 ft |
| Poured concrete | £25–40 | Difficult | Poor | 25–30+ years | Large, permanent, lean-to models |
| Timber frame on gravel | £10–18 | Easy–Moderate | Good | 8–15 years | Wooden greenhouses |
Paving slabs are a strong alternative for most standard greenhouses under 10 × 8 ft. They're cheaper, drain better, and individual slabs can be lifted for repairs. For small greenhouses under 6 × 4 ft, paving slabs or even compacted gravel can work fine. If you're not sure which is right for your situation, read our complete paving slab base guide for a detailed comparison.
For lean-to greenhouses, concrete is the strongest choice because the structure attaches to your house wall and needs to be perfectly level against an existing building. Wooden greenhouses can also work well on concrete, provided you include the DPC membrane to prevent moisture wicking into the timber frame.
Is Concrete Worth the Effort?
If you're spending £500–£2,000+ on a greenhouse you plan to keep for 10+ years, a concrete base is a sound investment.
Spending ~£300 and a weekend to make sure your greenhouse lasts 25 years is straightforward maths. I've seen too many expensive greenhouses destroyed because someone tried to save £200 on the base.
That said, be honest about whether you actually need concrete. A well-built paving slab base lasts 20–30 years too, costs less, and is far easier to DIY. Concrete makes the most sense for large greenhouses (10 ft+ wide), lean-to structures, and sites with particularly soft or unstable ground.
Professional vs DIY
Concrete bases are harder to DIY than paving slabs — if you're not confident with formwork and levelling, hiring a professional is worth the extra £300–£400.
The work is physically demanding and time-sensitive — once you start pouring, you have roughly 2 hours to get everything level before the concrete starts setting. There's no "lift it and adjust" option like with paving slabs.
If you'd prefer professional help with the greenhouse assembly itself, our nationwide installation service handles everything from base-frame anchoring upwards. The base must be completed and fully cured before our team arrives.
Useful Resources
- For help choosing the right greenhouse for your base, check out the Greenhouse Buyers Guide.
- The Royal Horticultural Society has guidance on greenhouse foundations and drainage.
- For building regulations in your area, check the Planning Portal — most domestic greenhouses don't need planning permission, but it's worth confirming.
- Questions about sizing or spec sheets? Ring us on 0800 098 8877 — we'll confirm exact dimensions for any model we sell.
Frequently Asked Questions
-
How deep should a concrete base be for a greenhouse?
100 mm (4 inches) is the right depth for most garden greenhouses up to 10 × 8 ft. Go deeper — 125–150 mm — for anything larger or if your soil is particularly soft clay. The compacted hardcore sub-base underneath adds another 75–100 mm, so you're digging 200–250 mm total.
-
Can you put a greenhouse directly on soil?
You can, but it will cause problems within months — soil shifts with moisture and temperature, leading to twisted frames and cracked glass. Doors won't close properly, weeds grow up through the floor, and pests can burrow underneath. A proper base (concrete, paving slabs, or at minimum compacted gravel) prevents all of these issues.
-
What is the cheapest way to build a greenhouse foundation?
Paving slabs on compacted sand-cement are the cheapest reliable option, costing around £80–150 for a 6 × 4 ft base. Gravel is cheaper still but causes problems long-term. For roughly £100 more, a concrete base gives you decades of maintenance-free stability. Read our paving slab base guide for a full cost breakdown.
-
Is a concrete base the best option for a greenhouse?
Concrete is the strongest and most durable option, but it's not always necessary — paving slabs work well for most greenhouses under 10 × 8 ft. Concrete is the best choice for permanent installations, large greenhouses, lean-to models attached to house walls, and sites with soft or unstable ground. For smaller freestanding greenhouses, paving slabs offer similar longevity with better drainage and easier DIY installation.
-
How long before I can build on a concrete base?
Wait at least 3 days before building your greenhouse on the base — 7 days is better. You can walk on it carefully after 24–48 hours, but the concrete reaches about 70% of its strength at seven days, which is plenty for a greenhouse. Full cure takes 28 days. In cold weather (below 10°C), add an extra 2–3 days to be safe.
-
Do I need steel reinforcement in a greenhouse base?
No — for domestic greenhouses under 12 × 10 ft, the concrete thickness and mix ratio provide enough strength without reinforcement. You'd only consider mesh reinforcement for very large structures (over 14 m² / 150 sq ft of base area) or if you're building on particularly unstable ground.
-
What if my ground isn't level?
Dig deeper on the high side of the slope to create a level trench for your formwork. Most UK gardens have at least a slight gradient — that's normal and not a problem. Use your string lines and spirit level to work out the levels before you start digging. The formwork holds everything level while the concrete cures, so you'll just need more material on the high side.
-
Can I pour a concrete greenhouse base in winter?
Yes, but don't pour if temperatures are below 3°C or frost is forecast within a week. Cold concrete takes much longer to cure and can be permanently damaged by freezing before it sets. Spring through autumn is ideal. If you must do it in winter, use a winter-grade concrete mix and cover the base with insulating blankets while it cures.