How to Build a Paving Slab Base for a Greenhouse: Complete Step-by-Step Guide
A paving slab greenhouse base costs £15-£25 per square metre in materials and takes 6-8 hours for a standard 6 ft x 8 ft greenhouse. Excavate 60-80 mm deep, compact the subsoil, lay a 40 mm sand-cement bedding (6:1 ratio), and place slabs with 10-15 mm drainage gaps. Roughly 60% of greenhouse structural complaints trace back to a poorly built foundation. A weekend of careful base work prevents years of cracked glass and jammed doors.
Key Takeaways
- Excavation depth matters. Dig 60-80 mm deep and compact the subsoil before laying anything. Skipping this causes 90% of settling problems.
- Use a 6:1 or 8:1 sand-cement ratio. Stronger mixes are unnecessary and more expensive.
- Oversize your base by 100-150 mm each side. This gives access for cleaning gutters and replacing glass.
- Budget roughly £15-£25 per m² for materials. A standard 6 ft x 8 ft base costs around £80-£120 in slabs, sand, and cement.
- Do not rush levelling. Check every slab with a spirit level. An uneven base causes frame distortion within 12-18 months.
Installer's Note
I have seen more greenhouse problems caused by bad bases than any other single issue. After 16 years helping over 150,000 customers at Greenhouse Stores, I would estimate that roughly 60% of structural complaints (cracked glass, jammed doors, twisted frames) trace back to a poorly built foundation. The work itself is not complicated. What matters is patience with the levelling and not skipping the compaction step. Every shortcut you take on a base shows up 6-12 months later when the frame starts to twist.
This guide covers exactly how I recommend building one, based on what I have seen work (and fail) across thousands of installations. For a broader look at all your foundation options, read our full guide to preparing the ground for a greenhouse base.
Why choose a paving slab base?
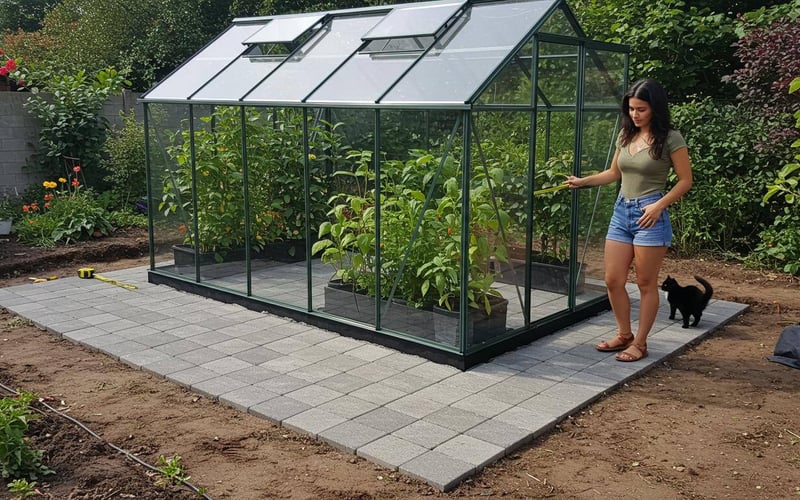
Paving slabs give you the durability of concrete with far better drainage, making them the best all-round foundation for most UK greenhouses. Unlike a solid concrete base that can trap water underneath, paving slabs let moisture drain through the 10-15 mm gaps between each slab. Standing water under a greenhouse accelerates corrosion on aluminium frames, rots wooden base rails, and creates a breeding ground for slugs.
The surface works well for staging, benches, and container growing. You get a clean, flat platform that is easy to sweep and disinfect once a year. And if you ever need to reposition your greenhouse or access pipework underneath, individual slabs can be lifted. Try doing that with poured concrete.
Paving slab bases suit any greenhouse size, from a small 4 ft x 6 ft starter right up to a 12 ft x 20 ft walk-in structure. This base type also prevents the common problems you see with poor foundations: twisted frames, cracked glass, jammed doors, and structural instability that gets worse over time.
Tools you will need
You probably own most of these already. The only item worth hiring is a plate compactor for bases larger than 3 m x 3 m.
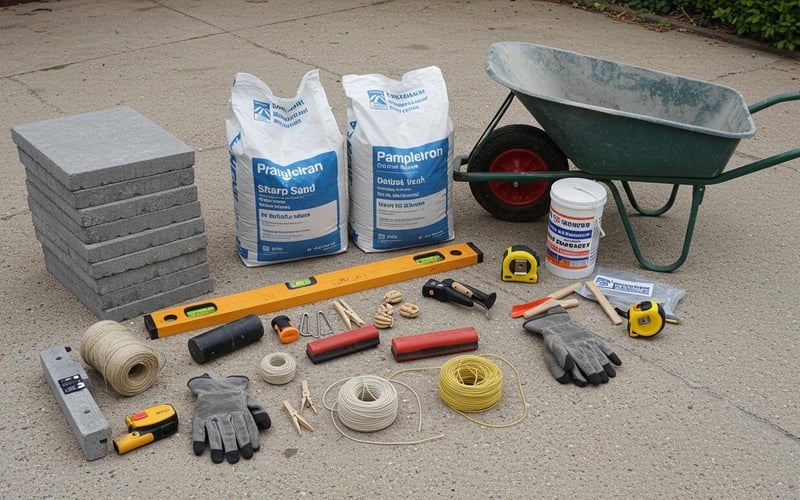
- Spade and shovel for excavation and moving materials
- Spirit level (minimum 600 mm) — this is your most important tool
- Rubber mallet for tapping slabs into position without cracking them
- String line and wooden pegs for marking out the area accurately
- Measuring tape (minimum 5 m) for precise measurements
- Wheelbarrow for moving sand, cement, and slabs
- Rake for spreading and levelling the sand-cement mix
- Long straight edge or timber plank (minimum 2 m) for screeding the bedding layer flat
- Work gloves and safety boots — standard 450 mm x 450 mm slabs weigh around 11 kg each
- Plate compactor (hire for £30-£50 per day) — recommended for bases over 9 m²
Materials and quantities
Calculate materials based on your greenhouse's actual footprint, not the nominal size on the label. A greenhouse sold as "6 ft x 8 ft" typically measures closer to 1,930 mm x 2,560 mm. Always check the manufacturer's spec sheet for exact external dimensions before ordering slabs.
Base materials
- Paving slabs — 450 mm x 450 mm or 600 mm x 600 mm concrete slabs, 35-50 mm thick
- Sharp sand — roughly 1 tonne per 10 m² of base area
- Cement — 1 x 25 kg bag per 6-8 bags of sharp sand (for a 6:1 to 8:1 mix)
- MOT Type 1 hardcore (optional) — needed on loose, sandy, or clay-heavy soils as a sub-base
Fixing materials
- Heavy-duty rawl plugs — 10 mm diameter minimum
- Galvanised or stainless steel screws/bolts — stainless is better for longevity, especially coastal areas
- Washers — to spread the load and stop screw heads pulling through the frame
Quick quantity guide
| Greenhouse size | Base size needed | Slabs (450 mm) | Sharp sand | Cement (25 kg bags) | Est. material cost |
|---|---|---|---|---|---|
| 4 ft x 6 ft | 1.5 m x 2.1 m | 12-14 | 0.3 tonne | 1 | £60-£90 |
| 6 ft x 8 ft | 2.1 m x 2.8 m | 18-22 | 0.6 tonne | 1-2 | £80-£120 |
| 8 ft x 10 ft | 2.7 m x 3.3 m | 28-32 | 0.9 tonne | 2 | £120-£170 |
| 8 ft x 12 ft | 2.7 m x 3.9 m | 34-38 | 1.1 tonne | 2-3 | £150-£210 |
| 10 ft x 12 ft | 3.3 m x 3.9 m | 42-48 | 1.3 tonne | 3 | £190-£260 |
Prices are approximate material costs only (2025/2026). Slab prices vary by supplier and finish. Budget an extra £30-£50 for tool hire if needed.
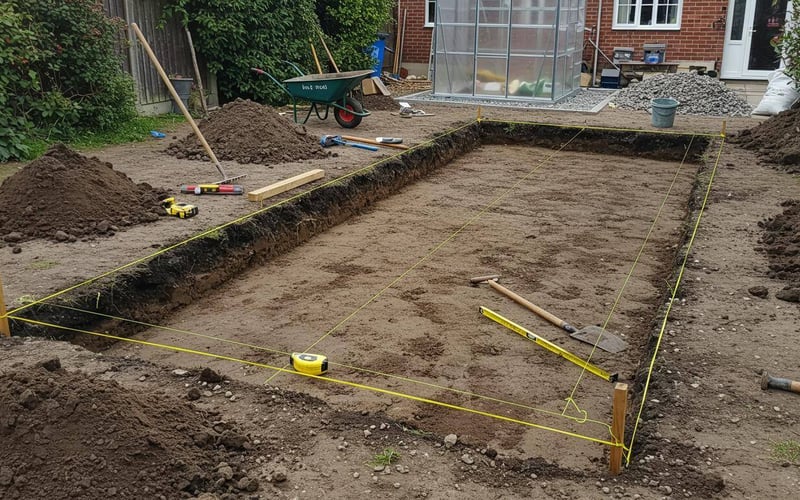
Step 1: Planning and measuring
Measure your greenhouse's actual external dimensions from the manufacturer's spec sheet, not the name on the box. Add 100-150 mm to each side. This gives access for cleaning gutters, replacing glass, and general maintenance. For smaller gardens, 100 mm is enough. For larger structures where you need ladder access, go with 150 mm.
Mark out your area using string lines and wooden pegs. Get the corners square by measuring the diagonals. If both diagonal measurements are identical (within 5 mm), your rectangle is square. If they do not match, adjust your pegs until they do.
Before you start digging, check for any buried services (gas, water, electric, drainage) in the area. Contact your local authority or use a CAT scanner if you are not sure.
Matt's tip: check your greenhouse spec sheet first
I see this mistake regularly. Customers order slabs based on the greenhouse name (e.g. "6 x 8") and end up 100-150 mm short. A "6 x 8" Vitavia Venus actually measures 1,930 mm x 2,562 mm externally. A "6 x 8" Elite Craftsman is 1,901 mm x 2,540 mm. Always download the spec sheet from the product page before you order materials. If you are buying from us, ring 0800 098 8877 and we will confirm the exact dimensions for your model.
Step 2: Excavation and ground preparation
Dig out 60-80 mm of topsoil across your marked area, remove all organic matter, and compact the subsoil until it is solid underfoot.
Excavation
Use spray paint or sand to mark your cutting lines on the turf, then cut along them with a spade. Remove all topsoil to a depth of 60-80 mm. This depth accommodates your 40 mm bedding layer and allows the slab surface to sit flush with or slightly above the surrounding ground.
Remove every trace of organic material: grass, roots, leaves. Anything that will decompose causes uneven settling 6-12 months later.
Compaction
Compact the exposed subsoil thoroughly. For a small base (under 9 m²), a hand tamper or heavy garden roller will do. For anything larger, hire a plate compactor at £30-£50 per day. The difference in results is worth it.
Walk across the compacted surface. If you leave visible footprints or feel any give, compact it again. The soil should be firm and solid across the entire area.
Dealing with problem soils
If your soil is heavy clay, very sandy, or particularly loose, lay a 50-75 mm sub-base of MOT Type 1 (crushed limestone) over the compacted subsoil. Compact this layer too. It costs an extra £30-£50 in materials but prevents long-term settlement.
Checking for level
Use a long spirit level or straight edge laid across the excavated area in multiple directions. Scrape down any high spots. Fill low spots with compacted sharp sand. Getting this level now is far easier than compensating with extra bedding material later.
Step 3: Creating the sand-cement bedding layer
Mix sharp sand and cement at a 6:1 or 8:1 ratio (dry), spread it 40 mm deep, and screed it flat with a straight edge.
Mixing
Combine 6-8 parts sharp sand with 1 part cement while both materials are dry. Mix thoroughly until you get a consistent grey colour throughout. Any streaks of pure sand or cement will create weak spots.
Only mix what you can lay in one session. If the dry mix gets rained on before you finish, the cement starts setting and the batch is wasted.
Spreading and screeding
Tip the mix into the excavated area and spread it with a rake to roughly 40 mm deep. Lay a long timber plank or aluminium straight edge across the bedding and drag it forward in a sawing motion. This levels the surface by removing high spots and highlighting areas that need more material.
Work methodically in one direction, then check across the perpendicular axis. The finished bedding layer should be consistently 40 mm below your intended finished paving level.
Final level check
Check everything with a spirit level. The bedding layer determines how flat your finished base will be, and you cannot fix it once slabs are down. According to the Building Research Establishment, roughly 90% of domestic paving failures trace back to problems in the bedding layer.
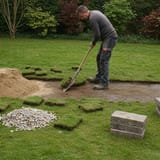
Step 4: Laying the paving slabs
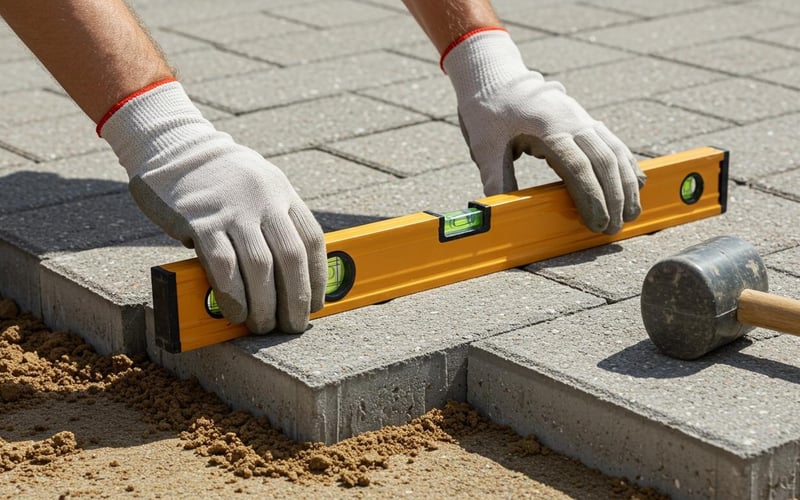
Start from one corner, lay each slab onto the bedding, tap it level with a rubber mallet, and check with a spirit level before moving on.
Starting position
Begin at one corner and work systematically across and forward. Plan your sequence so you never walk on the prepared bedding. Disturbed bedding means unlevel slabs.
Standard 450 mm slabs weigh around 11 kg each and 600 mm slabs weigh roughly 20 kg. Get a helper if you are using larger slabs.
Placing and tapping
Lower each slab gently onto the bedding. Do not drop it. Dropping traps air underneath and creates an uneven seat. Use a rubber mallet to tap the slab down evenly, working from different edges to settle it into the mix.
Tap firmly but not aggressively. Listen for a solid, consistent sound. Hollow areas mean the slab is not making full contact with the bedding.
Levelling each slab
Check each slab individually with your spirit level across both axes. Then check it against its neighbouring slabs. Every slab must be level on its own and relative to its neighbours.
If a slab sits too high, carefully lift it, scrape out some bedding, and re-lay. If too low, add a little more dry mix and re-seat. This back-and-forth is normal. Do not stand on slabs until the base is complete and the cement has had at least 24 hours to begin curing.
Maintaining gaps
Keep consistent 10-15 mm gaps between every slab. These gaps are critical for drainage so water does not pool on or under the base. Use 10 mm spacers (offcuts of plywood work well) or judge by eye once you have set a rhythm.
Step 5: Finishing and curing
Brush off excess material, strengthen the perimeter with a 5:1 mix, and dampen the base lightly to start curing.
Edge treatment
Edges take more stress than the centre of your base, especially the two sides where you walk alongside the greenhouse. Use a slightly stronger 5:1 sand-cement mix to bed the outer row of slabs.
Cleaning up
Brush all excess dry mix off the slab surfaces with a stiff brush before dampening anything. Cement residue left on slab surfaces stains permanently once it cures. Five minutes of brushing now saves hours of scrubbing later.
Curing
Lightly mist the entire base with a fine spray from a garden hose or watering can. You want enough moisture to darken the mix in the joints without washing it out. Leave the base untouched for at least 24-48 hours before starting greenhouse assembly. In cold weather (below 5°C), extend this to 72 hours.
Securing your greenhouse to the base
Drill through the greenhouse base frame into the slabs using masonry bits, and anchor with 10 mm rawl plugs and galvanised or stainless steel bolts.
Every greenhouse manufacturer provides fixing instructions, but the principle is the same: the base frame must be bolted to the slabs to prevent wind uplift. Even a modest 40 mph gust can shift an unsecured aluminium greenhouse. Choose stainless steel fixings over galvanised if your budget allows. The cost difference is typically under £10 for a full set, and stainless lasts 25+ years versus 10-15 for galvanised.
Use a masonry drill bit and work slowly to avoid cracking the slab. Clear dust from each hole before inserting the rawl plug. Tighten bolts firmly but do not overtighten. If you would rather have professionals handle the assembly, our greenhouse installation service covers anchoring as standard.
Drainage and water management
Paving slab bases drain naturally through the gaps between slabs. No additional drainage is needed for most UK gardens. The 10-15 mm joints let rainwater pass straight through to the ground below.
Two situations where you might need extra attention:
- Clay-heavy soils: If your garden waterlogs in winter, install a simple French drain (a gravel-filled trench) along one or two edges of the base.
- Sloping sites: Make sure the finished base sits slightly above the surrounding ground on the downhill side so surface runoff does not flow toward your greenhouse.
A gentle slope of 1-2% (roughly 10-20 mm per metre) across the base will not affect greenhouse stability and helps water shed in heavy rain.
Common problems and how to fix them
Most paving slab base problems trace back to poor compaction, organic material left in the excavation, or rushing the levelling.
| Problem | Cause | Fix |
|---|---|---|
| Rocking slabs | Poor compaction or uneven bedding | Lift affected slabs, re-screed bedding, re-lay |
| Cracked slabs | Void underneath causing flexing | Replace slab, fill void before re-laying |
| Settlement after 6-12 months | Organic material decomposing | Lift area, dig out organic matter, re-compact |
| White staining (efflorescence) | Mineral salts migrating to surface | Fades naturally in 6-12 months, or clean with patio cleaner |
Maintenance and long-term care
A well-built paving slab base needs almost no maintenance. Once a year in spring, sweep the base clean and wash it down with warm soapy water. This removes algae, moss, and overwintered pests. Use a stiff brush and garden hose. Do not use a pressure washer as it can blast out the sand-cement from between slabs.
Check the joints annually. If the sand-cement has washed out in places, top up with fresh dry mix and dampen it in. Check your greenhouse fixing bolts at the same time. A properly built paving slab base will last 20-30 years with this minimal upkeep.
Cost comparison: paving slabs vs other base types
Paving slabs cost more than gravel but less than poured concrete, and offer the best balance of durability, drainage, and repairability.
| Base type | Cost per m² | DIY difficulty | Drainage | Durability | Repairability |
|---|---|---|---|---|---|
| Compacted gravel | £8-£12 | Easy | Excellent | 5-10 years | Easy (top up) |
| Paving slabs | £15-£25 | Moderate | Very good | 20-30 years | Good (lift and re-lay) |
| Poured concrete | £25-£40 | Difficult | Poor | 30+ years | Difficult |
| Timber frame on gravel | £10-£18 | Easy-Moderate | Good | 8-15 years | Moderate |
For the concrete option, see our separate guide to building a concrete base.
Size guide by greenhouse type
The base-building method stays the same regardless of greenhouse size, but larger structures may need thicker slabs and a hardcore sub-base.
Small greenhouses (4 ft x 6 ft to 6 ft x 8 ft): Standard 35 mm thick slabs on a 40 mm bedding layer work perfectly. These are manageable one-person projects that take a full day. Browse our small greenhouses.
Medium greenhouses (8 ft x 10 ft to 8 ft x 12 ft): The increased area makes a plate compactor worthwhile and you will want a helper for slab-laying. Budget a full weekend. See our 8 ft x 10 ft greenhouses.
Large greenhouses (10 ft x 12 ft and above): Use 50 mm thick slabs minimum and always lay a 75 mm MOT Type 1 sub-base. Browse our large greenhouses.
|
Matt's pick for a paving slab baseBest for: First-time buyers wanting a solid 6 ft x 8 ft greenhouse Why I recommend it: The Vitavia Venus 5000 is our most popular 6x8. External footprint is 1,930 mm x 2,562 mm, so you need a base of roughly 2.1 m x 2.8 m (18-22 slabs at 450 mm). The aluminium frame bolts cleanly to paving slabs with standard rawl plugs. I have installed hundreds of these on slab bases and the combination just works. Price: From £509 |
Safety advice
Paving slabs are heavy enough to cause serious injuries. Use proper lifting technique and wear protective gear throughout.
- Lifting: Bend at the knees, keep your back straight. Standard 450 mm slabs weigh around 11 kg; 600 mm slabs weigh roughly 20 kg. Get help for anything heavier.
- Clothing: Wear work gloves, safety boots, and knee pads for extended ground-level work.
- Cement handling: Wet cement is alkaline and irritates skin. Wear gloves when mixing.
- Buried services: Check for gas pipes, water mains, and electric cables before digging.
Professional vs DIY: which makes sense?
Most confident DIYers can build a paving slab base in a weekend. The work does not require specialist skills. If you can measure accurately and use a spirit level, you can do this. Total time for a 6 ft x 8 ft base is typically 6-8 hours.
Professional landscapers typically charge £200-£400 for a base this size. That is reasonable if you have mobility issues, a challenging site, or prefer someone else to do the heavy lifting.
For the greenhouse itself, our professional installation service handles everything from base-frame anchoring upwards. For help choosing the right size, read our greenhouse sizing guide.
Frequently asked questions
How do I build a paving slab base for a greenhouse?
Excavate 60-80 mm deep, compact the subsoil, lay a 40 mm sand-cement bedding layer (6:1 ratio), place slabs with 10-15 mm drainage gaps, level each one, and anchor the frame with rawl plugs. The whole process takes 6-8 hours for a standard 6 ft x 8 ft base. Read the step-by-step sections above for full details.
What is the best base for a greenhouse?
Paving slabs are the best all-round base for most UK greenhouses. They combine 20-30 years of durability, natural drainage, and straightforward DIY installation. Poured concrete is stronger but drains poorly and is harder to repair. Compacted gravel is cheaper but settles over time. See our greenhouse base preparation guide for detailed comparisons.
Can I lay paving slabs straight onto soil?
No. Slabs on bare soil settle unevenly within 6-12 months. You need to excavate the topsoil, compact the subsoil, and lay a sand-cement bedding layer. This prevents the expensive foundation problems that are much harder to fix with a greenhouse sitting on top.
How much does a paving slab greenhouse base cost?
Budget roughly £15-£25 per square metre for materials. That works out to £80-£120 for a typical 6 ft x 8 ft greenhouse base. The main costs are slabs (£1.50-£3.50 each), sharp sand (around £40 per tonne), and cement (£5-£6 per 25 kg bag). Add £30-£50 for plate compactor hire on larger bases.
How long should I wait before putting a greenhouse on a paving slab base?
Wait at least 24-48 hours in warm weather (above 10°C). In cold weather below 5°C, extend this to 72 hours. The sand-cement bedding layer needs time to begin curing. Walking on the slabs too early can shift them and undo your levelling work.