How to Prepare Ground for a Greenhouse Base
Preparing the ground for a greenhouse base takes 1-2 days and determines the lifespan of your structure. We install greenhouse bases every week and see the same mistakes repeated. A level, well-drained foundation on 5-10cm of compacted hardcore prevents glass cracking, door jamming, and structural twisting. Five base types suit different budgets, from £50 for gravel to £400+ for brick perimeter walls.
Key Takeaways
- A greenhouse base must be level, stable, and 10-15cm larger than the greenhouse footprint on all sides.
- Concrete bases last 30+ years but cost more than paving slabs or gravel alternatives.
- Include a 1-2% slope (1-2cm per metre) away from the structure for drainage.
- Base preparation typically takes 1-2 days depending on soil conditions and base type.
- Anchor your greenhouse to the base — unsecured structures lift in winds above 40mph.
- Clear all vegetation, remove 10-15cm of topsoil, and compact thoroughly before building any base.
Installer's Note
We have fitted hundreds of greenhouses over the past 15 years. The single biggest cause of warranty claims we see is poor base preparation. Spend the extra day getting your base right. You will avoid cracked glass, jammed doors, and pooling water for the entire life of your greenhouse. Every base type in this guide works when built properly. Choose based on your budget and skills, not shortcuts.
Why a Proper Greenhouse Base Matters
A solid base is the foundation of any greenhouse. Skipping this step never saves time. We have seen plenty of greenhouse installations fail because of poor foundations.
What happens with a bad base? Glass cracks from frame distortion. Doors jam as aluminium profiles twist. The structure warps unevenly. Water pools where it should not. Fixing these problems costs far more than doing it right the first time.
Your greenhouse needs a level, stable platform that will not shift with frost or rain. The base must be square and exactly the right size. A few centimetres off and the frame will not fit properly. Gaps let in pests and draughts.
The base also needs proper drainage. Standing water rots timber, rusts metal, and creates ideal conditions for plant diseases. Sorting drainage from day one saves countless plants over the years.
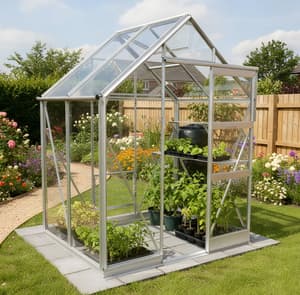
Many gardeners opt for Vitavia greenhouse bases which come sized precisely for their structures. These metal bases raise the greenhouse slightly off the ground, improving airflow and reducing damp problems.
Assessing Your Garden Space
Before picking up a spade, take time to assess your site properly. We have prepared dozens of greenhouse bases over the years, and thorough site assessment always pays off.
First, check sunlight patterns. Your greenhouse needs at least 6 hours of direct sun daily, ideally more during winter months. A sunlight tracking app works well, but watching sun patterns for a few days gives reliable results too.
Next, measure your available space. Your base should extend about 10-15cm beyond the greenhouse footprint on all sides. This gives enough room to work and ensures stability. Use wooden stakes and string to mark out the area.
Check for underground pipes or cables. Nothing ruins a project faster than hitting a water pipe. Call utility companies if you are unsure — it is free and prevents disasters.
Is your ground level? Probably not. Most gardens have some slope. Measure the height difference across your marked area using a long spirit level on a straight piece of timber. Note the high and low points — you will need this information when levelling.
Consider access too. Can you get materials to your site easily? Will you need to bring wheelbarrows through narrow gates? How will you get the greenhouse components there? Planning this now prevents struggles later.
Elite greenhouses come in various sizes to suit different garden spaces. Measure twice, buy once. We learned that lesson after fitting a greenhouse too large for its allocated space.

|
Matt's Pick for greenhouse basesBest For: Any greenhouse up to 12x10ft on flat ground Why I Recommend It: A paving slab base is far simpler than concrete and strong enough for every greenhouse we install. I have never had a customer need to replace one. Price: £509 |
Popular greenhouses for your new base

Different Base Options for Your Greenhouse
Not all bases are equal. Each has pros and cons depending on your budget, skills, and greenhouse type.
Concrete Base
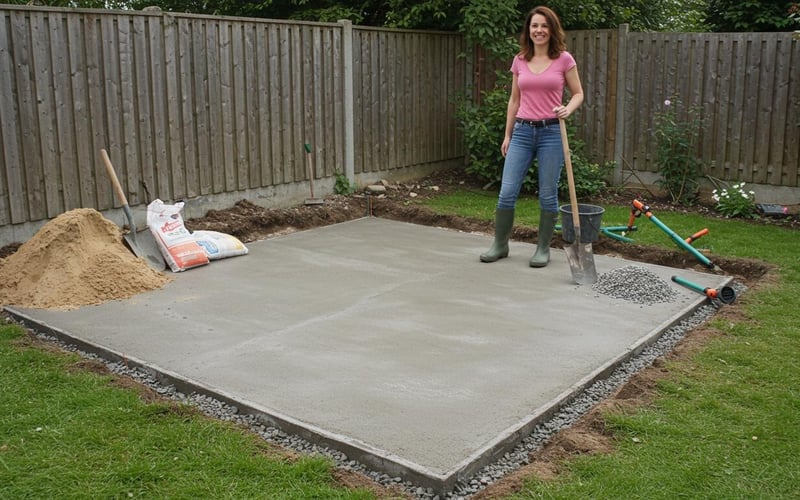
A solid concrete slab ranks as the most durable option. It will not shift, rot, or degrade over time. Concrete is the best choice for larger greenhouses or exposed, windy sites.
Pros:
- Extremely stable and long-lasting (30+ years)
- Can be made perfectly level
- Provides excellent anchoring points
- Deters pests from burrowing underneath
Cons:
- Most expensive base option (£300-500 for materials)
- Requires more skill to create
- Permanent — difficult to change later
- Poor drainage unless specifically designed with a slope
For a concrete base, you need at least 10cm depth of concrete on 5-10cm of hardcore. That adds up to significant materials and cost. See our concrete base guide linked below for a full step-by-step walkthrough.
Paving Slab Base
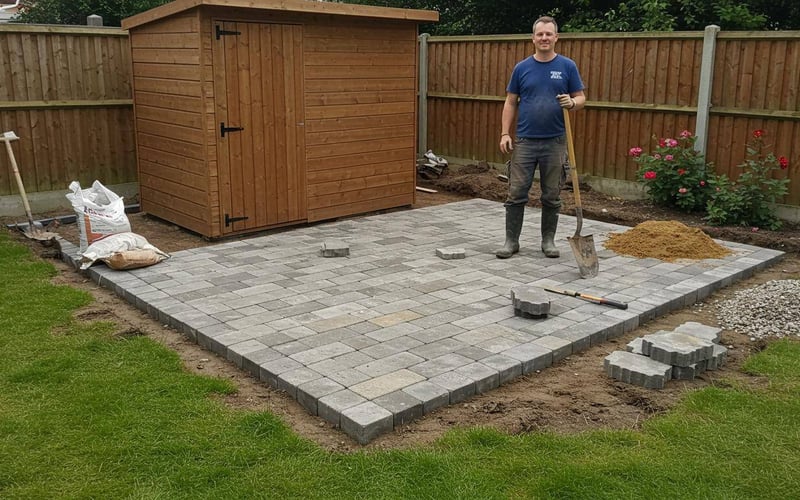
Building a paving slab greenhouse base is one of our favourite foundation methods. You get a good blend of appearance and practicality that is hard to beat with other options.
The surface works well for growbags and container gardening, giving a stable, level platform. The gaps between slabs handle drainage naturally, so waterlogging is rarely an issue.
Why Paving Slabs Work So Well
A properly built paving slab base will last 15-20 years when done right. The surface stays easy to manage throughout the year. You can give it a thorough clean and disinfect annually with soapy water and a brush.
Water drains away naturally through the joints between slabs. No standing water, no soggy patches that cause problems later. The solid foundation prevents any warping or settling that sometimes occurs with timber alternatives.
Getting Ready to Lay Paving Slabs
Before you start building your paving slab base, be aware that these slabs are heavy. Even smaller 450mm × 450mm slabs can be awkward to handle alone. Always get someone to help you position and level them. Our paving slab base guide linked below covers the complete process.
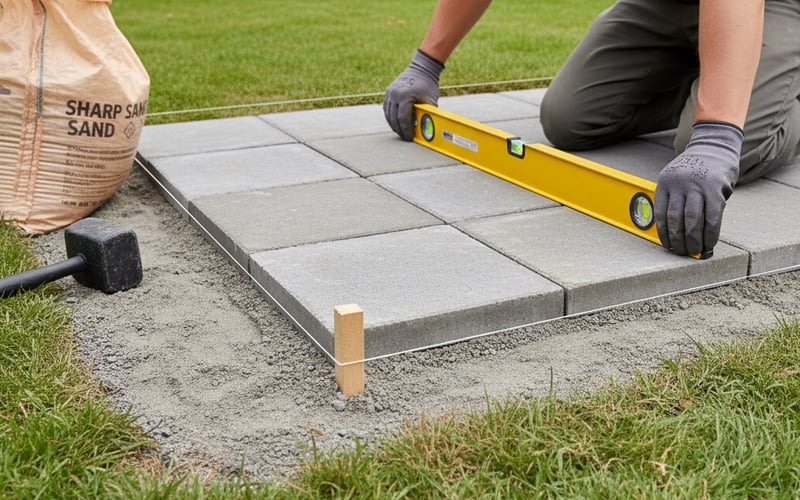
Keep your spirit level close at hand throughout the job. Do not walk on freshly laid slabs until the mortar has set completely. Patience here prevents cracked slabs later.
Once everything has properly cured, secure your greenhouse using heavy-duty rawl plugs, washers, and screws straight through the paving slabs. The result is a foundation that looks professional and performs reliably for years.
Pros:
- Good balance of stability and cost (£150-300)
- Better drainage than solid concrete
- Can be lifted and reused if needed
- Easier for DIY gardeners
Cons:
- Requires more skill than gravel
- Can settle unevenly if sub-base is poorly compacted
- Weeds can grow between slabs without membrane
Lay slabs on 5cm of sharp sand over 5-10cm of compacted hardcore for best results.
Gravel or Hardcore Base
The budget-friendly option. Works well for smaller greenhouses and temporary structures. Total material cost for a 6ft × 8ft base is typically £50-100.
Pros:
- Excellent drainage
- Inexpensive (£50-100 for most sizes)
- Easy to install in a single afternoon
- Can be modified or removed easily
Cons:
- Less stable than other options
- May need regular topping up
- Uneven to walk on
- Plants may root through it
Add landscape fabric under gravel to prevent weeds growing through. Always use angular gravel that locks together when compacted — rounded decorative gravel shifts constantly underfoot.
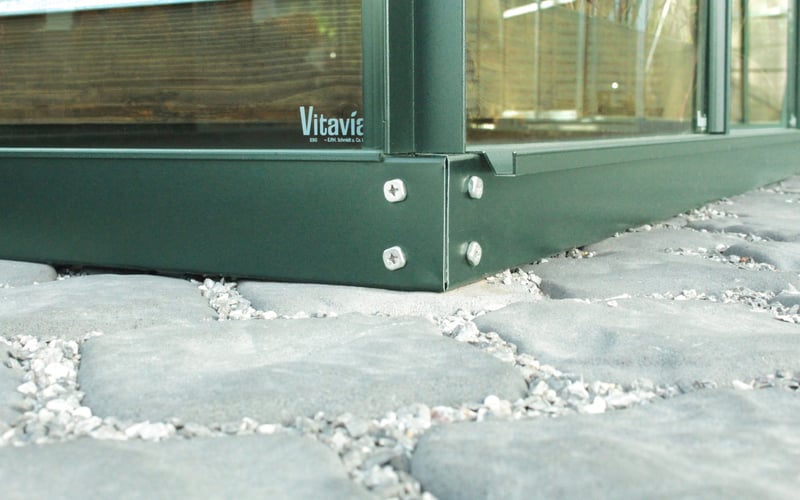
Steel Base Plinth with Corner Spikes
Vitavia greenhouses include steel bases with 18-inch corner posts. These work on soil, gravel, or hardcore surfaces. Sink the posts and concrete them in for solid stability. Building on concrete or slabs? Simply skip the posts.
Wooden Decking as a Greenhouse Base
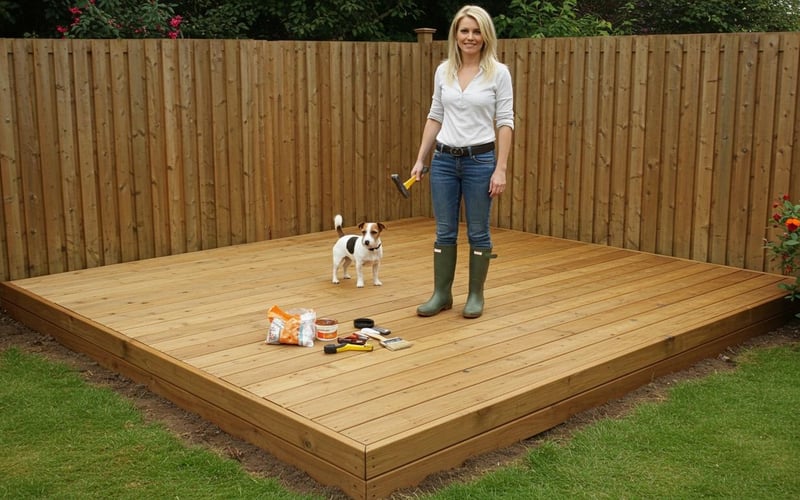
Wooden decking delivers surprising performance as a greenhouse foundation. We have built greenhouses on timber platforms that have outlasted many conventional bases.
The advantages are clear: timber decking creates instant drainage. Water passes between the boards, preventing the soggy conditions that kill seedlings. The raised profile also keeps the structure above flood-prone areas — a good solution for gardeners with clay soil.
Construction is straightforward. You need:
- Pressure-treated 4×2 joists
- Decking boards (25mm minimum thickness)
- Concrete pier blocks or adjustable deck supports
- Galvanised joist hangers and screws
The build process is simple:
- Mark your area 15cm larger than the greenhouse footprint
- Set pier blocks at maximum 1.2m spacing in both directions
- Install joists at 400mm centres
- Screw decking boards perpendicular to joists, leaving 5mm gaps
Matt's Tip: Timber Selection
Use only pressure-treated timber rated UC4 for ground contact. Standard decking fails prematurely in the constantly damp greenhouse environment. I replaced my first deck after just 4 years because the timber was only UC3 rated. The UC4 replacement has now lasted 9 years with minimal degradation. The extra £50-80 in timber costs saves you rebuilding the entire base.
Maintenance matters. Inspect annually for soft spots and replace damaged boards immediately. Apply wood preservative every two years to exposed surfaces.
Cost-wise, wooden bases sit in the middle range — more than gravel but less than concrete. For a 6ft × 8ft greenhouse, budget £200-300 for materials plus a day of labour.
The greenhouse anchoring works well on wood — bolt the frame directly to the deck. This creates solid stability in wind while allowing future dismantling if needed.
The air gap beneath provides unexpected benefits beyond drainage. It creates natural ventilation under your plants, reducing fungal problems significantly. Our tomato crops improved noticeably after switching from concrete to decking, purely from improved air circulation.
One drawback to consider: pests. Wood invites mice, voles, and woodlice to nest beneath. Combat this with fine mesh stapled to the underside of joists before adding decking boards. This single step eliminates rodent problems.
Brick Perimeter Bases
Dwarf wall greenhouses need special consideration. These greenhouses sit on a low brick wall, which itself needs a proper foundation.
Pros:
- Attractive appearance
- Extra thermal mass helps temperature regulation
- Very stable base for the greenhouse
- Reduced glass breakage risk at low level
Cons:
- Requires bricklaying skills
- Most expensive option (£400+)
- Permanent structure
- Needs proper concrete foundations (45cm deep minimum)
For brick bases, you need a concrete foundation trench about 45cm deep to prevent frost heave. This depth ensures the base stays stable through winter freeze-thaw cycles.
Tools and Materials Needed
Getting your tools sorted before starting saves time and frustration. Here is what you need:
Essential Tools
- Spade and fork for digging
- Rake for levelling
- Wheelbarrow for moving materials
- Spirit level (1m long minimum)
- String line and pegs for marking out
- Tape measure (at least 5m)
- Rubber mallet
- Wooden tamper or plate compactor
- Builder's square for checking corners
Materials for Different Base Types
Concrete Base:
- Ready-mix concrete or bags of cement and aggregates
- Sharp sand
- Hardcore or MOT Type 1
- Damp proof membrane
- Timber for shuttering
- Reinforcing mesh (optional but recommended for bases over 8ft × 10ft)
Paving Slab Base:
- Paving slabs (600mm × 600mm work well)
- Sharp sand
- Hardcore or MOT Type 1
- Weed membrane
- Cement (for mortar)
Gravel Base:
- Angular gravel (not rounded)
- Hardcore or MOT Type 1
- Weed membrane
- Timber or concrete edging
Wooden Decking Base:
- Pressure-treated timber joists (100mm × 50mm)
- Decking boards (minimum 25mm thick)
- Concrete pier blocks or adjustable deck supports
- Galvanised joist hangers
- Stainless steel screws
- Weed membrane
- Fine mesh for pest prevention
Always use angular gravel that locks together when compacted. Rounded decorative gravel shifts constantly and does not form a stable base.
Overorder materials slightly. Running short mid-project wastes a full day. Our rule of thumb: add 10% to calculated quantities for wastage.
Building on a severe slope? You might need greenhouse accessories like ground anchors or foundation plates for extra stability.
Step-by-Step Ground Preparation Guide
Follow these steps and you will have a solid foundation for your greenhouse. We use this exact process on every installation.
Step 1: Mark Out the Area
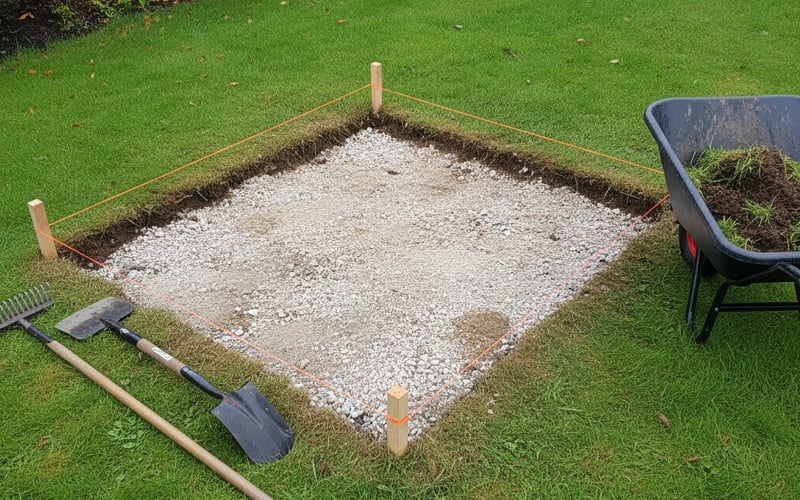
Start by marking a rectangle 20cm larger than your greenhouse dimensions on each side. Use wooden pegs at the corners with string stretched between them.
Check that opposite sides are equal length and corners are square. The easiest method is the 3-4-5 rule: from one corner, measure 3 feet along one string and mark it. Then measure 4 feet along the adjacent string and mark that. The diagonal between these marks should measure exactly 5 feet if your corner is square.
We have seen plenty of bases fail because they were not square. Take time with this step — it sets up everything else.
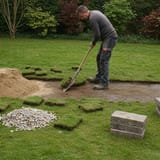
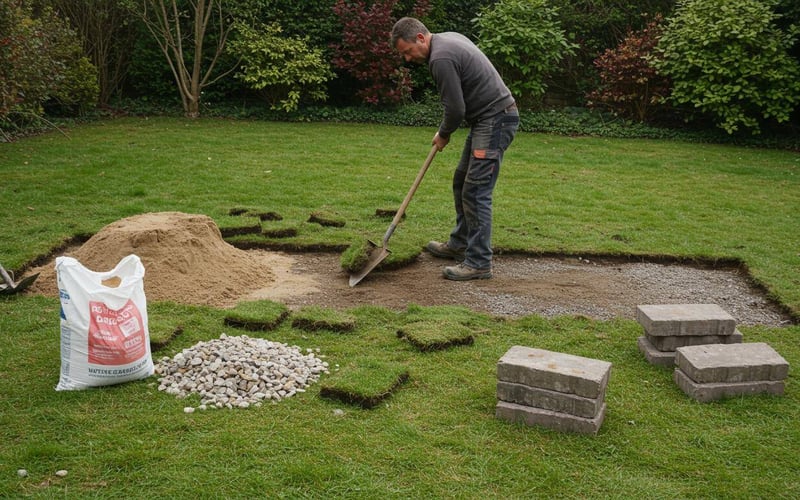
Step 2: Clear the Ground
Remove all vegetation, including roots. Scrape off the top layer of soil (about 10-15cm) to remove organic matter. A flat spade gives a cleaner cut than a pointed digger's spade for this job.
If you find large rocks or tree roots, dig them out completely. Leaving them causes problems later as they shift or rot, creating voids under your base.
Step 3: Level the Ground
This is the most important step. An uneven base means an unstable greenhouse.
For sloped sites, decide whether to dig into the slope or build up the lower end. For slight slopes (under 5%), digging down is usually easier. For steeper slopes, you might need a combination approach or even retaining walls.
Use a long straight edge with a spirit level on top to check your progress. Work methodically across the site. We drive a peg at each corner set to the same height. String stretched between them acts as a level guide.
Step 4: Improve Drainage
Even with good surface drainage, water can still collect under your base. Install a drainage layer of 5-10cm of hardcore or crushed stone. Spread it evenly and rake level.
If your site has particularly poor drainage, consider a land drain. This is a perforated pipe surrounded by gravel that directs water away. This extra step has saved many greenhouses from becoming waterlogged.
Step 5: Compact the Ground
Use a tamper or plate compactor to firm the ground thoroughly. This prevents settling later. Compact in layers if your sub-base is deeper than 10cm.
Skipping proper compaction is the second most common mistake we see. Poorly compacted sub-bases cause slabs to sink unevenly within months.
Step 6: Add Weed Membrane
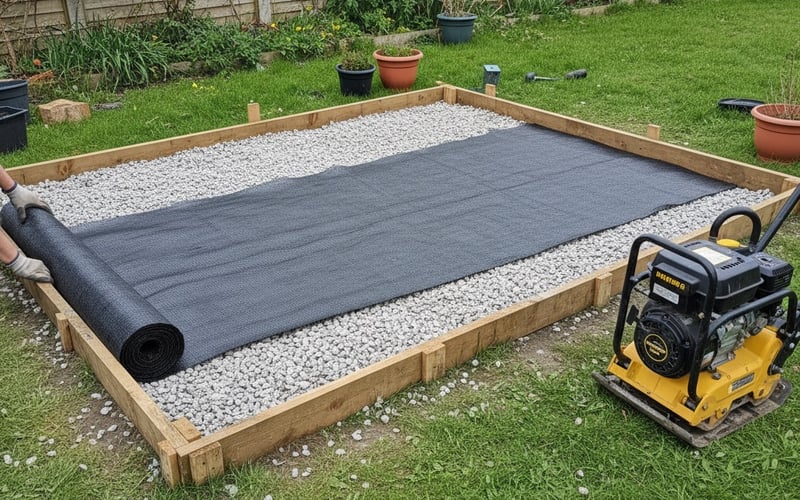
Lay weed-suppressing fabric over the entire area. This stops weeds growing up through your base, particularly important for gravel or paving slab bases.
Overlap joints by at least 15cm and extend beyond your base area by about 30cm all around. You can trim the excess later.
Step 7: Construct Your Chosen Base
For concrete:
- Create shuttering around the perimeter using timber
- Add reinforcing mesh for strength
- Pour concrete and level using a straight edge
- Allow to cure for at least 7 days before building your greenhouse
For paving slabs:
- Spread 5cm of sharp sand over the area
- Level using a timber straight edge
- Lay slabs starting from one corner, tapping down with a rubber mallet
- Check level as you go with a spirit level
- Fill joints with sand or mortar depending on preference
For gravel:
- Install edging around the perimeter to contain the gravel
- Spread a 5-10cm layer of angular gravel
- Rake level and compact
For wooden decking:
- Position concrete pier blocks at maximum 1.2m spacing
- Check each block is level and adjust as necessary
- Install joists across the blocks, securing with appropriate brackets
- Fix decking boards perpendicular to joists, leaving 5mm gaps between boards
- Add protective mesh underneath if pest prevention is needed
We have built all these types, and each works well when done properly. Choose based on your budget, skills, and how permanent you want the installation to be.
Drainage Solutions for Greenhouse Bases
Water management makes or breaks a greenhouse. We have seen well-built setups ruined by poor drainage planning.
Surface Water Management
All bases need a slight slope — about 1-2% — to direct water away from the greenhouse. That is roughly a 1-2cm fall over 1 metre. For concrete bases, create this slope when levelling your concrete. For paving or gravel, establish the slope in your sub-base.
Direct water toward a suitable drainage point — ideally a soakaway or existing drain. Never direct runoff toward your house or neighbouring properties.
Internal Drainage Options
Inside your greenhouse, you have several drainage choices:
Central Drainage Channel: A shallow channel running the length of your greenhouse directs water to a collection point or drain. Works well with solid floors like concrete or slabs.
Gravel Pathways: Create paths between growing beds using gravel over a drainage layer. Water percolates through to underlying soil.
Raised Beds with Drainage Layer: Build beds with drainage holes and a layer of gravel at the bottom. Excess water drains away rather than pooling.
We combine these approaches in our display greenhouse. Gravel paths run between raised beds with a gentle slope toward the door. This system handles even the heaviest watering sessions.
Dealing with Problematic Sites
Some locations present extra challenges:
Clay Soil: Clay holds water and expands or contracts with moisture changes. Add extra drainage layers and consider installing perimeter drains to keep water away from your base.
High Water Table: If groundwater rises close to the surface seasonally, raise your entire base above ground level. We have seen greenhouses built on deliberately raised platforms with excellent results.
Steeply Sloping Sites: Create terracing with retaining walls before building your base. This prevents erosion and gives you a level platform.
Maintaining Your Greenhouse Base Long-Term
A good base lasts for decades with proper care. We are still maintaining bases we built over 15 years ago with just minor attention needed.
Regular Checks and Maintenance
Concrete Bases:
- Check annually for cracks and repair promptly
- Clean algae growth to prevent slippery surfaces
- Reseal joints between concrete and greenhouse frame if needed
Paving Slab Bases:
- Re-level any slabs that sink or rise with frost
- Remove weeds from joints promptly
- Replace damaged slabs rather than letting them deteriorate
Gravel Bases:
- Top up gravel as needed (it tends to scatter over time)
- Maintain edges to keep gravel contained
- Check and renew weed membrane if weeds start appearing
Wooden Decking Bases:
- Inspect annually for soft spots or rot
- Replace damaged boards immediately
- Apply wood preservative every two years
- Check and tighten loose screws
- Keep ventilation gaps clear beneath decking
Preventing Future Problems
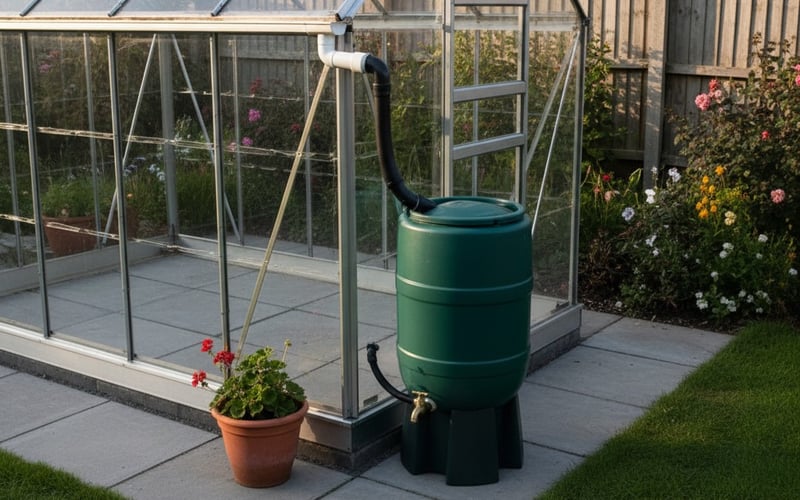
Guttering Management: Install guttering to direct roof runoff away from your base. Collecting this water in butts gives you free water for plants while protecting your foundation.
Perimeter Maintenance: Keep the area around your greenhouse clear of vegetation. Plants growing against the base can damage it and reduce ventilation.
Winter Preparations: Check drainage before winter sets in. Clear channels and ensure water can flow freely away from the structure. In frosty regions, check concrete for cracks from freeze-thaw cycles.
We inspect our greenhouse bases every spring and autumn, making minor repairs before they become major issues. This maintenance routine takes just an hour but saves days of repair work later.
If you notice puddles forming around your greenhouse after rain, act quickly to improve drainage. Water undermining your base causes the most serious structural problems.
Once your base is complete and your greenhouse is up, you are ready to start growing. Check the related articles below for guides on getting started with greenhouse growing.
Frequently Asked Questions
How much bigger should my base be than my greenhouse?
Your base should extend 10-15cm beyond the greenhouse on all sides. This extra space gives room for fixings and prevents soil erosion around the edges. It also makes installation easier because you have space to stand while bolting the frame down.
Can I put a greenhouse directly on soil?
Placing a greenhouse on bare soil is not recommended. Bare soil leads to uneven settling, poor drainage, and persistent weed problems. At minimum, use a layer of compacted gravel on weed membrane to create a stable surface.
How deep should a greenhouse foundation be?
Foundation depth depends on the base type you choose. For concrete bases, 10cm depth on 5-10cm of hardcore is standard. For paving slabs, use 5cm of sharp sand on 10cm of hardcore. For gravel, a 10-15cm layer is typical. Brick perimeter walls need foundations at least 45cm deep to prevent frost heave.
How long does it take to prepare a greenhouse base?
Most bases take 1-2 days to prepare and build. This does not include curing time for concrete, which needs 7 days minimum before you build on it. Larger or more complicated bases on difficult sites may take longer.
How do I fix my greenhouse to the base?
Most greenhouses include a base fixing kit. For concrete, use masonry bolts or concrete screws. For paving slabs, fix to each slab where frame posts sit. For gravel bases, use ground anchors that extend below the gravel layer. For wooden decking, bolt directly through the frame into the joists.
How long will a greenhouse base last?
A properly installed concrete base lasts 30+ years. Paving slab bases typically last 15-20 years before needing maintenance. Gravel bases require ongoing topping up but can be refreshed indefinitely. Wooden decking bases made with UC4 pressure-treated timber last 10-15 years with proper care.
What is the cheapest greenhouse base option?
Compacted hardcore with angular gravel on top is cheapest. Material costs for a 6ft × 8ft base are typically £50-100. It provides adequate stability for smaller greenhouses while offering excellent natural drainage through the gravel layer.