How to Grow Mushrooms in a Greenhouse
Mushrooms grow in a greenhouse at temperatures of 10-20°C with 80-90% humidity and no direct sunlight. Oyster mushrooms are the easiest variety for beginners, producing a first harvest in 2-3 weeks from a kit. Grow on pasteurised straw, hardwood logs or commercial substrate blocks. A shaded greenhouse bench or the space under staging provides ideal conditions. Button mushrooms need a dark, cool area and compost-based substrate. Expect 2-4 flushes per substrate block.
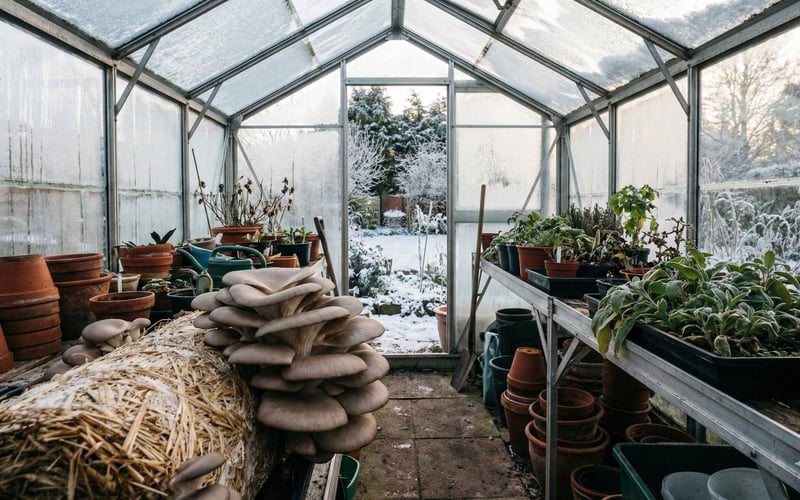
Growing mushrooms in a greenhouse is one of the most productive winter crops available to UK gardeners. Grey oyster mushrooms fruit at 10-20°C and need 80-95% humidity. A ready-to-grow kit produces a first harvest in 7-14 days. The shaded space under greenhouse staging provides indirect light, steady moisture, and shelter from direct sun. Use a potting shed for incubation and the greenhouse for fruiting. This two-stage approach gives fresh mushrooms from October through April.
Key Takeaways
- Humidity is critical: Mushrooms need 80-95% humidity. A greenhouse naturally holds more moisture than a centrally heated kitchen.
- Use the dead zone under staging: The shaded space beneath staging is wasted on plants but perfect for fungi.
- Grey oyster mushrooms are the best starter variety: They tolerate UK winter temps down to 10°C. They fruit on straw or cardboard.
- The two-stage method works best: Incubate spawn bags in a dark potting shed. Move to the greenhouse for fruiting once colonised.
- Start with a kit first: A ready-to-grow kit removes the guesswork and produces your first flush in under two weeks.
Installer's Note
Over 16 years of fitting greenhouses across the UK, I have seen every crop imaginable grown under glass. But the customers who grow mushrooms under their staging always impress me. They are using space that would otherwise sit empty all winter. One customer in Yorkshire had three tiers of oyster mushroom blocks under a Halls Popular 6x8. He harvested a kilo a week from November to March. If you have staging in your greenhouse, you already have a mushroom growing setup waiting to happen.
Why a Greenhouse Beats Your Kitchen Windowsill
Most mushroom growing kits sold in the UK are marketed for kitchen counters. The problem is that our homes are too dry. Central heating drops indoor humidity to around 40-50%. Mushrooms need 80-95%.
A greenhouse naturally retains moisture. Even an unheated aluminium greenhouse holds higher relative humidity than a living room. Condensation on the glass — normally a nuisance for plant growers — is a positive sign for fungi cultivation.
You can also create micro-climates inside the greenhouse with very little effort. A simple plastic humidity tent draped over a growing block traps moisture around the fruiting surface. Placing blocks inside cold frames on the greenhouse floor gives you a double-walled humidity chamber. These small adjustments make the difference between a dried-out kit and a heavy harvest.
Temperature stability is the other advantage. Glass buffers daytime warmth and releases it slowly overnight. Even in January, a greenhouse stays 3-5°C warmer than outside air. That margin keeps grey oyster mushrooms in their productive range.
Which Mushrooms Grow Best in a UK Greenhouse?
Not every mushroom variety suits British conditions. Tropical species like pink oyster mushrooms will die in an unheated greenhouse during January. But several varieties thrive in cool, humid UK conditions from autumn through spring.
Here is a breakdown of the five best varieties for greenhouse growing:
| Variety | Difficulty | Temperature Range | Best Growing Method | Notes |
|---|---|---|---|---|
| Grey/Blue Oyster | Beginner | 10°C - 20°C | Straw blocks / bags | Aggressive coloniser. Cold-tolerant. Highest yield of any home-grown variety. |
| Wine Cap (King Stropharia) | Beginner | 10°C - 25°C | Woodchip beds | Grows directly in woodchip beds on the greenhouse floor. Minimal maintenance. |
| Shiitake | Intermediate | 12°C - 20°C | Hardwood logs | Takes several months to fruit but delivers superior flavour. Needs oak or beech logs. |
| Button / Portobello | Advanced | 15°C - 20°C | Composted manure trays | Needs precise temperature control and sterile conditions. Prone to green mould contamination. |
| Lion's Mane | Intermediate | 15°C - 24°C | Hardwood sawdust blocks | Requires very high humidity. Best suited to warmer months or heated greenhouses. |
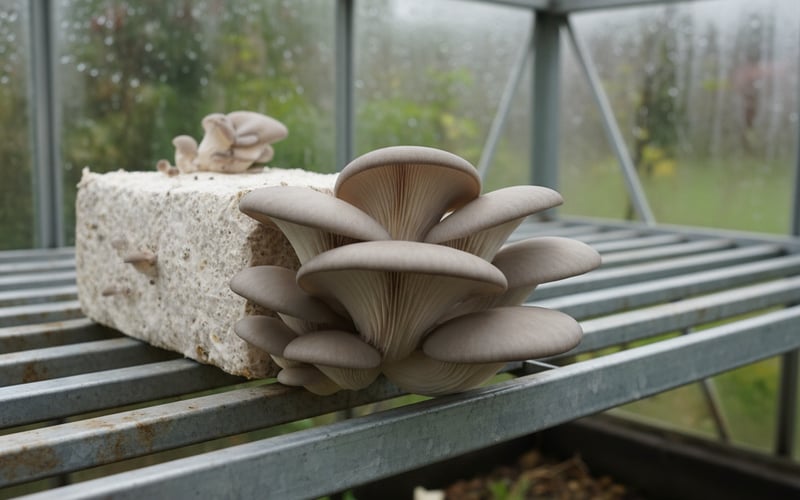
For beginners, grey oyster mushrooms are the clear choice. They colonise fast, tolerate temperature swings, and produce multiple flushes from a single block. One 2.5kg straw block typically yields 500-750g of mushrooms across three harvests.
The Two-Stage Approach: Potting Shed Then Greenhouse
This is the technique most online guides miss. Mushrooms have two distinct life phases, and each phase needs a different environment.
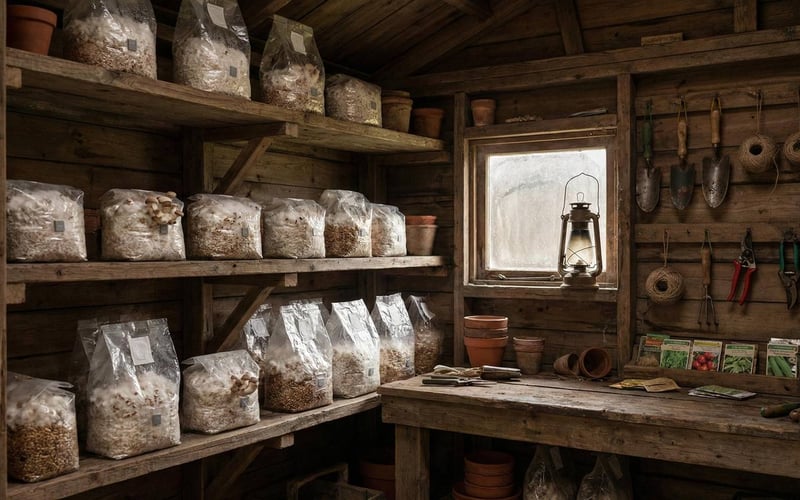
Stage one is incubation. The mycelium (the white root network) colonises the substrate. This phase needs darkness, steady warmth around 20-24°C, and minimal airflow. A potting shed is ideal. Timber insulates better than glass. The interior stays dark naturally and the temperature holds steadier.
Stage two is fruiting. Once the substrate has turned completely white with mycelium (usually after 2-4 weeks), the block is ready to fruit. Move it into the greenhouse. The drop in temperature, increase in fresh air, and introduction of indirect light signals the fungi to produce mushrooms. This environmental shock is what triggers pinning — the formation of tiny mushroom buds.
By rotating blocks between the potting shed and greenhouse, you maintain a continuous supply. Start a new batch every two weeks. By the time one block finishes its third flush, the next is fully colonised and ready to move across.
Step-by-Step: From Spawn to Harvest
If you are not using a pre-made kit, here is the full process for growing oyster mushrooms from grain spawn. This method uses low-tech equipment suitable for any home grower.
Prepare Your Substrate
Oyster mushrooms grow on straw, cardboard, coffee grounds, or hardwood pellets. Wheat straw is the most reliable and widely available option.
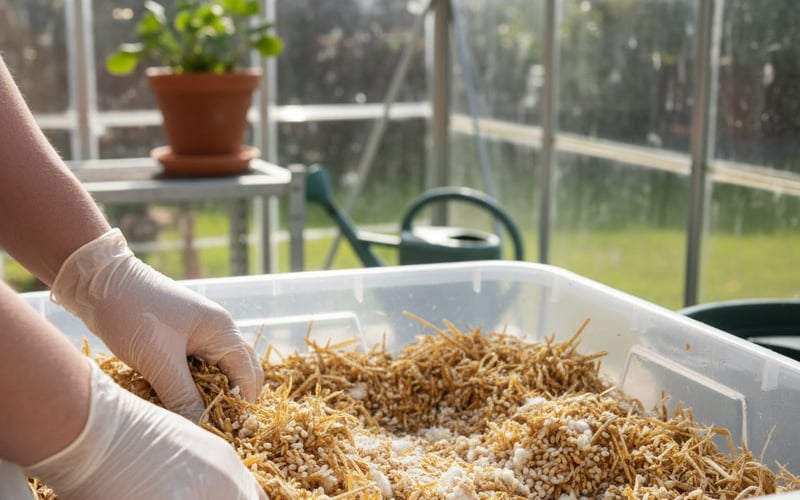
Chop the straw into pieces roughly 50mm long. Shorter pieces pack tightly and give the mycelium more surface area. Submerge the chopped straw in hot water at 65-80°C for one hour. This pasteurisation step kills competing bacteria and moulds without fully sterilising the substrate.
After an hour, drain the straw thoroughly. Squeeze a handful — it should feel like a wrung-out sponge. Damp but not dripping. Excess water is the most common cause of contamination in home mushroom growing.
Inoculate the Substrate with Spawn
Once the pasteurised straw has cooled to below 30°C, mix in your grain spawn. A ratio of roughly 10% spawn to 90% straw by weight works well. More spawn means faster colonisation and less chance of contamination, so beginners can go up to 15%.
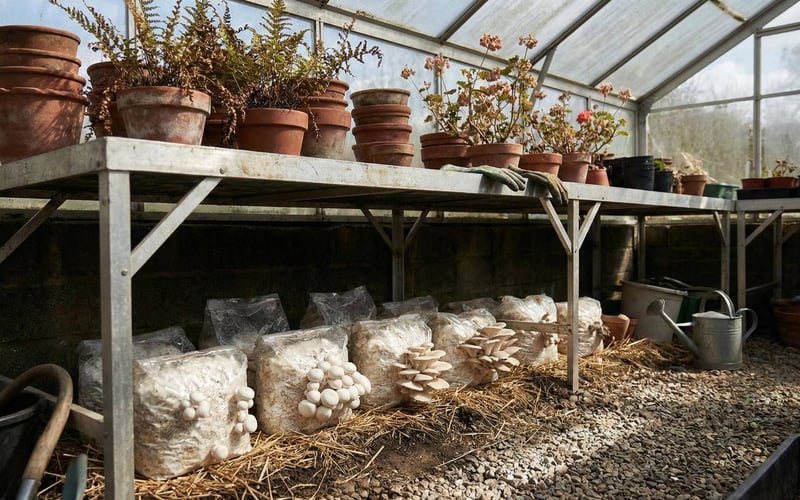
Pack the inoculated straw tightly into clear plastic bags. Poke 6-8 small holes (5mm diameter) around each bag for gas exchange. You can also use 20-litre buckets with 10mm holes drilled around the sides.
Incubate in the Dark
Place the sealed bags in your potting shed, garage, or any dark space that holds a steady temperature between 20-24°C. Do not open the bags during this phase. The mycelium needs undisturbed time to spread through the substrate.
After 2-4 weeks, the straw inside the bag should look completely white. This means the mycelium has fully colonised the substrate. Any patches of green, black, or orange indicate contamination — remove those bags immediately and do not open them indoors.
Move to the Greenhouse for Fruiting
Transfer the fully colonised blocks to your greenhouse. Place them under the staging where they are shielded from direct sunlight but receive ambient light. The temperature drop and fresh air exposure triggers the fruiting response.
Mist the blocks with clean water 2-3 times per day. You are aiming for visible moisture on the surface of the block at all times. Within 5-10 days, you should see tiny pins forming at the holes in the bag. These pins develop into full-sized mushrooms within another 3-5 days.
Harvest by twisting the mushroom cluster gently at the base. Do not cut with a knife — the stump left behind can rot and invite contamination. After harvesting, continue misting. Most blocks produce a second flush 10-14 days later, and often a third flush after that.
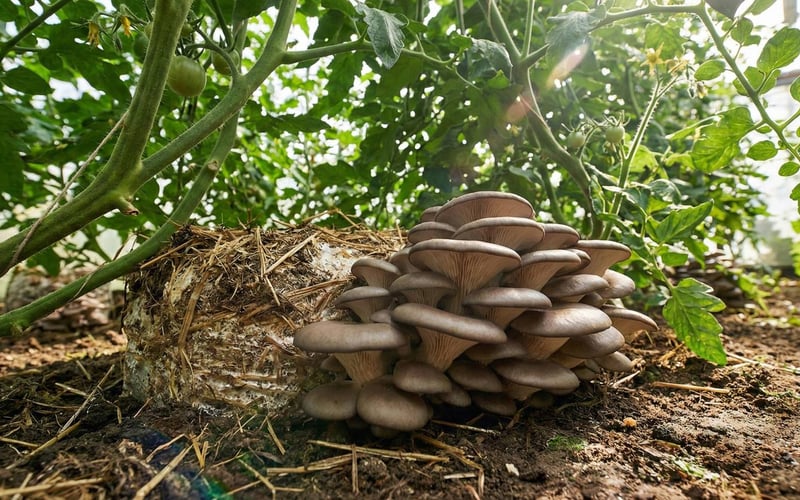
The CO2 Symbiosis: Why Tomatoes Love Mushrooms Nearby
Here is a biological trick that makes mushroom growing even more valuable. Plants absorb carbon dioxide and release oxygen through photosynthesis. Mushrooms do the opposite — they consume oxygen and release CO2 through respiration.
By placing mushroom blocks under your staging, you create a natural CO2 generator at floor level. The enriched air rises gently through the canopy of your plants above. While this effect is modest in winter when plant growth is slow, it becomes genuinely useful in spring.
If you time your spring mushroom crop to coincide with young tomato plants starting their rapid growth phase, the extra CO2 can measurably boost growth rates. Commercial growers pay for CO2 enrichment systems. You get it free from your mushroom blocks.
Winter Care and Troubleshooting
Growing mushrooms through the UK winter presents specific challenges. Here are the three most common problems and how to solve them.
Protecting Blocks from Hard Frost
Grey oyster mushrooms tolerate cold down to around 5°C but freezing solid will damage the mycelium. If overnight frost is forecast, drape horticultural fleece over your mushroom blocks. Two layers of fleece provide roughly 2-3°C of frost protection.
For extra insulation, place blocks inside small greenhouses or propagators within your main greenhouse. This double-glazing effect keeps air around the blocks above freezing even on the coldest nights.
Dealing with Green Mould (Trichoderma)
Trichoderma is the mushroom grower's worst enemy. It appears as bright green patches on the white mycelium and spreads fast in warm, stagnant conditions.
If you spot a small green patch early, apply table salt directly onto it. The salt kills the trichoderma spores locally and can save the rest of the block. If more than 20% of the block has turned green, the battle is lost. Seal the bag tightly, take it outside, and dispose of it. Never open a contaminated bag inside the greenhouse. Trichoderma spores spread through the air and will infect your other blocks.
Prevention is the best approach. Pasteurise your straw properly, wash your hands before handling spawn, and keep tools clean.
Long Spindly Stems with Tiny Caps
If your mushrooms develop elongated stems and undersized caps, they are stretching for fresh air. This is the most common fruiting problem and the easiest to fix.
Increase ventilation around the blocks. If you are using a humidity tent, cut larger holes or open it for 30 minutes twice a day. Too much sealing traps CO2 around the fruiting bodies, causing the leggy growth pattern.
What to Do with Spent Mushroom Substrate
After a block has produced its third flush, yields drop off and the substrate is exhausted. Do not throw it away. Spent mushroom substrate is an excellent soil amendment.
The mycelium has broken down the straw into easily accessible nutrients. Crumble the spent block over your vegetable beds as mulch. If you are growing potatoes, they respond well to spent substrate worked into the top 100mm of soil.
You can also dig spent substrate directly into borders as a soil improver. It increases water retention in sandy soils and improves drainage in heavy clay. It works especially well as a base layer when growing garlic in raised beds.
Matt's Tip: Use Your Winter Gap
The space under your greenhouse staging sits empty from October to March while most plants are dormant. That is four to five months of wasted growing space. I set up my first mushroom blocks under the staging in 2019 and have not had an empty winter since. Start your first spawn bags in mid-October and time them in two-week rotations. You will have fresh oyster mushrooms on the table every week until April. The staging creates the exact conditions fungi need: shade above and humidity all around.
|
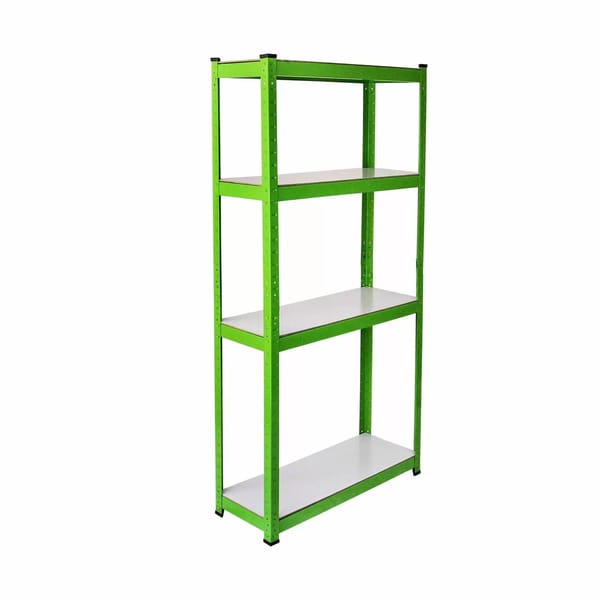
Matt's Pick for Creating Mushroom Growing SpaceBest For: Providing shaded growing space underneath while keeping plants on top Why I Recommend It: I use four-tier staging in my own greenhouse. It creates a dark, humid zone underneath for mushroom blocks. The slatted shelves allow airflow while the tiers above cast consistent shade. Price: £89 |
Frequently Asked Questions
Do mushrooms need light or dark to grow?
Mushrooms need indirect light to fruit but not direct sunlight. The mycelium colonises the substrate best in darkness during the incubation phase. Once colonisation is complete, the fruiting bodies need some ambient light to form properly. Total darkness often produces deformed mushrooms with elongated stems. The shaded area under greenhouse staging provides the ideal balance.
Can you grow mushrooms in an unheated greenhouse?
Yes, several cold-tolerant varieties thrive in unheated greenhouses. Grey oyster mushrooms fruit at temperatures as low as 10°C. Blue oyster, wine cap, and winter enoki also handle UK winter conditions well. Protect blocks from hard frost with horticultural fleece or by placing them inside a cold frame. An unheated greenhouse holds 3-5°C above the outside temperature, keeping most cold-tolerant varieties in their productive range.
How long does it take to grow mushrooms from a kit?
Ready-to-grow kits produce a first harvest in 7-14 days. Once you open the kit and begin misting, pinning (tiny mushroom buds) usually appears within 7-10 days. These pins develop into full-sized mushrooms within another 3-5 days. A single kit typically produces three flushes over 4-6 weeks. Each flush yields 150-250g of fresh mushrooms depending on variety and conditions.
What is the best mushroom for beginners to grow?
Grey oyster mushrooms are the best variety for beginners. Pleurotus ostreatus colonises substrate aggressively, outcompeting most contaminant moulds. It tolerates 10-20°C, fruits quickly, and grows on cheap substrates like straw, cardboard, or coffee grounds. A single 2.5kg straw block can yield 500-750g across three harvests. It is a productive and forgiving choice for beginners.
Are mushrooms dangerous to other greenhouse plants?
No, edible mushroom varieties pose no risk to living plants. The species grown for food are saprophytic fungi — they feed on dead organic matter, not living tissue. They will not attack your tomatoes, cucumbers, or any other greenhouse crop. Mushrooms actually benefit nearby plants by releasing CO2 through respiration. This enriches the air and can boost photosynthesis in the plants above.
Related Articles
- What Can I Grow in the Greenhouse in Winter?
- Controlling Grey Mould in the Greenhouse
- How to Make Your Own Compost
- What to Grow in a Greenhouse: Beginners Guide
- Winter Greenhouse Care: UK Guide
Need advice on greenhouse growing? Our team has been fitting and advising on greenhouses since 2007. Email us at team@greenhousestores.co.uk.