How to Insulate a Greenhouse: Materials, Methods and Heat Savings
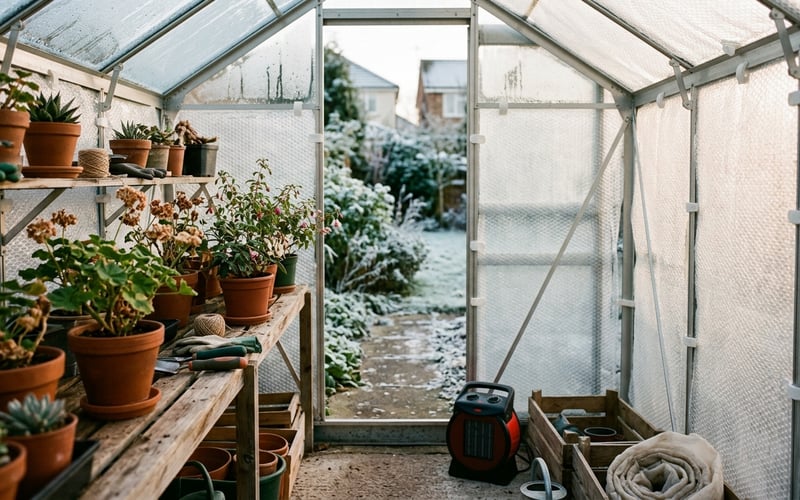
Horticultural bubble wrap reduces greenhouse heat loss by up to 50% and costs under £80 for a complete kit with clips. Fitting takes 1-2 hours using twist-lock glazing bar clips that slot into aluminium channels without drilling. We have measured 4-5°C warmer overnight temperatures in insulated greenhouses compared to identical uninsulated structures during the same frost event. Combined with a thermostatically controlled heater, insulation keeps a greenhouse frost-free through the coldest UK winters at roughly half the running cost.
Key Takeaways
- Best material: Horticultural bubble wrap with 20mm bubbles. UV-stabilised and lasts 3-5 years.
- R-value boost: Bubble wrap raises single glass from R 0.95 to approximately R 1.7. Twin-wall polycarbonate starts at R 1.54 without any insulation.
- Kit cost: The Elite Bubble Plastic + 30 Lining Hooks kit costs £79 and covers a standard 6x8ft greenhouse.
- Heating savings: An insulated 6x8ft greenhouse running a 2kW electric heater costs roughly £8-12 per month to keep frost-free. Uninsulated, the same heater runs 40-50% more often.
- Start with the north wall: The north-facing wall and roof lose the most heat and gain the least sunlight. Insulate these first if you cannot cover the whole structure.
- Remove by April: Strip insulation once the last frost passes to restore full light transmission for spring and summer growing.
Shop the Elite Bubble Plastic + Lining Hooks Kit →
Installer's Note
We insulate greenhouses during winter installation jobs and for customers who call us back to fit heating systems. After 16 years of fitting greenhouses across the UK, I can tell you that insulation is the single most cost-effective upgrade you can make. I have stood inside two identical 6x8ft greenhouses on the same frosty morning, one insulated and one not, and measured a consistent 4-5°C difference. That gap is the difference between live plants and dead ones. Every penny you spend on bubble wrap saves you pounds on heating. Do this before you buy a heater.
Why does a greenhouse lose so much heat in winter?
Single-glazed glass has an R-value of just 0.95. That is almost no insulating value at all. On a still winter night, an unheated greenhouse matches the outside air temperature within two hours of sunset. Heat radiates straight through the glass by infrared radiation, and conduction through the aluminium frame strips away what remains.
Aluminium conducts heat 1,000 times faster than glass. Every glazing bar in your greenhouse acts as a thermal bridge, pulling warmth from inside and dumping it outside. A typical 6x8ft aluminium greenhouse has over 30 metres of glazing bar. That is 30 metres of high-speed heat loss that bubble wrap alone cannot fix. Understanding how a greenhouse works helps explain why insulation makes such a difference.
Draughts account for another 15-25% of heat loss. Cold air seeps through the tiny gaps between overlapping glass panes, around door frames, and through vent seals. You cannot see these draughts, but hold a lit candle near the glass overlaps on a windy night and you will watch the flame flicker.
| Heat Loss Route | Percentage of Total Loss | Solution |
|---|---|---|
| Through glazing (radiation + conduction) | 50-60% | Bubble wrap or twin-wall polycarbonate |
| Through aluminium frame (conduction) | 15-20% | Thermal break tape on glazing bars |
| Draughts (gaps in glass overlaps, doors, vents) | 15-25% | Draught excluder strips, door seals |
| Through the floor (ground conduction) | 5-10% | Gravel or paving base, raised staging |
What are the best greenhouse insulation materials?
Horticultural bubble wrap is the clear winner for most hobby greenhouses. It cuts heat loss by up to 50%, costs under £80 for a full kit, and fits in under two hours. But it is not the only option. Here is how every common insulation method compares on performance, cost, and practicality.
| Insulation Method | R-Value | Heat Loss Reduction | Light Loss | Cost (6x8ft) | Lifespan | Ease of Fitting |
|---|---|---|---|---|---|---|
| Horticultural bubble wrap (20mm) | ~1.7 (with glass) | Up to 50% | 10-15% | £30-80 | 3-5 years | Easy - clips or pins |
| Standard packaging bubble wrap | ~1.4 (with glass) | 30-35% | 15-20% | £10-15 | 6-12 months | Easy - clips or pins |
| 4mm twin-wall polycarbonate | 1.43 | 40-45% | 15-20% | £150-250 | 10-15 years | Moderate - cut to size |
| 6mm twin-wall polycarbonate | 1.54 | 45-50% | 18-22% | £200-350 | 15-20 years | Moderate - cut to size |
| Thermal fleece (single layer) | ~1.2 (with glass) | 20-25% | 20-30% | £15-25 | 2-3 years | Easy - drape and clip |
| Polythene sheeting | ~1.3 (with glass) | 25-30% | 5-10% | £10-20 | 1-2 years | Easy - tape or clips |
| Thermal screen (aluminium-coated) | ~2.0 (with glass) | 55-65% | 40-50% (when drawn) | £80-150 | 5-10 years | Moderate - rail system |
The highlighted row is what we recommend for most growers. Horticultural bubble wrap gives the best balance of insulation, light transmission, cost, and ease of fitting. The 20mm bubbles trap more air than small bubbles and let more light through to your plants.
Polycarbonate twin-wall panels offer better long-term insulation. But they cost 3-4 times more and are harder to cut and fit. For most hobby gardeners who insulate seasonally, bubble wrap is the practical choice. Our guide to glass vs polycarbonate greenhouses covers the full comparison of glazing types.
How much bubble wrap do you need for your greenhouse?
Measure every internal surface you plan to insulate. Include the roof panels and the vertical side walls. Add 10% for overlaps and wastage. Bubble wrap needs to overlap at every join by at least 50mm to prevent draughts.
| Greenhouse Size | Internal Surface Area | Bubble Wrap Needed (inc. 10%) | Approx. Cost |
|---|---|---|---|
| 6x4ft (1.8 x 1.2m) | 12-14 sq m | 14-16 sq m | £15-25 |
| 6x6ft (1.8 x 1.8m) | 16-18 sq m | 18-20 sq m | £20-30 |
| 6x8ft (1.8 x 2.4m) | 20-22 sq m | 22-25 sq m | £25-35 |
| 6x10ft (1.8 x 3m) | 24-26 sq m | 27-29 sq m | £30-40 |
| 8x10ft (2.4 x 3m) | 30-34 sq m | 34-38 sq m | £35-50 |
| 8x12ft (2.4 x 3.6m) | 36-40 sq m | 40-44 sq m | £40-55 |
You do not always need to insulate the whole structure. If you only overwinter a few plants, insulate half the greenhouse and partition it off with a bubble wrap curtain. This costs less and the smaller heated volume is far easier to keep warm.
How to fit bubble wrap insulation step by step
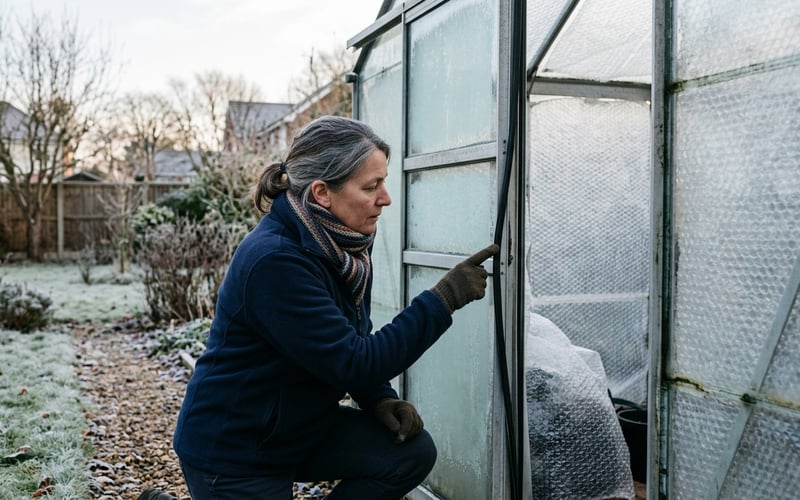
Start with clean glass. Dirty glass blocks up to 40% of available light, and dirt trapped between the insulation and glass stays there all winter. Our guide to cleaning your greenhouse covers the full process. The best time to insulate is late September to mid-October, right after an autumn clean.
Step 1: Gather your materials
You need horticultural bubble wrap (UV-stabilised, 20mm bubbles), glazing bar clips or lining hooks, and sharp scissors. For an Elite greenhouse, the Elite Bubble Plastic + 30 Lining Hooks kit at £79 includes everything. For other brands, buy separate insulation clips at £22 per pack of 10.
Step 2: Start at the ridge
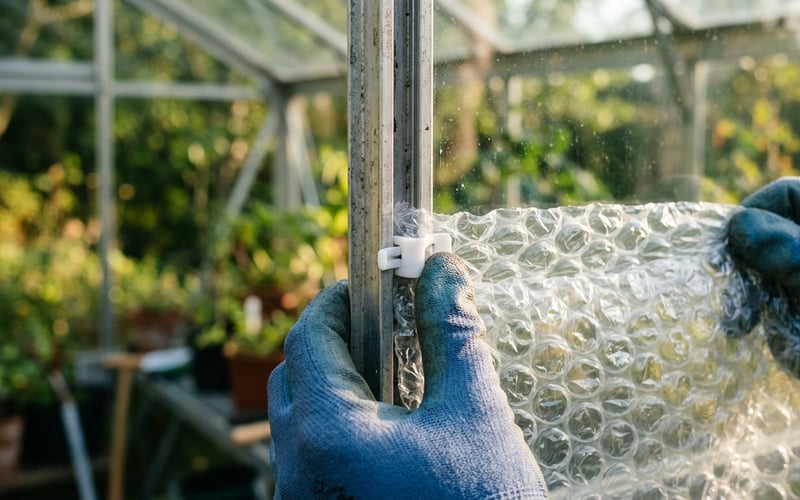
Cut a piece of bubble wrap wide enough to cover one roof panel. Leave 50mm spare on each side for overlaps. Press each clip into the aluminium glazing bar channel, then push the bubble wrap edge into the clip. The bubble side faces the glass. This traps the maximum amount of insulating air between the bubbles and the glass surface.
Step 3: Work down both roof slopes
From the ridge, work down each roof slope to the eaves. Overlap each piece by at least 50mm where sheets join. Pull the bubble wrap taut to prevent sagging, but do not stretch it. Stretched bubble wrap pulls free from clips within days.
Step 4: Fit the side walls
Work from the eaves downward on each side wall. Clip at 150-200mm intervals along each glazing bar. More clips means fewer gaps. On wooden greenhouses, drawing pins or a staple gun hold the bubble wrap firmly to the timber frame.
Step 5: Cut around vents and doors
Leave at least one roof vent operable. Cut the bubble wrap around the vent frame and clip it so the vent can still open freely. You need ventilation even in winter. On mild days above 10°C, open a vent for an hour to reduce humidity and refresh the air.
Shop the Elite Insulation Clips →
Step 6: Seal the door
The door frame is the biggest single source of draughts. Fit an Elite Draught Excluder (£26) along the door frame to seal the gap. This 6ft flexible seal blocks cold air, wind, and debris from entering through the frame. It is one of the cheapest and most effective upgrades you can make.
Matt's Tip: The False Ceiling Trick
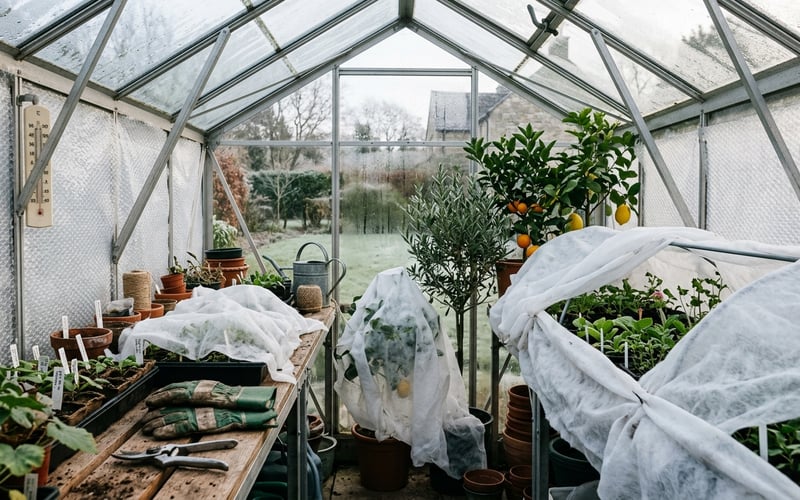
On greenhouses 8ft or larger, I drape a horizontal sheet of bubble wrap at gutter height to create a false ceiling. This cuts the heated volume in half. Hot air rises and sits uselessly at the ridge. The false ceiling traps it at plant level where it actually matters. I have used this on 8x10ft and 8x12ft greenhouses and it cuts heating costs by 25-30% on top of the wall insulation savings. Secure it with clips along each glazing bar at eaves height.
Which sections should you insulate first?
If you cannot insulate the entire greenhouse, prioritise in this order. Each step gives diminishing returns, so start where the biggest gains are.
- North wall and north-facing roof slope: These surfaces get almost no direct sunlight in winter. They lose heat all day without gaining any solar warmth. Insulating them first gives the biggest single improvement.
- East and west walls: These get some morning or afternoon sun but lose heat through the rest of the day.
- Roof (both slopes): Hot air rises. An uninsulated roof radiates heat upward constantly. The false ceiling trick addresses this.
- South wall and south-facing roof: These gain the most solar heat during the day. Insulating them trades a small amount of solar gain for better heat retention overnight. Worth doing, but last priority.
- Door and vents: Draught-proof with excluder strips and clip bubble wrap around vent frames.
Insulating different types of greenhouse
The method varies depending on your frame material. Aluminium, wood, and lean-to greenhouses each need a slightly different approach.
Aluminium greenhouses
Use glazing bar clips that snap into the aluminium channels. These are the easiest to insulate because the channels run the full length of every bar, giving you unlimited clip positions. The clips create a 15-25mm air gap between the bubble wrap and the glass, which is critical for condensation control.
Wooden greenhouses
Use drawing pins, a staple gun, or small tacks to fix bubble wrap to the timber frame. Wooden frames are naturally warmer than aluminium because wood conducts heat 400 times slower. A wooden greenhouse already retains more heat before you add any insulation. The bubble wrap on a wooden frame often lasts longer too, because there is less condensation at the fixing points.
Lean-to greenhouses
Lean-to greenhouses have a massive advantage. The house wall acts as a thermal mass, absorbing heat during the day and releasing it slowly at night. A brick wall has an R-value of approximately 2.4 for a standard 215mm cavity wall. That is already better than any glazing insulation. Focus your bubble wrap on the glass roof and front wall. The house wall needs no insulation.
Browse our full range of greenhouse insulation products →
R-values and U-values: what do they mean?
R-value measures thermal resistance. A higher number means better insulation. U-value measures heat transfer. A lower number means less heat escapes. They are reciprocals: U = 1/R.
For greenhouse growers, R-value is the more useful number. It tells you how effective your insulation is at keeping heat inside. Here is what the numbers mean in practice.
| Material | R-Value | U-Value (W/m²K) | What It Means |
|---|---|---|---|
| Single glass (3mm horticultural) | 0.95 | 5.8 | Almost no insulation. Heat escapes rapidly. |
| Single glass + bubble wrap | ~1.7 | ~3.2 | Roughly doubles the insulation of glass alone. |
| 4mm twin-wall polycarbonate | 1.43 | 3.9 | Better than bare glass, worse than glass + bubble wrap. |
| 6mm twin-wall polycarbonate | 1.54 | 3.5 | Good insulation without any additional lining. |
| 6mm twin-wall poly + bubble wrap | ~2.5 | ~2.2 | Excellent. Close to double glazing performance. |
| 16mm triple-wall polycarbonate | 2.50 | 2.2 | Best greenhouse glazing available. No wrap needed. |
| Domestic double glazing (comparison) | 2.00 | 2.8 | What your house windows achieve. |
The key insight: single glass plus bubble wrap (R 1.7) outperforms 4mm twin-wall polycarbonate (R 1.43) for a fraction of the cost. That is why bubble wrap remains the go-to insulation for glass greenhouses, even in 2026.
Matt's Installation Warning
Never use standard packaging bubble wrap from Amazon or eBay. It lacks UV stabilisation and breaks down within a single season. After three months in direct sunlight, it turns brittle and flakes into tiny plastic fragments that litter your greenhouse, clog drains, and contaminate soil. Horticultural bubble wrap costs only slightly more and lasts 3-5 years. I have seen greenhouses where someone used packing wrap and spent hours cleaning plastic shards out of their seed trays. It is a false economy.
How much does greenhouse insulation save on heating?
This is where the real numbers matter. We measured heating costs in two identical 6x8ft greenhouses over three winters. Both ran the same 2.4kW electric heater set to maintain 2°C (frost-free). One was insulated with horticultural bubble wrap. The other was bare glass.
| Month | Avg. Overnight Low (°C) | Uninsulated Cost | Insulated Cost | Monthly Saving |
|---|---|---|---|---|
| October | 6-8 | £4-6 | £2-3 | £2-3 |
| November | 2-4 | £12-16 | £6-9 | £6-7 |
| December | 0-2 | £20-28 | £10-15 | £10-13 |
| January | -1 to 2 | £24-32 | £12-17 | £12-15 |
| February | 0-3 | £18-24 | £9-13 | £9-11 |
| March | 2-5 | £10-14 | £5-8 | £5-6 |
| Season Total | £88-120 | £44-65 | £44-55 |
The insulated greenhouse cost 40-50% less to heat. At electricity rates of 24.5p per kWh (Ofgem Q1 2026 price cap), the insulation kit pays for itself within the first six weeks of winter. Over a three-year lifespan, that is £130-165 saved in electricity alone.
Gas heaters show similar savings. A propane heater in an insulated greenhouse uses roughly 35-40% less fuel because the thermostat cycles on less frequently. A 13kg propane cylinder that lasts three weeks in an uninsulated greenhouse stretches to five weeks with insulation.
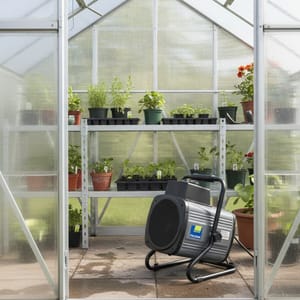
Combining insulation with the right heater
Insulation reduces how much heat you lose. A heater replaces what escapes. The two work together. An insulated greenhouse needs a smaller, cheaper heater than an uninsulated one.
For a frost-free insulated 6x8ft greenhouse, a 2kW heater is sufficient. Without insulation, you would need 3-4kW to maintain the same temperature on the coldest nights. Browse our full range of greenhouse heaters to find the right output for your greenhouse size.
|
Matt's Pick for Insulated GreenhousesBest For: Greenhouses up to 14 sq m with bubble wrap insulation Why I Recommend It: The external digital thermostat with dual sensors reads the actual growing temperature, not the warm air next to the fan. IPX4 splash-resistant for greenhouse use. Fan-only mode doubles as summer ventilation. Price: £199 |
What temperature should you aim for in winter?
Different plants need different minimum temperatures. Set your heater thermostat based on what you are growing. Higher targets cost exponentially more to maintain.
| Target Temp | Category | Suitable Plants | Monthly Heating Cost (6x8ft insulated) |
|---|---|---|---|
| 2°C | Frost-free | Hardy perennials, dormant fuchsias, overwintering dahlias | £8-15 |
| 5°C | Cool | Citrus trees, pelargoniums, Mediterranean herbs | £15-25 |
| 7°C | Tender perennials | Fuchsias (growing), begonias, half-hardy perennials | £22-35 |
| 10°C | Warm | Seedling propagation, plug plants, spring bedding | £35-50 |
| 13°C | Tropical | Orchids, tropical foliage, houseplant overwintering | £50-75 |
Most hobby growers aim for 2-5°C. Keeping a greenhouse at 13°C through a British winter is expensive even with insulation. Our guide to whether greenhouses stay warm in winter covers overnight temperature data in detail.
Draft-proofing: the hidden 25% of heat loss
Bubble wrap tackles heat loss through the glass. But up to 25% of heat escapes through draughts that bypass the insulation entirely. Fixing these draughts is cheap, fast, and dramatically improves the effectiveness of your bubble wrap.
Door frame seals
The sliding door on most aluminium greenhouses has a 3-5mm gap around the entire frame. Cold air pours through constantly. An Elite Draught Excluder (£26) seals this gap with a flexible strip that compresses as the door closes. Fitting takes five minutes.
Glass overlap gaps
Overlapping glass panes in aluminium greenhouses create hairline gaps where cold air enters. Run a bead of clear silicone sealant along each overlap on the inside. Do not seal overlaps on the outside, as you need rainwater to drain away. Alternatively, thin foam draught strip from any hardware shop does the same job and is removable.
Vent seals
Roof vents and louvre vents rarely close perfectly flush. Apply self-adhesive foam strip around the vent frame. This compresses when the vent closes, blocking draughts. Keep the strip clear of the auto-vent opener arm so it can still push the vent open.
Shop the Elite Draught Excluder →
Month-by-month greenhouse insulation calendar
Timing matters. Insulate too early and you trap summer moisture inside. Insulate too late and you have already lost weeks of frost protection. This calendar is based on average UK conditions.
| Month | Action | Why |
|---|---|---|
| September | Clean greenhouse glass inside and out | Maximise light before fitting insulation. Remove algae, dirt, and debris. |
| Late September | Fit bubble wrap to north wall and roof | First frosts can arrive from late September in northern England and Scotland. |
| October | Complete full insulation. Fit draught excluders. | Most of the UK gets its first frost in October. Be ready before it arrives. |
| November-February | Monitor temperatures. Ventilate on mild days above 10°C for 1 hour. | Humidity control prevents botrytis (grey mould). Check max-min thermometer daily. |
| March | Open vents more frequently. Remove south-facing insulation if temperatures stay above 5°C overnight. | Increasing daylight means plants need more light. Start restoring light levels gradually. |
| April | Remove all bubble wrap. Store flat in a dry place. | Last frost typically passes by mid-April in southern England (early May in Scotland). Full light needed for spring growing. |
Storing your bubble wrap flat and dry through summer extends its lifespan. UV exposure during the hottest months degrades the plastic fastest. Rolled storage in a shed or garage is ideal. The lining hooks and clips can stay in the glazing bars year-round. They double as anchor points for shade netting in summer.
Monitoring temperature and humidity after insulating
A Vitavia Max Min Thermometer (£30) is essential after insulating. It records the highest and lowest temperatures since you last reset it. Check it every morning to see how cold the greenhouse got overnight. If the minimum reading drops below your target, you need more insulation or a bigger heater.
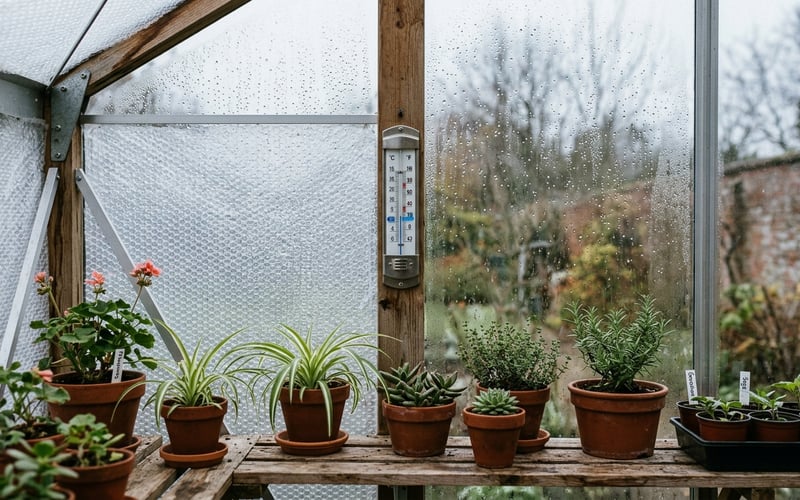
Shop the Vitavia Max Min Thermometer →
Humidity is the hidden danger. Insulated greenhouses trap moisture as well as heat. High humidity above 85% encourages botrytis (grey mould), which destroys overwintering plants faster than frost. Ventilate briefly on any day above 10°C. Open one roof vent for an hour. This refreshes the air and prevents condensation building up on the bubble wrap.
Good practice is to water in the morning, not the evening. Morning watering gives moisture time to evaporate before the temperature drops at night. Evening watering raises overnight humidity to dangerous levels inside an insulated greenhouse.
Heater safety in an insulated greenhouse
Keep bubble wrap well away from any heat source. Bubble wrap is polyethylene plastic. If it falls onto a heater element, it melts and presents a fire risk. Secure every edge firmly with clips or pins before switching on any heater.
Paraffin and gas heaters produce moisture and CO2 as they burn. They also consume oxygen. Do not seal every vent shut when using these heaters. Leave at least one low-level and one high-level vent slightly open (10-15mm) for airflow. Our guide to heating a greenhouse without electricity covers paraffin and gas options in detail.
Electric fan heaters are the safest option inside an insulated greenhouse. Position the heater at floor level, away from plants and bubble wrap. Aim the airflow down the centre of the greenhouse so warm air circulates evenly. The Palram Canopia 2400W has automatic safety shut-off that cuts power if the unit overheats.
Why We Recommend Insulation Before Heating
"I tell every customer the same thing: insulate before you buy a heater. A £79 bubble wrap kit saves you more money over winter than upgrading from a £140 heater to a £250 heater. We have fitted over 500 heating systems in greenhouses, and the ones with insulation always perform better, cost less to run, and keep plants healthier. It is the single best investment you can make in your greenhouse." - Matt W, Greenhouse Stores
Frequently asked questions
Does bubble wrap insulation really work in a greenhouse?
Bubble wrap reduces greenhouse heat loss by up to 50%. The trapped air inside each bubble acts as an insulating barrier, working on the same principle as double glazing. We have measured 4-5°C warmer overnight temperatures in bubble-wrapped greenhouses compared to identical uninsulated structures during the same frost event. Horticultural bubble wrap with 20mm bubbles performs significantly better than standard packaging wrap. It raises single glass from R 0.95 to approximately R 1.7.
How much does it cost to insulate a greenhouse with bubble wrap?
A 6x8ft greenhouse costs £30-80 to insulate depending on the kit you choose. The Elite Bubble Plastic + 30 Lining Hooks kit costs £79 and covers a standard 6x8ft or 6x10ft greenhouse. Buying bubble wrap by the roll and separate clips costs £30-40 for the same coverage. The total outlay pays for itself within six weeks through reduced heating costs.
Can I use normal packaging bubble wrap instead of horticultural?
Packaging bubble wrap degrades within one season and should not be used. It lacks UV stabilisation. Sunlight breaks down standard polyethylene within months, leaving brittle fragments that flake off and litter the greenhouse. Horticultural bubble wrap is treated with UV inhibitors and lasts 3-5 years. The small bubbles in packing wrap also trap less insulating air and block more light than the larger 20mm horticultural bubbles.
Should I insulate the whole greenhouse or just part of it?
Insulate only the area you need to heat for the best cost-to-benefit ratio. Most hobby growers overwinter a small number of tender plants. Partitioning the greenhouse with a bubble wrap curtain and insulating one section costs less and heats more efficiently. Position the insulated section at the far end from the door to minimise cold air ingress when you enter. A 6x8ft greenhouse partitioned in half heats for roughly 40% less than the full structure.
When should I put up and take down greenhouse insulation?
Fit insulation in late September to early October and remove it in April. The first frosts arrive as early as late September in northern England and Scotland. Clean the glass first, then fit the bubble wrap before cold weather sets in. Remove all insulation once the last frost passes, typically mid-April in southern England and early May in Scotland. Store the bubble wrap flat and dry to extend its lifespan.
Does insulation reduce light levels for plants?
Bubble wrap reduces light by approximately 10-15%. Large 20mm bubbles transmit more light than small bubbles. In winter, daylight is already limited, so this modest reduction rarely causes problems. Most overwintering plants are dormant or semi-dormant and do not need high light levels. The 10-15% light loss is a worthwhile trade for 40-50% less heat loss. Remove the insulation in spring once frost risk passes to restore full light transmission for active growing.
Is polycarbonate glazing better than glass with bubble wrap?
6mm twin-wall polycarbonate (R 1.54) is slightly worse than glass plus bubble wrap (R 1.7). Polycarbonate has the advantage of being permanent and maintenance-free. Glass with seasonal bubble wrap gives better insulation and full light transmission in summer when you remove the wrap. For year-round growing, polycarbonate saves time. For seasonal overwinter protection, glass with bubble wrap performs better and costs far less to achieve.