How to Make Your Own Compost: UK Beginner's Guide
Homemade compost takes 4-6 months in a hot bin or 12-18 months in a cold heap. Mix greens and browns 50/50 by volume, keep moisture like a wrung-out sponge, and turn the pile every 7-10 days to hit a core temperature of 55-65C. Finished compost should look dark, crumbly, and smell like damp woodland. Use it as raised bed mulch, mixed 1:1:1 with loam and grit for pots, or dug into clay and sandy soils to improve structure.
Key takeaways
- Hot bins finish in 4-6 months. Cold heaps take 12-18 months but need almost no work.
- Aim for 50/50 greens to browns by volume. Too many greens and the pile turns slimy and smells of ammonia.
- Turn the pile every 7-10 days. Aeration is what drives the heat that kills weed seeds and pathogens.
- Keep moisture like a wrung-out sponge. Cover the bin in winter to stop rain waterlogging the heap.
- Never compost meat, dairy, cooked food, or perennial weed roots. These attract rats or regrow once spread.
Installer's Note
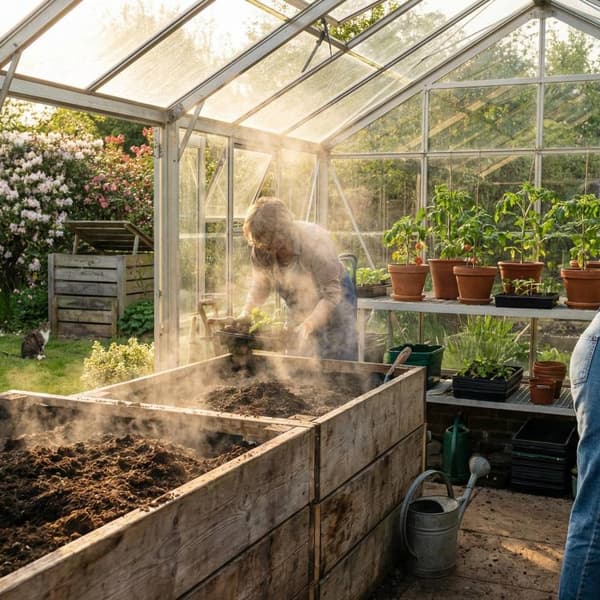
Across 16 years of greenhouse installations, the customers with the best crops are nearly always the ones who make their own compost. Greenhouse soil gets exhausted faster than open ground because you crop the same beds twice as hard. A two-bin system next to the greenhouse means there is always a barrow of dark, crumbly compost ready to top up the borders before each new sowing.
Why every greenhouse grower should make compost
Greenhouse soil is worked harder than any other patch in the garden. Tomatoes, peppers, and cucumbers are heavy feeders that strip nitrogen, potassium, and trace elements out of the borders within a single season.
Homemade compost solves four problems at once. It feeds hungry crops, holds moisture in pots that bake in summer, fills raised beds without paying bagged-compost prices, and adds the beneficial bacteria that suppress disease in intensive growing.
- For pots and containers. Sifted compost holds moisture far longer than bagged peat-free mixes, which dry out in a single hot afternoon.
- For raised beds. A 60cm-deep raised bed swallows around 600 litres of compost. Buying that bagged costs £120-£180. Homemade is free.
- For clay or sandy borders. Compost forces clay particles apart and binds sandy soil together. Either way, it improves structure within one season.
- For greenhouse borders. The microbial life in finished compost suppresses fusarium and verticillium wilt, two of the most common greenhouse diseases.
If you grow in border soil rather than pots, our guide to raised beds in a greenhouse explains how to layer homemade compost into a no-dig system that needs less watering.
Choosing your method: heap, bin, or tumbler
The right setup depends on how much space you have and how quickly you need finished compost.
The cold heap
- Best for: Large allotments and unused corners of bigger gardens.
- Pros: No turning, no monitoring, no kit to buy. Pile it up and walk away.
- Cons: Takes 12-18 months. Weed seeds often survive the lower core temperature.
The hot bin (plastic or wooden)
- Best for: Most home growers who want reliable, predictable results.
- Pros: Insulated walls retain heat, finishing compost in 4-6 months. Keeps the garden tidy.
- Cons: Needs turning every 7-10 days with a fork to keep oxygen flowing.
The tumbler
- Best for: Patios, courtyard gardens, and urban growers with limited space.
- Pros: Spin-handle turning, sealed against rats, and produces small batches of potting compost in 8-10 weeks.
- Cons: Limited to around 200 litres. Not enough for a full raised-bed top-up.
If you are short on space, our greenhouse staging options keep tools, trays, and compost bins organised against a single wall.
The perfect formula: greens vs browns
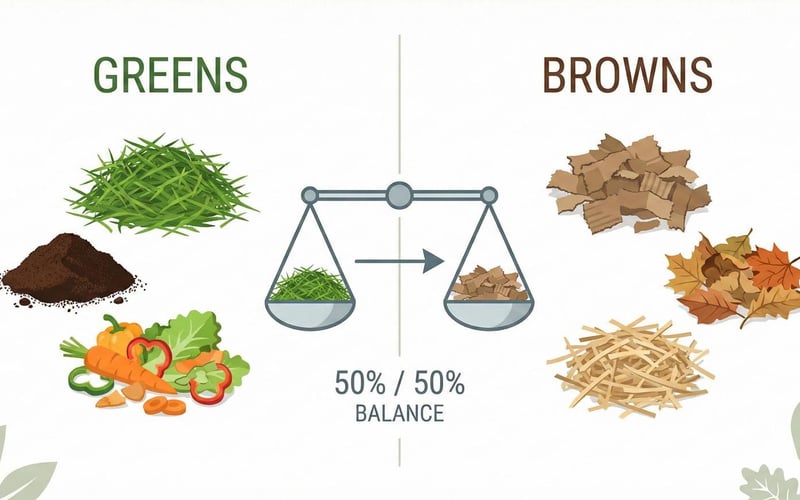
The biggest mistake beginners make is the slimy, smelly pile. It happens when there is too much wet nitrogen and not enough dry carbon to balance it.
The golden ratio: Aim for 50/50 greens to browns by volume, not by weight.
The greens (nitrogen-rich)
- Grass clippings (mix in well to avoid matting into a slimy layer).
- Vegetable peelings and uncooked fruit scraps from the kitchen.
- Coffee grounds, which act as a free natural accelerator.
- Annual weeds pulled before they have set seed.
- Spent crops from greenhouse borders at the end of the season.
The browns (carbon-rich)
- Cardboard torn into 5-10cm pieces, with all tape and staples removed first.
- Woody prunings shredded down to finger-thick lengths.
- Dried autumn leaves and clean straw.
- Plain paper, egg cartons, and toilet roll tubes.
- Wood ash from a clean log burner (no coal, no painted timber).
Coffee grounds are one of the cheapest accelerators going, but they need rationing. Our guide on using coffee grounds for plants covers safe dosage and which crops respond best.
How to make compost fast: the hot method
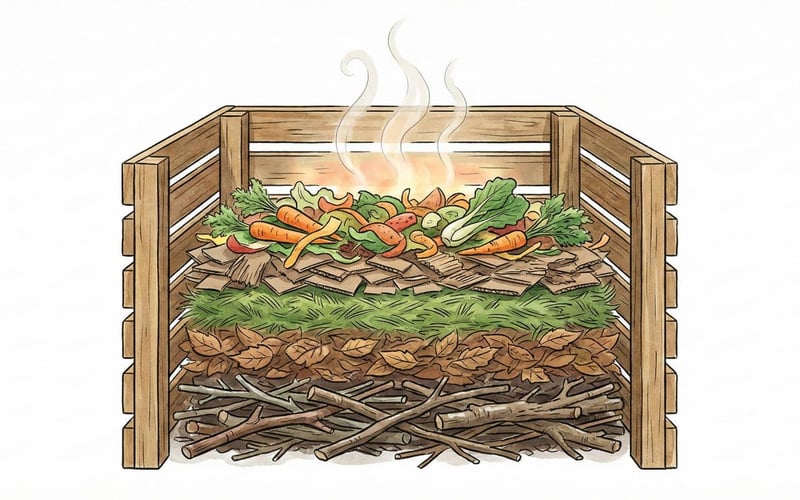
If you want compost ready for spring sowing, build the heap actively. The hot method follows five steps.
- Chop and shred. Smaller pieces have more surface area for bacteria. A garden shredder on woody waste cuts months off the timeline.
- Layer it up. Start with twigs at the base for airflow. Alternate 10-15cm layers of greens and browns up the bin.
- Add an activator. Chicken manure pellets, nettle tea, or a commercial activator kickstarts the bacteria in the first week.
- Monitor moisture. Squeeze a handful. It should feel like a wrung-out sponge. Water lightly if dry, add cardboard if soggy.
- Turn every 7-10 days. Use a garden fork to lift material from the edges into the centre. This adds oxygen and reignites the heat.
A soil thermometer from our greenhouse accessories range tells you exactly what is happening inside the pile. Aim for 55-65C in the centre during the first month, which is hot enough to kill most weed seeds and pathogens.
What not to compost
To keep beds safe and pest-free, leave these items out of the home heap.
- Meat, fish, and dairy. They attract rats, foxes, and flies within hours.
- Cooked food and bread. Same problem as above, even if it looks like plant matter.
- Diseased plants. Tomato blight and clubroot spores survive home composting temperatures. Burn or use the council green bin.
- Perennial weed roots. Bindweed, couch grass, and dock regrow when spread back onto the beds.
- Cat and dog waste. Pathogens harmful to humans, especially around food crops.
- Glossy magazines and printed receipts. Inks and thermal coatings often contain compounds you do not want near vegetables.
- Citrus peel in bulk. Small amounts are fine. Too much makes the heap acidic and slows worm activity.
Troubleshooting common compost problems
Most compost issues come down to one of three things: too wet, too dry, or too imbalanced. Use this table to diagnose and fix the heap.
| Symptom | Probable cause | The fix |
|---|---|---|
| Smells of ammonia or rotten eggs | Too much nitrogen and not enough air | Turn the pile and mix in shredded cardboard or torn paper. |
| Pile is dry and nothing is rotting | Too much carbon or moisture has dried out | Water the heap and add fresh grass clippings or kitchen scraps. |
| Fruit flies swarming | Exposed food waste on the surface | Cover fresh kitchen scraps with a layer of brown leaves or soil. |
| Slugs in the heap | Normal. They help break material down | Pick them out before spreading the finished compost on beds. |
| Too wet and slimy | Rain getting in or poor base drainage | Cover with a lid or old carpet. Add dry woody material to soak up excess. |
| Pile not heating up | Too small, too cold, or short on greens | Build to at least 1m cubed, add an activator, and turn weekly. |
How to use finished compost in every garden type

When is compost ready? It should be dark brown, crumbly, and smell like damp woodland. You should not be able to identify the original ingredients. Once ready, apply it based on where you are growing.
For pots and containers (the potting mix recipe)
Garden compost is too rich and dense to use neat in pots. Mix it on a sturdy bench using this ratio:
- 1 part sifted compost. Provides the slow-release nutrients.
- 1 part garden soil or loam. Adds structure and weight so pots do not blow over.
- 1 part perlite or horticultural grit. Ensures drainage so roots do not rot.
For a deeper look at container vs border vs grow-bag growing, our breakdown of pots, bags, or border growing covers the trade-offs for greenhouse crops.
For raised beds (the no-dig mulch)
Raised beds slump as soil settles and crops are pulled. Instead of digging, top them up with compost.
- In autumn or early spring, spread a 5-8cm layer of compost across the surface.
- Do not dig it in. Worms pull the organic matter down through the soil profile, preserving structure.
- Plant directly into the fresh compost layer the following spring.
For open soil borders
- Clay soil. Dig compost in vigorously to force the dense particles apart and improve drainage.
- Sandy soil. Lay compost as a thick mulch to lock moisture in before summer heat strips it out.
If you are not sure which soil type you have, our guide to UK garden soils walks through the squeeze test and what to add for each type.
For greenhouse borders
Intensive cropping under glass exhausts soil within a single season. Treat greenhouse borders like raised beds: mulch thickly with 5-8cm of compost in autumn after the last harvest, then again in early spring before planting tomatoes, peppers, or cucumbers.
Heavy feeders like tomatoes respond particularly well. Our guide to growing tomatoes in a greenhouse explains the feeding schedule that pairs with a homemade compost mulch.
Matt's Tip: The two-bin system
After 16 years of greenhouse installations, I always tell customers to set up two compost bins side by side. Fill one while the other finishes. By the time you have filled the second bin, the first is ready to dig out. You never run out during the growing season, and you never have to stop adding kitchen scraps because the active bin is full.
| Matt's Pick for the composting workspace | |
| Best For | Mixing compost with perlite and loam for potting blends. The built-in soil tray catches mess. |
| Why I Recommend It | I have used one of these for years. Sieving compost at waist height saves your back, and the slatted lower shelf stores grit and perlite bags out of the way. |
| Price | From £179 |
| Link | View the Elite Potting Bench |
Frequently asked questions
How long does it take to make compost?
A cold heap takes 12-18 months; a hot bin takes 4-6 months. The hot method needs chopped materials, an insulated bin, and a turn every 7-10 days. Cold heaps take longer but need almost no work, which suits anyone with space rather than time.
Can I put weeds in my compost bin?
Annual weeds are fine if they have not gone to seed. Avoid perennial weeds with running roots like dandelion, bindweed, or couch grass. These survive home composting temperatures and regrow when you spread the finished compost back onto beds.
Will my compost bin attract rats?
Not if you avoid meat, dairy, bread, and cooked food. Plant-only compost rarely attracts rodents. Use wire mesh under the base of a wooden bin for extra protection. Tumblers are sealed and almost completely rat-proof.
Can I compost in winter in the UK?
Yes, but decomposition slows below 5C. Insulate the bin with bubble wrap, hessian, or old carpet to retain heat. Keep adding kitchen scraps through winter. The pile will speed up again as soon as spring temperatures arrive.
Do I need a compost accelerator?
Accelerators help but are not essential. They get the bacteria moving in cooler weather. Free natural alternatives include chicken manure pellets, nettle tea, urine diluted 1:10, and fresh coffee grounds, all of which add the nitrogen that feeds the composting bacteria.
How much compost will one bin produce?
A standard 330-litre bin yields around 100-150 litres of finished compost. The pile shrinks by roughly two-thirds as material breaks down. Plan on two bins if you want enough to mulch a typical 6x8 greenhouse border each year.
Can I use homemade compost for seed sowing?
Sift it first and dilute with vermiculite or sharp sand. Garden compost is too rich and lumpy for seed trays. Use a 50/50 mix of sifted compost and vermiculite for propagation. Our greenhouse propagation guide covers the full sowing process.