How to grow Ginger in a Greenhouse
Ginger (Zingiber officinale) grows well in a UK greenhouse but fails outdoors. It needs consistent temperatures of 25-30°C and around 50% humidity for eight to ten months. Plant rhizomes 5cm deep in January or February, keep the soil moist, and harvest when the leaves yellow in October. A single rhizome piece with two or three growth buds produces 300-500g of fresh ginger.
Key takeaways
- Ginger needs a heated greenhouse in the UK — it won't complete its growth cycle outdoors
- Plant in January or February — this gives the full 8-10 months needed before autumn harvest
- Buy organic rhizomes — non-organic supermarket ginger is often treated with growth inhibitors
- Partial shade, not full sun — direct sunlight scorches ginger leaves
- Water two to three times per week — consistent moisture without waterlogging
Installer's Note
We've fitted greenhouses for 16 years and ginger is one of those crops that surprises people. You'd think it needs some elaborate tropical setup, but it doesn't. Any heated greenhouse holding 25°C during the day will grow good ginger. I've grown it in a standard 6x4 Vitavia with a 2KW electric heater and produced 400g per rhizome piece. The key thing most guides skip? Ginger hates direct sun. Put it under the staging shelf or against the shaded wall.
What conditions does ginger need to grow?
Ginger is a tropical plant from Southeast Asia. It needs warmth, humidity and filtered light. The UK climate can't provide these conditions outdoors for the eight to ten months ginger needs to mature. A greenhouse solves all three problems at once.
| Condition | Ideal range | Minimum | Notes |
|---|---|---|---|
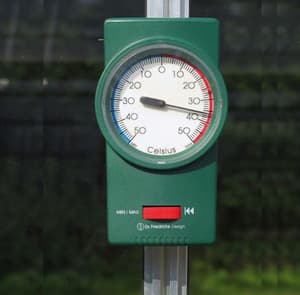
| Day temperature | 25 – 30°C | 15°C | Growth stops below 15°C |
| Night temperature | 18 – 22°C | 15°C | Must stay above 15°C overnight |
| Humidity | 50% | 40% | Mist foliage in dry spells |
| Light | Partial shade | — | Direct sun scorches leaves |
| Soil pH | 5.5 – 6.5 | — | Slightly acidic, like ericaceous compost |
| Pot size | 12 – 15 litres | 10 litres | Rhizomes spread horizontally |
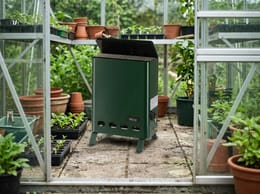
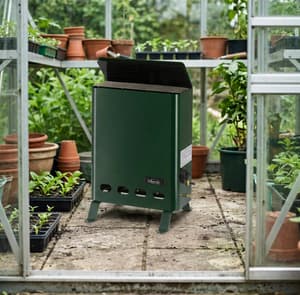
Temperature is the most important factor. If your greenhouse drops below 15°C regularly, ginger growth stalls. A greenhouse heater (from £140) pays for itself if you plan to grow ginger and other tropical crops. Track temperatures with a max-min thermometer so you know what's happening overnight.
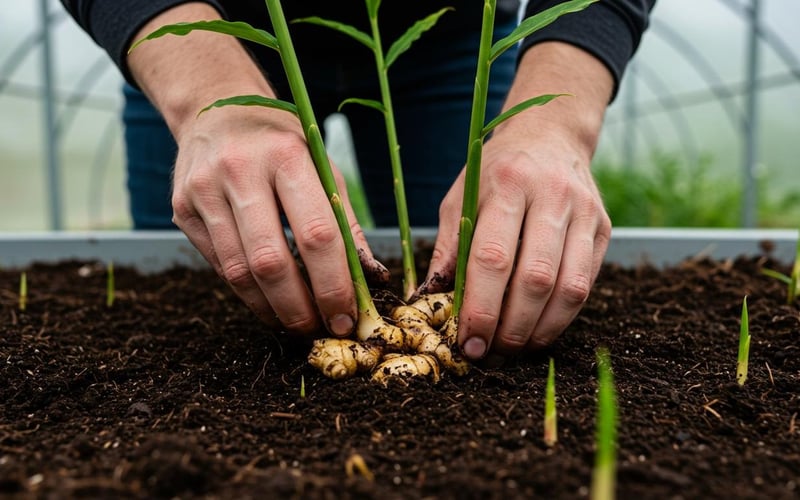
How to plant ginger in a greenhouse
Start in January or February. Buy organic ginger rhizomes from a supermarket or greengrocer. Non-organic ginger is often treated with growth inhibitors that prevent sprouting. Look for firm, plump pieces with visible growth buds — small bumps similar to potato eyes.
Step-by-step planting method
- Soak for 24 hours. Place rhizomes in warm water overnight. This removes any residual growth inhibitors.
- Cut into sections. Each piece needs two or three growth buds. Let cut surfaces dry for 24 hours to form a callus.
- Fill pots with compost. Use a mix of multipurpose compost and perlite for drainage. Pots need to be at least 12 litres — ginger spreads sideways.
- Plant 5cm deep. Place rhizomes with the growth buds pointing upward. Cover lightly.
- Water gently. Moisten the compost without saturating it. Overwatering at this stage causes rot.
- Keep at 20-25°C. A heated propagator speeds up sprouting. Expect shoots in three to four weeks.
Once shoots reach 5-8cm, pot on into their final containers. Space plants 30cm apart if growing multiple pots. Place them under staging or on the shaded side of the greenhouse — not in direct sunlight.
Matt's Tip: Where to position ginger in your greenhouse
Most people put ginger in the sunniest spot because they think "tropical plant = lots of sun." Wrong. In the wild, ginger grows on the forest floor under tree canopy. In your greenhouse, the best position is under the staging shelves or against the north-facing wall. It still gets plenty of light but avoids the scorching afternoon sun that burns leaves brown at the edges.

Caring for greenhouse ginger month by month
| Month | What to do |
|---|---|
| January | Soak and plant rhizomes. Keep at 20-25°C in a heated propagator. |
| February | First shoots appear after 3-4 weeks. Mist foliage to raise humidity. |
| March | Pot on into 12-15 litre containers. Move to greenhouse staging. |
| April – May | Water 2-3 times per week. Begin monthly feeding with tomato fertiliser. |
| June – August | Peak growth. Maintain 25-30°C. Shade from direct afternoon sun. |
| September | Reduce watering. Stop feeding. Leaves begin to yellow. |
| October | Harvest when leaves die back. Save rhizome pieces for next year. |
Watering is the biggest cause of failure. Ginger needs consistent moisture but rots in waterlogged soil. Water at soil level, not overhead. Let the top centimetre dry between waterings. Reduce watering from September onwards — drier soil firms up the rhizomes before harvest.
Feed monthly with a liquid tomato fertiliser (high potassium) from April through August. Apply to damp soil to avoid root burn. Stop feeding in September. Our guide on making your own compost covers how to create nutrient-rich growing media.
Common mistakes when growing ginger
- Overwatering. The number one killer of greenhouse ginger. Waterlogged compost causes rhizome rot within days. Check drainage holes are clear.
- Too much direct sun. Ginger grows on the forest floor in the wild. Full greenhouse sun scorches leaves. Position under staging or use greenhouse shading from May to August.
- Pots too small. Rhizomes spread horizontally. A cramped pot limits yield. Use at least 12-litre containers.
- Using non-organic rhizomes. Supermarket ginger is often sprayed with growth inhibitors. Buy organic or soak for 24 hours to remove residues.
- Harvesting too early. Ginger needs a full 8-10 months. Impatient harvesting gives thin, fibrous rhizomes with weak flavour.
Red spider mite is the most common pest in warm, dry greenhouses. Increase humidity by misting foliage and placing water trays on the floor. Our greenhouse pest control guide covers organic treatments.
Harvesting and storing greenhouse ginger
Harvest ginger when the leaves turn yellow and die back in October. This signals the rhizomes have reached full maturity. Reduce watering for two weeks before harvest to firm up the roots.
Tip the pot out carefully and brush off loose soil. Don't wash the rhizomes until you're ready to use them — unwashed ginger stores longer. Set aside two or three pieces with healthy growth buds for next year's planting. Store these in dry sand in a frost-free spot over winter.
How long does fresh ginger keep?
- Room temperature: two to three weeks in a cool, dark cupboard
- Refrigerated: three to four weeks wrapped in a paper bag
- Frozen: up to 12 months. Grate before freezing for easy portioning.
- Dried: slice thinly, dry in a low oven, store in an airtight jar
What to grow alongside ginger
Ginger grows well with other tropical crops that share its warmth and humidity requirements. Turmeric is the best companion — it needs identical conditions and the two complement each other in cooking. Chillies also thrive in the same temperature range. Our guide on growing chillies in a greenhouse covers setup and care.
Avoid growing ginger alongside garlic, onions or brassicas. These compete for nutrients and prefer different humidity levels. Ginger also pairs badly with tomatoes — tomatoes prefer drier air while ginger needs consistent moisture. If growing both, keep them on opposite sides of the greenhouse.
|
Matt's Pick for growing gingerBest For: maintaining 25°C+ in a 6x8ft greenhouse through the growing season Why I Recommend It: thermostat control means it only fires up when temperature drops below your set point Price: £140 |
Useful kit for growing ginger in a greenhouse
Frequently asked questions
Can you grow ginger outdoors in the UK?
No, ginger won't complete its growth cycle outdoors in Britain. It needs eight to ten months above 15°C, which the UK climate cannot provide. Even in the warmest southern counties, outdoor temperatures drop too low from October through April. A heated greenhouse or conservatory is the only reliable option for UK ginger growers.
How long does ginger take to grow in a greenhouse?
Ginger takes eight to ten months from planting to harvest. Plant rhizomes in January or February and expect to harvest in October when the leaves die back. You can pick "baby ginger" after four to five months for a milder flavour. Full-sized rhizomes need the complete growing season to develop properly.
What size greenhouse do I need for ginger?
A 6x4ft greenhouse is large enough for several ginger plants. Ginger grows 60-90cm tall and each pot needs about 30cm of floor space. A standard 6x4ft greenhouse holds four to six pots. Larger greenhouses let you grow ginger alongside companion crops like chillies and turmeric. Our greenhouse size guide helps with planning.
How much ginger can you harvest from one plant?
A single rhizome piece yields 300-500g after eight to ten months. Start with a piece that has two or three growth buds. Larger starter pieces produce proportionally more. Growing conditions matter — consistent warmth, correct watering and monthly feeding all increase final yield.
Does ginger need a heated greenhouse?
Yes, ginger needs consistent warmth above 15°C to grow. In the UK, this means heating from October through May at minimum. A 2KW electric heater with a thermostat is sufficient for greenhouses up to 8x10ft. Running costs are higher than for cold-hardy crops like grapes or figs. But a single harvest produces ginger worth more than the heating bill.
Related articles
- 25 unusual things to grow in a greenhouse
- Growing vegetables in a greenhouse all year round
- How to heat a greenhouse
- How to grow herbs in your greenhouse
- What to grow in a greenhouse: beginners guide
Browse our full range of greenhouse accessories for heaters, thermometers and staging.