How to Grow Potatoes UK
Potatoes grow in most UK soils and produce 1-2.5kg per plant depending on variety. Chit seed potatoes on a windowsill from late January, planting out first earlies in March, second earlies in April and maincrops in mid-April. Plant tubers 12cm deep, 30cm apart in rows 60cm apart. Earth up stems when they reach 15cm to prevent green tubers. First earlies are ready in 10-12 weeks, maincrops in 18-20 weeks. Container growing suits small spaces with a minimum 30-litre pot.
Potatoes are the most popular crop among UK greenhouse customers. Plant First Earlies outdoors from late March or under glass from February for harvests by May. Space tubers 30cm apart in 12cm deep trenches. One seed potato produces roughly 1kg of crop. Chit tubers for 6 weeks before planting to boost yields. With 16 years of greenhouse fitting experience, we harvest new potatoes 4–6 weeks ahead of outdoor growers every season.
Key Takeaways
- Choose the right variety – Earlies for speed and salads, Maincrops for bulk storage and roasting
- Chit for 6 weeks before planting – start in late January to give tubers a strong head start
- Earth up regularly – prevents green tubers and maximises your total crop count
- Watch for blight – warm, humid UK summers trigger blight so water at the base, not the foliage
- Use your greenhouse – start Earlies under glass in February for harvests weeks ahead of outdoor planting
Installer's Note
We fit greenhouses every week for customers who grow potatoes as their first crop of the year. Even a 6×4 aluminium greenhouse has enough floor space for six 30-litre grow bags. When we install lean-to greenhouses against south-facing walls, the retained warmth lets customers plant tubers as early as late January. By May, they are eating new potatoes while neighbours are still waiting to plant outdoors.
Understanding Potato Types: Earlies vs Maincrop
Before buying seed potatoes, you need to know what you are growing. In the UK, we categorise potatoes by how long they take to mature.
First Earlies
These are the fastest potatoes to harvest. Plant them around late March outdoors, and they will be ready in 10–12 weeks (June or July). They produce smaller, waxy new potatoes that are perfect for salads.
- Why grow them: They are usually harvested before blight becomes a major issue in the UK summer.
- Recommended varieties: Rocket or Swift.
Second Earlies
These take about 13–15 weeks. Plant them in mid-April for a July or August harvest. They are slightly larger than First Earlies but still excellent salad potatoes.
- Recommended varieties: Charlotte or Maris Peer.
Maincrop
These are the long-season potatoes. Planted in mid-April, they take 20 weeks or more and are harvested from August to October. These are your baking and roasting potatoes for winter storage.
- Why grow them: Large yields and excellent storage potential.
- Recommended varieties: King Edward or Maris Piper.
When to Plant Potatoes in the UK
Timing is critical. Plant too early outside and frost will blacken the shoots. Plant too late and you miss the growing window.
| Variety | Plant Outdoors | Harvest | Greenhouse Planting (Forcing) |
|---|---|---|---|
| First Earlies | Late March | June–July | February |
| Second Earlies | Mid-April | July–August | March |
| Maincrop | Mid-April | August–October | N/A (too large for containers) |
If you want a head start, using glass allows you to plant Earlies in bags as early as February. The greenhouse protects them from frost while the soil warms up. Browse our full range of greenhouses for sale to find the right size for your growing plans.
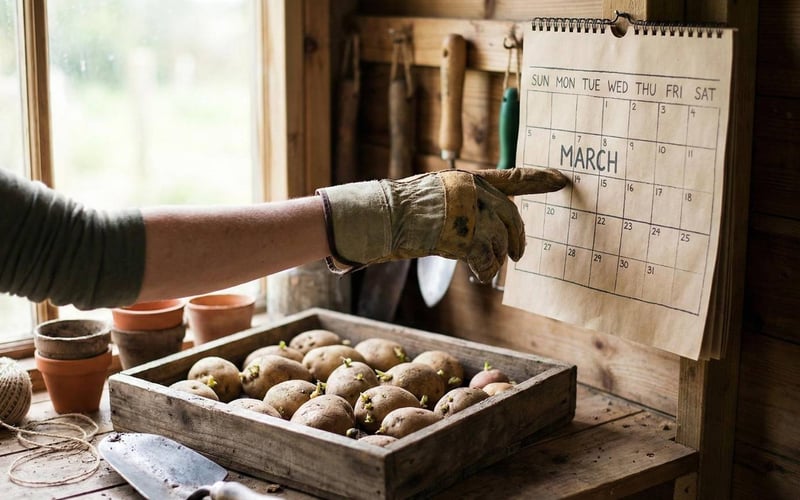
Preparation: Chitting Your Potatoes
Chitting means encouraging the seed potato to sprout before planting. This step is especially important for Earlies to give them the strongest possible start.
How to Chit
- Timing: Start about 6 weeks before planting (late January or early February).
- Location: Place seed potatoes in egg boxes or chitting trays. A potting shed bench is ideal, or a bright windowsill in a cool room.
- Position: Stand them rose end up (the end with the most eyes).
- Environment: Keep them in a cool, light, frost-free place at around 7–10°C.
Matt's Tip: Getting the Right Chit
You want short, stubby green shoots about 2cm long. If the shoots are long, white, and spindly, the tubers are not getting enough light. I move mine to the greenhouse staging shelf where they get bright daylight without direct sun. After 16 years, I have never had a failed chit using this method.
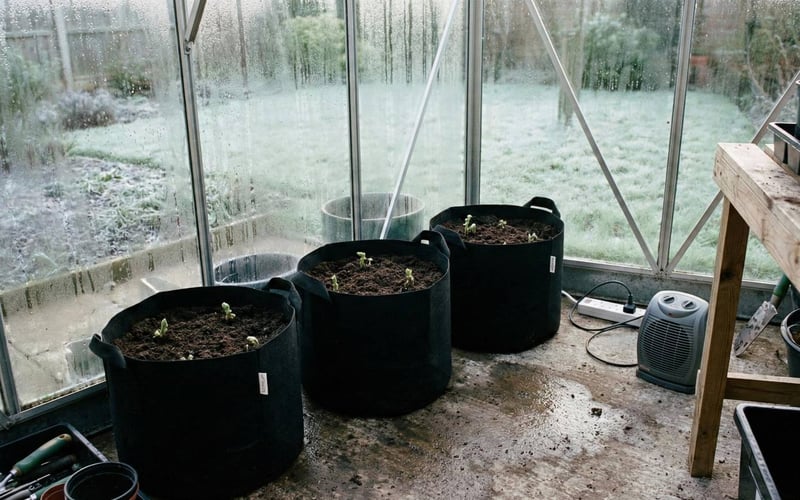
Planting Method 1: The Greenhouse Head Start (Winter Planting)
This method is overlooked by many growers, but it makes a significant difference if you own a greenhouse. By planting in late winter (January or February), you can be eating new potatoes in May.
- Use containers: Use 30-litre pots or dedicated potato grow bags.
- Compost mix: Use a peat-free multi-purpose compost mixed with a handful of potato fertiliser.
- Planting: Place 3 chitted tubers halfway down the bag and cover with 10cm of compost.
- Protection: Keep them in the greenhouse. If a hard frost is forecast, drape horticultural fleece over the bags overnight.
- Watering: Keep the compost moist but not sodden. Rot is the main risk in winter containers.
This method also frees up your greenhouse floor space in time for tomatoes during summer.
Planting Method 2: Growing in the Ground
If you have an allotment or large vegetable patch, growing in the ground is the most cost-effective method.
- Prepare the soil: Dig over the soil in winter. Potatoes thrive in rich soil, so dig in plenty of well-rotted manure or homemade compost.
- Dig trenches: Dig a V-shaped trench about 12cm (5 inches) deep.
- Spacing:
- Earlies: 30cm apart, rows 45cm apart.
- Maincrop: 37cm apart, rows 75cm apart.
- Plant: Place tubers with shoots facing up. Handle gently to avoid snapping the chits.
- Cover: Carefully rake the soil back over the trench to cover the tubers.
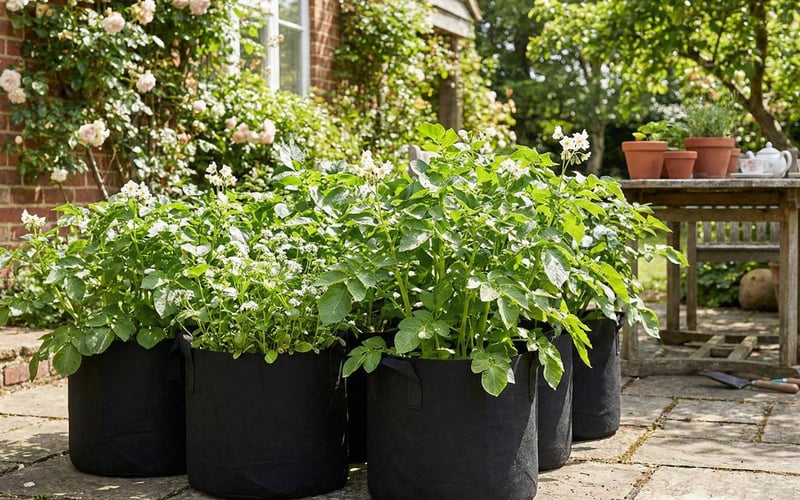
Planting Method 3: Containers and Bags (Small Spaces)
Potatoes thrive in bags on patios or balconies. Container growing is ideal for gardeners without open ground.
- The container: You need at least 30cm depth. Specialised potato bags are a good choice because they fold flat for storage in winter.
- Drainage: Ensure there are holes in the bottom. Add a layer of gravel if using a plastic pot.
- The layering technique:
- Fill the bottom 10cm with compost.
- Place 3 tubers (for a 30–40 litre bag).
- Cover with another 10cm of compost.
- As the green shoots appear, keep adding more compost (earthing up) until you reach the top of the bag.
Important: Do not overfill the bag with seed potatoes. Three tubers in a standard bag yield more total weight than five. Extra tubers compete for space and stay small.
Essential Care: Earthing Up, Water, and Feed
Earthing Up
Whether in bags or trenches, you must earth up regularly. As the stems grow, draw soil up around them to create a ridge.
- Frost protection: Earthing up shields young shoots from late frosts.
- Prevents green tubers: Light turns exposed potatoes green and toxic. A thick ridge of soil blocks all light from reaching the developing tubers.
Watering
Potatoes are thirsty plants, especially when the tubers begin to swell (usually just after flowering).
- Ground: Water heavily once a week in dry spells rather than a light sprinkle every day.
- Containers: These dry out quickly. In hot UK summers, you may need to water daily.
Feeding
- Ground: If you manured the soil beforehand, additional feed is usually unnecessary.
- Containers: Compost nutrients deplete after about 6 weeks. Use a liquid high-potash feed (tomato feed works well) every fortnight once foliage is established.
Dealing with Pests and Diseases
Potato Blight
Blight is the most serious threat for UK potato growers. It is a fungal disease spread by wind in warm, humid weather (often called Smith Periods).
- Symptoms: Brown patches on leaves surrounded by a pale halo. Tubers turn to reddish-brown mush.
- Prevention: Water the soil, not the leaves. Ensure good airflow around the plants. Growing First Earlies means you harvest before blight typically arrives.
- Treatment: There is no cure once blight takes hold. Cut all foliage down to ground level immediately to stop it travelling to the tubers. Wait 2 weeks, then dig up the potatoes.
Slugs
Slugs tunnel into Maincrop potatoes underground, leaving holes and causing rot.
- Solution: Nematodes are the best organic defence. Apply them to the soil in spring before planting.
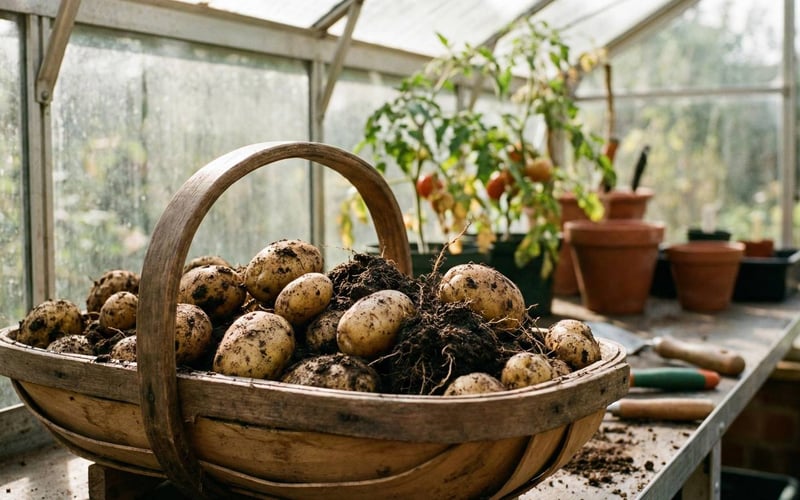
Harvesting and Storage
When to Harvest
- Earlies: Wait until flowers open or buds drop. Carefully dig with your hand to check the tuber size. Harvest as needed for fresh eating.
- Maincrop: Wait until the foliage turns yellow and dies back. Cut the foliage down and leave the potatoes in the ground for 10 days. This sets the skins, making them far better for long-term storage.
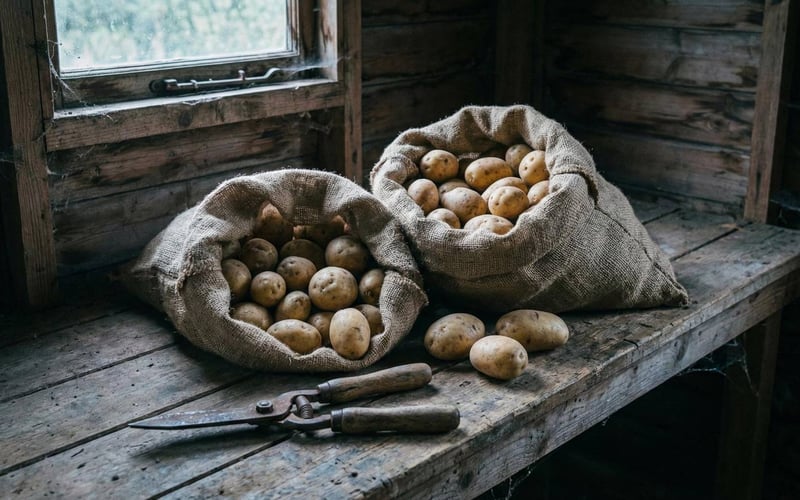
Storing Your Crop
Once dug up, let them dry on the surface for a few hours (not in direct sun). Store in hessian sacks or paper bags. Never use plastic, or they will sweat and rot. Keep them in a cool, dark, frost-free place. A potting shed or garage works well, provided it does not freeze. Check them regularly and remove any that have gone soft.
Growing garlic in a greenhouse is an excellent follow-on crop. Plant cloves in the space you have just cleared for a late autumn harvest.
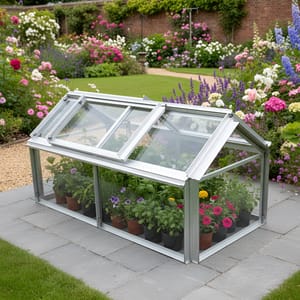
Using a Cold Frame for Early Potatoes
A cold frame is a practical alternative if your greenhouse is already full. Place chitted tubers in containers inside the cold frame from February. The low profile traps heat close to the compost surface. Prop the lid open on warmer days to prevent overheating. We regularly recommend cold frames to customers who want to extend their growing season without dedicating full greenhouse floor space.
|
Matt's Pick for Early Potato GrowingElite Min E Lite 4x2 Cold Frame Best For: Chitting seed potatoes and forcing early harvests in containers from February onwards. Why I Recommend It: I have used this cold frame on customer installations where greenhouse space is tight. The 4ft x 2ft footprint holds six 10-litre pots comfortably, and the aluminium frame needs zero maintenance. The hinged lid makes daily ventilation simple. I have seen customers harvest new potatoes a full month earlier than outdoor growers. Price: £249 |
Summary
Growing potatoes in the UK is a rewarding cycle that can keep your kitchen stocked for months. The principles stay the same whether you grow under glass or in a raised bed. Prepare the soil, protect from frost, earth up regularly, and water well.
What is the best month to plant potatoes in the UK?
Late March to mid-April is the ideal outdoor planting window. This timing avoids the worst of the UK frost risk while giving tubers the full growing season. In a greenhouse, you can plant First Earlies as early as February for a May crop. Southern England gardeners can sometimes push outdoor planting to mid-March in sheltered spots.
Do I really need to chit potatoes?
Chitting is recommended for First and Second Earlies. It speeds up the harvest by 2–3 weeks compared to unchitted tubers. For Maincrops, modern trials suggest chitting makes less difference to final yield. Many experienced growers (ourselves included) still chit Maincrops to check the tubers are viable before committing them to the ground.
How many potatoes do you get from one plant?
One seed potato typically produces about 1kg of harvest. The exact yield depends on variety, spacing, and growing conditions. In a grow bag with 3 tubers, expect around 2–3kg of potatoes if watered and fed correctly. First Earlies produce fewer but earlier tubers. Maincrops give the heaviest total yields per plant.
Can I grow potatoes in supermarket bags?
Yes, strong reusable bags work as potato containers. You must punch plenty of drainage holes in the bottom first. If water pools in the bag, the potatoes will rot within days. Dedicated potato growing bags are deeper and have access flaps for easier harvesting.
How often should I water potatoes in bags?
Check container potatoes every 2–3 days in spring. In the height of summer, check daily. If the compost pulls away from the side of the bag, it is too dry and needs immediate watering. Consistent moisture prevents scab on the potato skins and promotes even tuber development throughout the growing season.
Frequently asked questions
When should I plant potatoes in the UK?
Plant first earlies from mid-March, second earlies in April, and maincrops in late April. Start chitting seed potatoes in January by standing them in egg boxes on a cool windowsill. Shoots should be 2-3cm long before planting.
How deep do you plant potatoes?
Plant seed potatoes 10-15cm deep with shoots pointing upward. Space first earlies 30cm apart in rows 45cm apart. Maincrops need 38cm spacing with 75cm between rows. Earth up when shoots reach 20cm tall.
Can you grow potatoes in a greenhouse?
Yes, plant potatoes in bags or containers in a greenhouse from February. This gives a harvest 4-6 weeks earlier than outdoor planting. Use 40-litre bags with multipurpose compost and keep frost-free overnight.
How long do potatoes take to grow?
First earlies take 10-12 weeks, second earlies 13-15 weeks, maincrops 18-20 weeks. Harvest first earlies when flowers open. Maincrops are ready when foliage yellows and dies back in August or September.
Why are my potatoes green?
Potatoes turn green when exposed to light during growing or storage. Green skin contains solanine, which is toxic. Earth up regularly to keep tubers covered. Store harvested potatoes in paper sacks in a dark, cool place.
Related Articles
- Growing Tomatoes in a Greenhouse
- How to Grow Carrots
- How to Grow Garlic in a Greenhouse
- How to Make Your Own Compost
- What Can I Grow in the Greenhouse in Winter
Questions about growing potatoes or choosing a greenhouse? Contact our team at info@greenhousestores.co.uk