How to Build a Brick Plinth for a Greenhouse: 7 Steps from UK Installers
A brick plinth for a greenhouse is a single course of solid bricks laid on a concrete footing. The plinth gives the aluminium frame a level, raised base that keeps it clear of ground moisture. The footing trench must be 210mm wide by 100mm deep. Use a 1:5 cement-to-ballast concrete mix, a 3:1 sand-to-cement mortar, and check the base is square by measuring equal diagonals.
Key Takeaways
- Dig a footing trench 210mm wide × 100mm deep, deeper on soft ground.
- Pour a 1:5 cement-to-ballast concrete foundation and let it cure for a full week.
- Lay one course of solid bricks (never frogged or perforated) bedded in 3:1 mortar.
- Use a string line to keep courses straight and a tape measure to check diagonals are equal.
- Point every joint, then prepare the interior with weed membrane, paver walkway and gravel.
Shop the Vitavia Greenhouse Range →
Installer's Note
I'm Matt W. I have been installing greenhouses with the Greenhouse Stores team for 16 years, since 2009, and we have fitted brick plinths under more than two hundred greenhouses across the Midlands and northern England. The single mistake we see homeowners make is rushing the concrete cure. Pour your footing on a Saturday and leave it untouched until the following Saturday before laying a single brick. Concrete that has not fully cured flexes under the weight of the brickwork, which cracks the mortar joints at the corners. Give the foundation the time it needs and you will not have to come back to it.
What is a brick plinth and why use one?
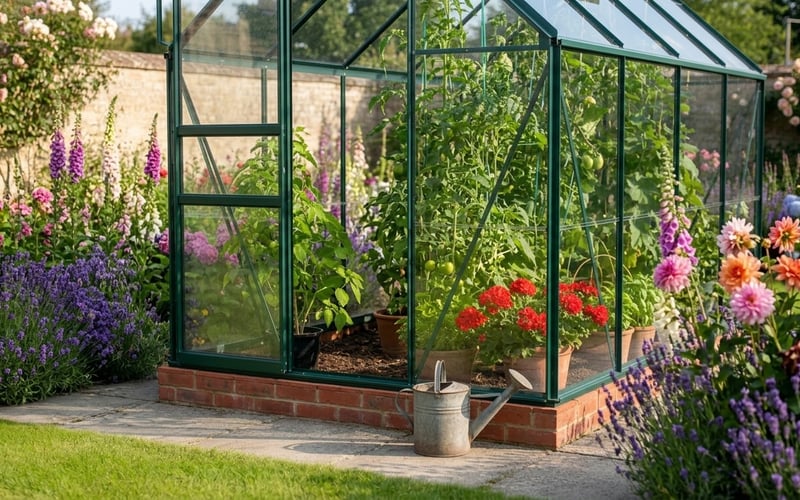
A brick plinth is a single course of solid bricks laid on a concrete footing to form the base of a greenhouse. The plinth raises the aluminium or steel frame around 75mm above the ground, which keeps the frame clear of standing water and rising damp.
Most aluminium greenhouses sit directly on a paving slab perimeter using the manufacturer's base kit. A brick plinth is the right choice when the ground slopes, when the site holds water in winter, or when you want a permanent base that lasts thirty years rather than ten. It also lifts the eaves height by about a brick, which adds useful headroom inside a small greenhouse.
For a side-by-side cost and durability breakdown of every base type, read our greenhouse foundation types comparison guide.
Greenhouse base options compared
| Base type | Material cost (8x6) | Difficulty | Lifespan | Best for |
|---|---|---|---|---|
| Brick plinth (1 course) | £120-£180 | Medium | 30+ years | Most aluminium greenhouses on sloping or wet sites |
| Concrete slab | £90-£140 | High | 40+ years | Wooden greenhouses, heated greenhouses with shelving load |
| Paving slabs (perimeter) | £60-£100 | Low | 10-15 years | Compact greenhouses on level, free-draining ground |
| Dwarf wall (3+ courses) | £300-£450 | High | 40+ years | Period-style greenhouses needing extra height |
| Manufacturer's base kit | £80-£160 | Low | 20+ years | Standard installs on stable, level ground |
Materials and tools you'll need
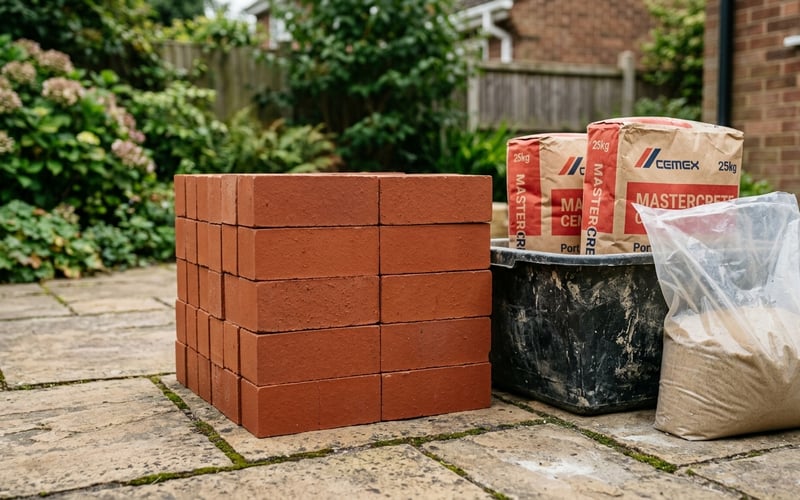
For a single-course plinth under an 8x6 greenhouse, expect to use roughly 42 solid bricks, three 25kg bags of cement, six 25kg bags of ballast, and one 25kg bag of building sand. A 10x8 greenhouse needs around 56 bricks; a 12x8 takes 64.
Materials:
- Good quality solid bricks (no frogs, no perforations)
- Cement (general purpose Portland)
- Ballast (mixed sand and gravel)
- Soft building sand
- Clean mixing water
- Timber boards for shuttering on soft ground
Tools:
- Spade and shovel
- Spirit level (at least 600mm)
- Tape measure (5m minimum)
- String line and pegs
- Builder's square or framing square
- Pointing trowel and laying trowel
- Mortar mixing tub or small cement mixer
- Rubber mallet
- Timber straightedge
Step-by-step build process
1. Mark out and dig the footing trench
Set out the trench using the base plan supplied with your greenhouse, not by measuring the assembled frame. The brickwork dimension is brand-specific. For Vitavia greenhouses the plinth sits slightly inside the frame footprint by a few millimetres each side. For Elite greenhouses the plinth matches the external frame dimension exactly. Transfer the dimensions from the base plan onto the ground using spray paint or string lines and pegs.
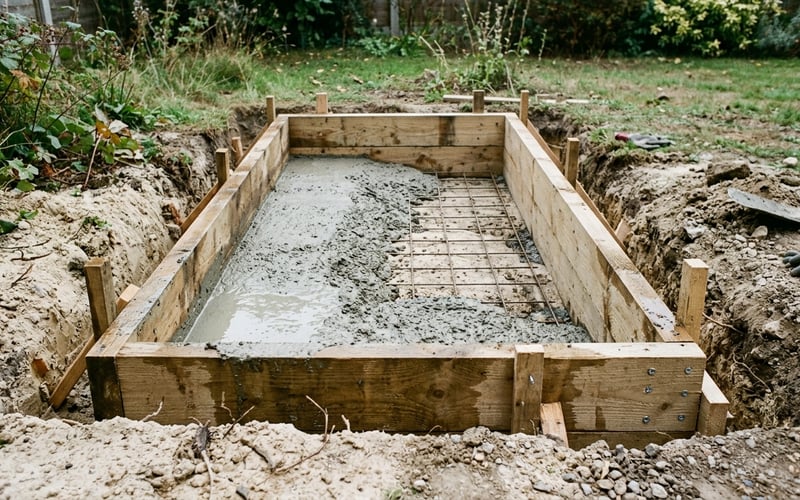
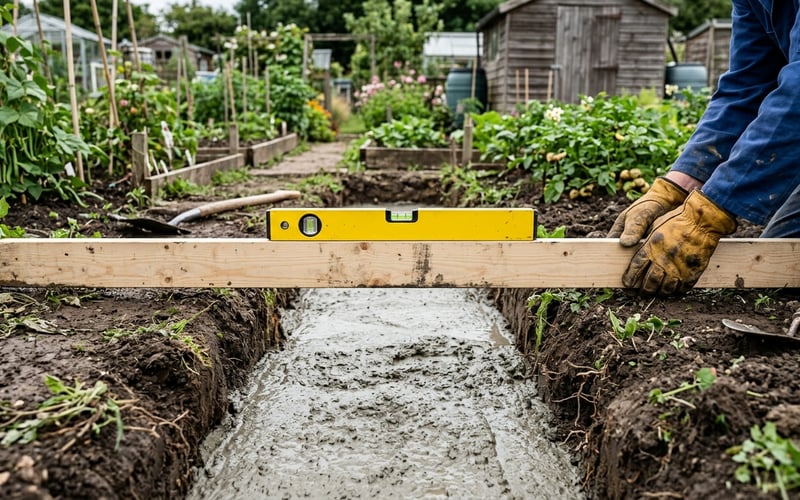
Dig a trench around the perimeter to a minimum width of 210mm and a minimum depth of 100mm. The trench needs to be wider than a single brick so the footing supports the brickwork on both sides, and deep enough to take a layer of concrete that will not crack under load.
On heavy clay the trench walls hold vertical and you can dig straight. On sandy or loamy ground the sides will collapse before you finish. Set timber shuttering boards inside the trench to hold the shape until the concrete is poured.

Shop Vitavia Greenhouse Bases →
2. Use timber shuttering on soft ground
If your soil collapses into the trench, install timber shuttering before pouring concrete. Cut 100mm-wide timber boards to length and screw them together at the corners to form a rectangular frame that sits inside the trench at the correct height.
Across the sandy soils we hit around the Cheshire plain, shuttering is non-negotiable. On Staffordshire clay we rarely bother because the trench holds its shape from dig to pour. Check your local soil before ordering timber.
Book Our Greenhouse Installation Service →
3. Pour and level the concrete foundation
Mix the concrete at a ratio of one part cement to five parts ballast. Use a small cement mixer for anything larger than an 8x6 plinth. Hand mixing eight or more barrows of concrete becomes hard work very fast.
Add water gradually until the mix holds its shape on a shovel without slumping. Pour the concrete into the trench in sections, working a shovel up and down to remove air pockets along the sides.
Lay a timber straightedge across the trench edges with a spirit level on top. Use it to tamp the concrete down to a consistent depth all the way round. Once the footing is level and at the right height, leave it alone. Cover with polythene if rain is forecast. Allow a full seven days before laying bricks.
Shop the Vitavia Apollo Greenhouse Range →
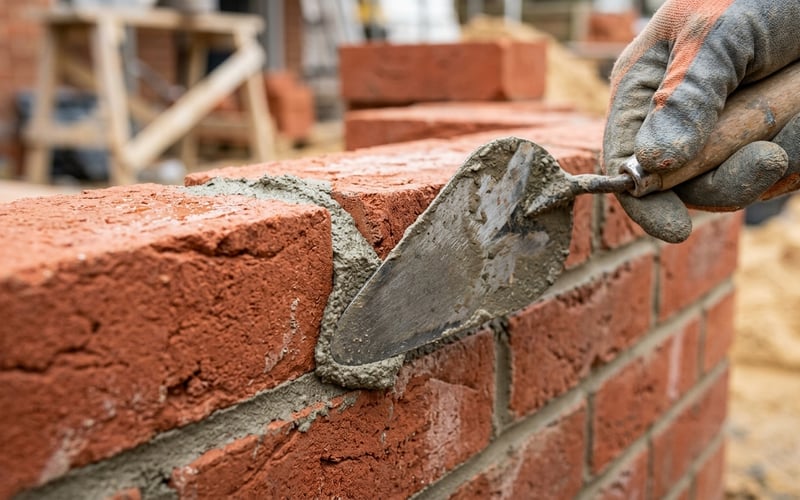
4. Choose the right bricks and mortar mix
Use good quality solid bricks only. Never use bricks with frogs (the indent on top) or perforations (the holes through). Frogged and perforated bricks trap water at the ground line and freeze-crack in a single UK winter.
Engineering bricks are the safest choice for a greenhouse plinth because they absorb very little moisture. Class B engineering bricks are widely available from any builders' merchant and cost around £0.80 to £1.20 each in 2026.
Mix mortar at three parts soft building sand to one part cement. Add water until the mix has the consistency of thick toothpaste, not soup. A wet mortar will slump as you lay each brick and the courses will never level.
Shop Elite Aluminium Greenhouses →
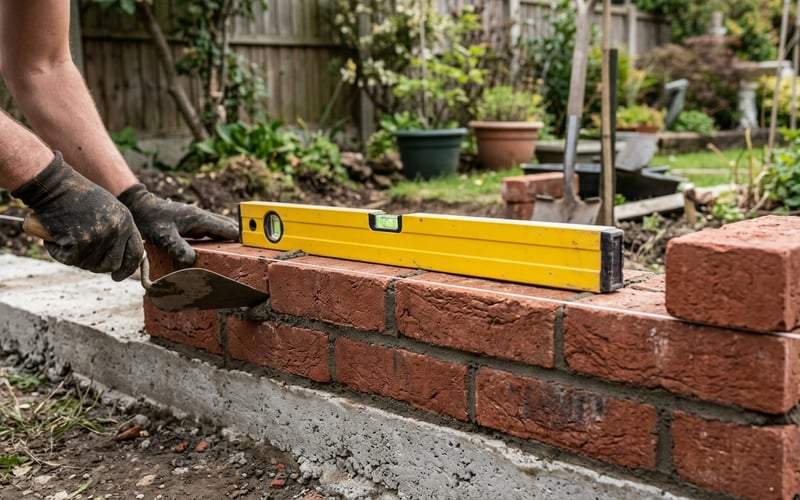
5. Lay the first course of bricks
Start at one corner. Spread a 10mm to 15mm bed of mortar on the cured concrete and set the first brick centrally on the footing, square to the line of the trench. Tap it down with the handle of your trowel or a rubber mallet until it sits firm. Check it is level along its length and across its width.
Walk to the opposite end of the same side and lay the second corner brick at the dimension shown on your base plan. Check this brick is level both in itself and with the first brick. A long spirit level laid across both will tell you.
Run a string line tight between the top outside edges of the two corner bricks. Lay the bricks between them, using the string as a guide so every brick sits at exactly the same height and on the same line.
Shop Swallow Wooden Greenhouses →
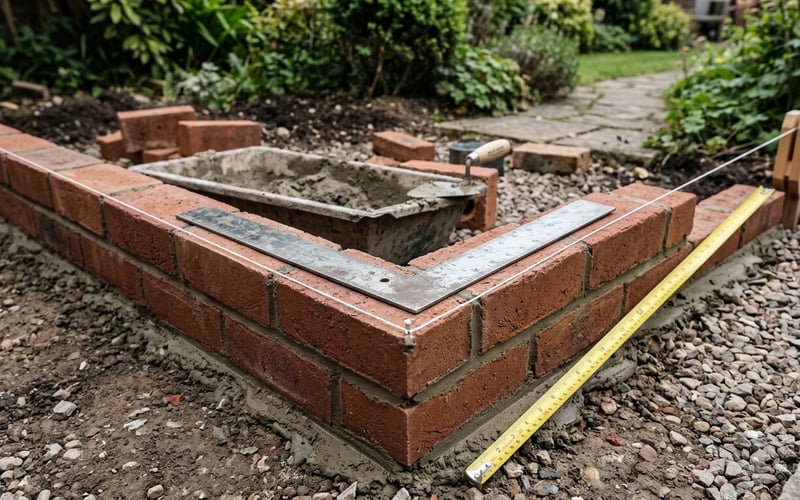
6. Turn the corner and lay the second side
Use a tape measure and builder's square to set up the next side at exactly 90 degrees to the first. Lay the far corner brick at the correct dimension for the new side and check it sits level with the first row.
Set a new string line between this corner brick and the original corner, and fill in the bricks between them just as before. Repeat on the third and fourth sides until the rectangle is closed.
Shop Janssens Royal Victorian Greenhouses →
7. Square the base and point the joints
Measure the diagonals across the rectangle from corner to corner. If both diagonals are exactly equal, the base is perfectly square. If one is longer than the other, the base is out of square. Tap the longer corner bricks gently inward with a rubber mallet until the two measurements match.
Do this check before the mortar starts to set. Aluminium greenhouse frames are precision-built, and a base that is out of square by even 10mm will fight you when the panels go in.

Shop Palram Canopia Polycarbonate Greenhouses →
Once the rectangle is square, point the vertical and horizontal joints. Use a pointing trowel to press fresh mortar firmly into any gaps and finish each joint with a smooth, slightly recessed profile that sheds water. Brush off any excess mortar from the brick faces with a soft brush once it has stiffened but before it sets hard. Leave the brickwork to cure for a minimum of 24 hours, and ideally 48 hours, before bolting on the greenhouse frame.
For the full assembly process once the plinth is built, read our step-by-step greenhouse installation guide.
Matt's Tip: Test the mortar with your thumb
The best moment to point is when you can press the mortar with your thumb and leave a slight imprint without smearing. Too soft and the pointing slumps out of the joint. Too hard and you need a wire brush to clean off the excess. We aim for that window roughly two to three hours after laying.
Shop the Vitavia Neptune Greenhouse →
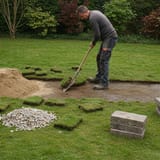
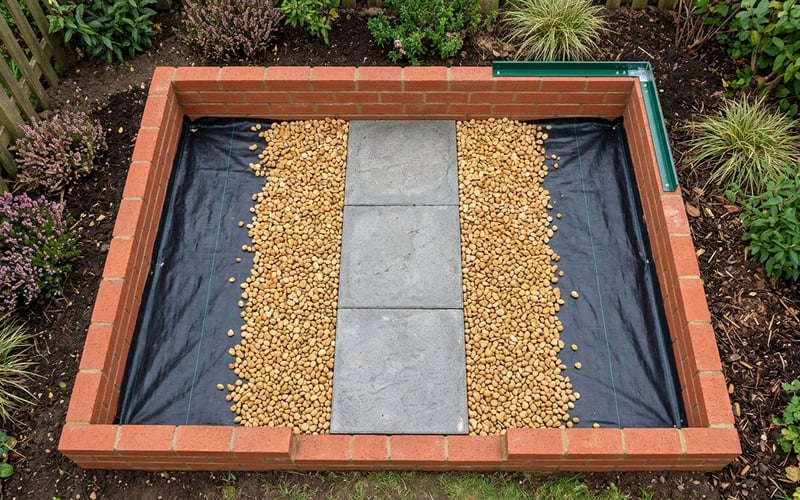
How to prepare the interior floor of your greenhouse
Once the plinth has cured, prepare the ground inside before you assemble the frame. A neat interior layout saves hours of cramped, awkward work once the glass is in.
Level the soil within the plinth using a rake and the back of a shovel. Lay a heavy-duty woven weed-suppressing membrane across the whole floor area, lapping it 50mm up the inside of the bricks to stop weeds tracking in at the edges.
Lay a central paver walkway down the middle of the greenhouse. Two 600mm x 600mm paving slabs wide is plenty for an 8x6. Fill the rest of the interior either side of the walkway with 20mm decorative gravel to a depth of around 50mm.
The gravel and paver combination is functional, not decorative. Spilled water from watering cans soaks straight through the gravel into the soil below. That lifts humidity inside the greenhouse on hot days while keeping the walkway clean and dry underfoot. Read our guide on how to prepare the ground for a greenhouse base for more on getting the site ready before assembly.
Shop Greenhouse Staging & Shelving →
Common mistakes we see when homeowners build a brick plinth
- Using frogged or perforated bricks. They look fine for two seasons, then water sits in the recesses, freezes and splits the brick. Solid bricks only.
- Skipping the concrete footing. Bricks laid straight onto soil sink at the corners within a year. The footing is non-negotiable.
- Mixing mortar too wet. A soup-like mortar will not hold a brick level. Aim for thick toothpaste consistency.
- Not checking diagonals. A base that is out of square forces the aluminium frame to twist. Every glazing joint then leaks.
- Building before the concrete has cured. Concrete reaches only around 65-70% of its design strength at seven days, and that is the realistic minimum. Loading it sooner is the single most common cause of plinth failure.
Matt's Pick: a greenhouse that suits a brick plinth base
Matt's Pick for a brick plinth install
Best For: First brick-base greenhouse build in a UK family garden
Why I Recommend It: The Vitavia Venus 5000 has a square, low-profile base that drops cleanly onto a single course of bricks. We fit more of these onto brick plinths than any other model.
Price: £649
For larger ranges and other shapes that work on a brick plinth, browse our full range of aluminium greenhouses.
Frequently asked questions
How deep should a greenhouse foundation be?
The footing trench should be a minimum of 100mm deep. On soft, sandy, or waterlogged ground, dig deeper to 150mm or 200mm. Consider adding a hardcore sub-base of compacted MOT Type 1 before pouring concrete. Always check your specific greenhouse manufacturer's base plan for any model-specific minimums.
Can I use engineering bricks for a greenhouse plinth?
Yes, and engineering bricks are the best choice for a greenhouse plinth. Class B engineering bricks absorb less than 7% moisture by weight, which means they resist frost damage at the ground line where most plinth failures start. Class A is even more water-resistant but harder to source and more expensive.
Do I need timber shuttering for the concrete footing?
Only if your soil is sandy, loamy, or otherwise loose. On heavy clay or compacted fill, the trench walls will hold vertical without any support. On free-draining sandy or silty ground, install 100mm timber boards inside the trench before pouring to stop the sides collapsing into wet concrete.
How long should the concrete cure before I lay bricks?
Wait at least seven days before laying bricks on the concrete footing. Although surface-set concrete will take light foot traffic at 24 to 48 hours, it has reached only around 40% of its design strength at that point. Loading it with brickwork too early causes the footing to flex and crack at the corners.
What is the difference between a brick plinth and a dwarf wall?
A brick plinth is a single course of bricks; a dwarf wall is three or more courses high. Plinths raise the greenhouse around 75mm and suit standard aluminium greenhouses. Dwarf walls raise the base 225mm to 450mm and are used for period-style greenhouses where the lower glazing is replaced by a solid masonry section.
Does a brick plinth need a damp-proof course?
No, a single-course brick plinth does not need a DPC. A single course is low enough that capillary rise from the soil rarely reaches the aluminium frame, and the frame itself is non-porous, so a DPC is not normally specified for greenhouse plinths. On dwarf walls of three courses or more, fit a DPC between the second and third courses.
How many bricks do I need for an 8x6 greenhouse plinth?
Around 42 standard solid bricks for a single-course 8x6 plinth. A 6x4 takes roughly 30 bricks, an 8x8 takes 48, a 10x8 takes 56, and a 12x8 needs 64. Always add 10% on top for cuts, breakages, and the odd brick rejected for chipped corners.
Related articles
- How to Build a Concrete Base for a Greenhouse: A Simple DIY Guide
- How to Build a Paving Slab Base for a Greenhouse
- 10 Common Greenhouse Installation Mistakes (and How to Avoid Them)
- How to Set Up a New Greenhouse: First-Time Owner's Checklist
- How Long Does a Greenhouse Last? UK Lifespan by Material and Brand