How to Dismantle a Greenhouse: Step-by-Step Guide
Dismantling a greenhouse takes 2-4 hours for two people on a standard 6x8 aluminium model. The key rule is to work from the top down: roof glass first, then side glass, then the door, then the frame. After dismantling over 500 old greenhouses during replacement installations, we have a clear system that minimises breakage and keeps everyone safe. Glass is the biggest hazard. One slip can cause a serious cut. This guide covers every step, from safety equipment to disposing of the old frame.
Key Takeaways
- Always work top to bottom: roof glass, then side glass, then door and vents, then the frame. Never unbolt the frame with glass still in it.
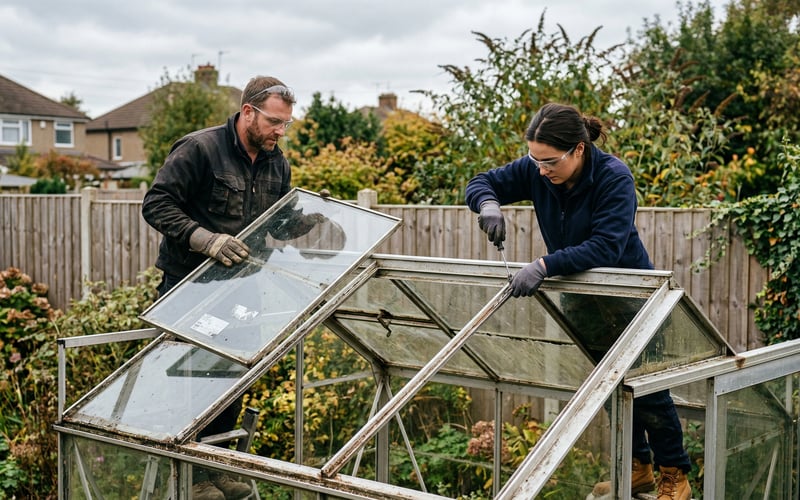
- You need two people. One holds the glass while the other removes clips. Solo dismantling risks dropped panes and serious cuts.
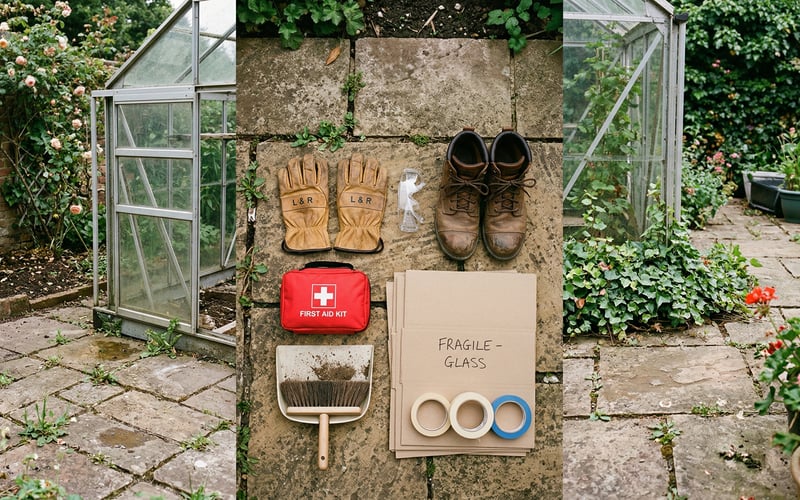
- Wear thick leather gloves, safety glasses and steel toe cap boots. Greenhouse glass (especially horticultural) breaks into razor-sharp shards.
- Label every frame section with masking tape if you plan to reassemble. Take photos of every junction before unbolting.
- Budget 2-4 hours for a 6x8, 4-6 hours for an 8x12, and a full day for anything over 10ft wide.
Installer's Note
We take down old greenhouses nearly every week as part of our replacement service. The most common injury we see on DIY dismantles is glass cuts to the forearms. Greenhouse glass is thin and the edges are sharp, especially on older horticultural glass panes. The second most common problem is a dropped roof pane landing on someone's foot. Proper gloves and boots are not optional. They are the difference between a safe afternoon's work and a trip to A&E.
What tools and safety equipment do you need to dismantle a greenhouse?
The right equipment makes dismantling faster and safer. Most of what you need is already in the shed. The one thing worth buying if you do not have it is a pair of thick leather rigger gloves. Thin gardening gloves are not enough for handling glass.
| Item | Why You Need It | Essential? |
|---|---|---|
| Thick leather gloves | Glass edges cut through thin gloves instantly | Yes |
| Safety glasses | Glass fragments fly when panes crack during removal | Yes |
| Steel toe cap boots | A dropped glass pane on a trainer will break toes | Yes |
| Long sleeves | Protects forearms when reaching overhead for roof panes | Yes |
| Cordless drill/driver | Faster than a spanner for removing corroded bolts | Recommended |
| Socket set (10mm, 13mm) | Most greenhouse bolts are 10mm or 13mm hex head | Yes |
| Flat-head screwdriver | For prying out glazing clips and spring clips | Yes |
| Pliers | For stubborn clips and bent fixings | Recommended |
| WD-40 or penetrating oil | Loosens corroded bolts. Apply 30 minutes before starting. | Recommended |
| Masking tape and marker pen | For labelling frame sections if reassembling | If reassembling |
| Cardboard sheets | Place between stacked glass panes to prevent scratches | If keeping glass |
| Dustpan and stiff brush | For sweeping broken glass fragments from the base | Yes |
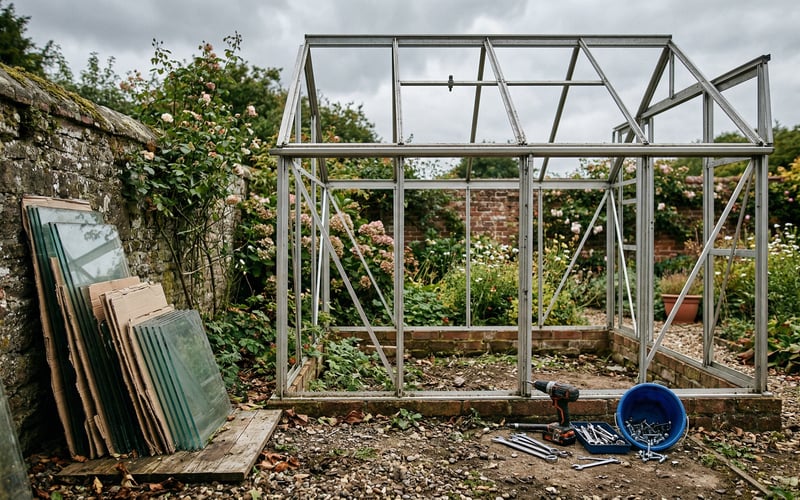
Step 1: Prepare the greenhouse and surrounding area
Clear everything out of the greenhouse before you start. Remove all plants, pots, staging, shelving, and accessories. Disconnect any electrical supply at the consumer unit. Remove the automatic vent openers. Clear a space outside for stacking glass and frame sections.
If you have staging or shelving, set it aside. If your new greenhouse is the same brand, greenhouse staging often fits across models.
Lay a dust sheet or old carpet on the ground next to where you will stack the glass panes. This gives a soft landing surface and stops panes sliding on concrete or paving.
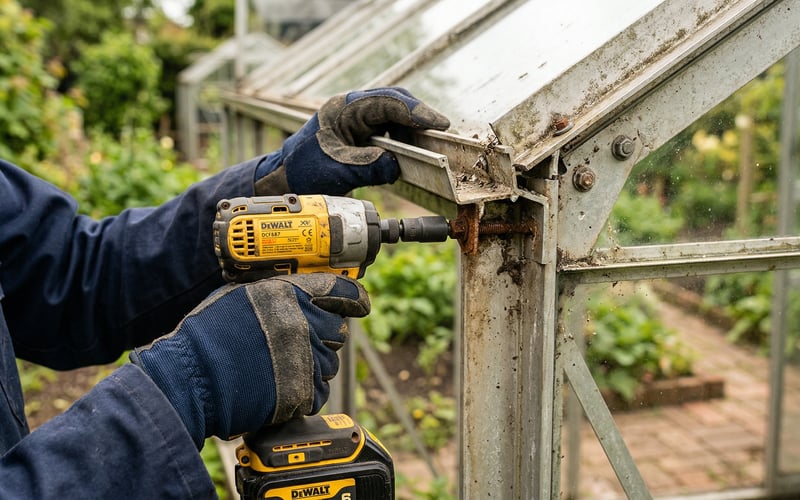
Matt's Tip: Spray Bolts the Night Before
Go round the greenhouse the evening before and spray every visible bolt head with WD-40 or Plus Gas. Greenhouse bolts sit outdoors for years and the aluminium corrodes around the steel bolt. Twenty minutes of soaking turns a snapped-bolt nightmare into a ten-second undo. I have seen customers spend three hours fighting corroded bolts that ten minutes of penetrating oil would have solved.
Step 2: Remove the roof glass first
The roof comes first because it is the most dangerous section. Overhead glass panes can slide out unexpectedly if the frame moves while you are working on the sides. Removing them first eliminates the biggest risk.

Here is the process:
- Start at the ridge. Work from the top of the roof downward, one pane at a time.
- Remove the glazing clips. Use a flat-head screwdriver to prise out spring clips or W-clips. On Vitavia and Halls greenhouses, these are Z-shaped spring clips that hook into the glazing bar channel. On Elite greenhouses, they are pre-formed overlap clips.
- Slide the glass upward. Most roof panes slide up toward the ridge to release from the lower glazing bar, then lift out. One person pushes up from inside while the other receives the pane from outside.
- Pass the pane to your helper. Never let go of a glass pane until someone else has hold of it. Wet glass is extremely slippery.
- Stack panes vertically. Lean them against a wall at a slight angle. Place cardboard between each pane. Never stack glass flat. A flat stack flexes under its own weight and the bottom pane cracks.
If any panes are cracked or chipped, remove them with extra care. Wrap them in newspaper before moving. Dispose of broken greenhouse glass at your local recycling centre. Do not put it in household recycling bins.
Step 3: Remove the side and end glass
Once the roof is clear, work down the sides. Side panes are easier to handle because you are working at ground level. On most aluminium greenhouses, side panes overlap each other from top to bottom. Start at the top of each side and work down, removing the overlap clips as you go.
End panels (the gable ends) often have shaped or cut glass panes around the door frame and the apex. These are more fragile because of the angles. Handle them with particular care.
For a detailed look at the different glazing types and how they affect the process, see our guide on glass vs polycarbonate greenhouses. Polycarbonate panels are lighter and virtually unbreakable, making them much easier to remove.
Step 4: Remove the door and vent windows
Doors and vents come off after the main glazing. Most greenhouse doors lift off their runners. Sliding doors simply slide to one end and lift up out of the bottom track. Hinged doors have two or three hinge bolts to undo.
Roof vents usually have a hinge bar bolted along the ridge. Remove the bolts and the entire vent lifts away as a single unit (frame + glass together). If you have automatic vent openers fitted, remove the wax cylinder first. They can be reused on a new greenhouse. Our Vitavia automatic vent openers at £46 are compatible across most Vitavia and Halls models.
Step 5: Dismantle the aluminium frame
With all the glass removed, the frame is safe to dismantle. Work from the top down: ridge bar first, then roof bars, then eave bars, then upright posts, then the base.
- Remove the ridge bar. This is the horizontal bar running along the top of the roof. It is bolted at each end to the gable frame and along its length to each roof bar. Undo all bolts and lift away.
- Remove the roof bars. Each one is bolted to the eave bar at the bottom and the ridge at the top. With the ridge removed, they lift straight off the eave.
- Remove the eave bars. These horizontal bars connect the tops of the upright posts on each side. They may be bolted or connected with T-bolts sliding in a channel.
- Remove the upright posts. The verticals bolt into the base at the bottom and connect to the eave at the top. With the eave removed, they are freestanding and simply unbolt.
- Remove the base frame. The aluminium base perimeter sits on the concrete or slab base. It is typically held together by corner brackets and bolts.
Keep all bolts, nuts and fixings in a bucket or plastic bag. If you are reassembling the greenhouse somewhere else, you will need every one of them. If not, bag them for recycling.
Step 6: Label everything if you plan to reassemble
If you are moving the greenhouse to a new location, labelling is critical. Without labels, reassembly becomes a puzzle with hundreds of identical-looking aluminium bars.
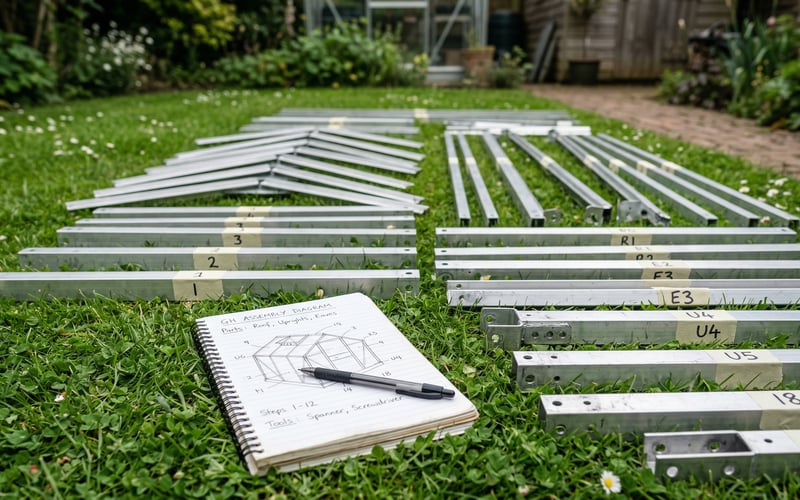
Our labelling system:
- Photograph every junction before unbolting. Take close-up photos showing which bars connect where and how many bolts hold each joint.
- Number each section with masking tape. Use a system: R1-R12 for roof bars, S1-S8 for side uprights, E1-E2 for eave bars, etc.
- Draw a simple diagram. A quick sketch on paper showing which number goes where takes five minutes and saves hours of head-scratching later.
- Bag bolts by section. Put the bolts from each joint in a labelled sandwich bag. "R1 to eave left" is much more useful than a bucket of mixed bolts.
If you are not reassembling, skip this step entirely and move straight to disposal.
How long does it take to dismantle a greenhouse?
Budget 2-6 hours depending on size, with two people working together.
| Greenhouse Size | Two People | Solo (Not Recommended) | Notes |
|---|---|---|---|
| 6x4 | 1.5-2 hours | 3-4 hours | Manageable solo but safer with two |
| 6x8 / 8x6 | 2-3 hours | 4-6 hours | Most common size we dismantle |
| 8x10 / 8x12 | 3-4 hours | Not recommended | Roof too high for safe solo work |
| 10x12+ | 4-6 hours | Not recommended | Consider professional dismantling |
| Wooden greenhouse | Full day | Not possible safely | Heavy timber sections need two people minimum |
Add 30-60 minutes if the greenhouse is old and bolts are heavily corroded. Spraying with penetrating oil the night before makes a significant difference.
How to dispose of an old greenhouse
Aluminium frames are valuable scrap metal. Glass goes to your local recycling centre.
| Material | Disposal Method | Cost |
|---|---|---|
| Aluminium frame | Scrap metal dealer or recycling centre. Aluminium is worth £0.80-£1.20/kg. A typical 8x6 frame weighs 30-50kg. | Free (you may get £25-£50) |
| Horticultural glass | Local household waste recycling centre (HWRC). Most accept flat glass separately from bottles. | Free |
| Toughened glass | Same as above. Toughened glass shatters into small cubes if broken, which is safer but harder to sweep up. | Free |
| Polycarbonate panels | HWRC rigid plastics section or general waste skip. | Free |
| Wooden frame | Skip hire or HWRC timber section. Treated timber cannot be burned at home. | £100-£250 for a skip |
| Concrete base | Leave in place for the new greenhouse. Or hire a skip for concrete rubble. | Free if reusing. £150-£300 for removal. |
If you are replacing with a new greenhouse, the old base can often be reused if it is level and the right size. Read our prepare ground for a greenhouse base guide to check whether your existing base is suitable.
When should you replace rather than repair a greenhouse?
If more than 30% of the frame is corroded or the base is twisted, replacement is more cost-effective than repair. We see customers spend hundreds on replacement glazing clips, panels, and fixings for a greenhouse that is structurally past its best. At a certain point, the parts cost more than a new greenhouse.
Signs it is time to replace:
- The aluminium frame has white powdery corrosion (aluminium oxide) at the joints
- The base frame is out of square and the door no longer slides properly
- Multiple glass panes have cracked from frame stress
- The glazing bars have lost their shape and glass panes rattle in the wind
- The greenhouse is over 15-20 years old and replacement parts are discontinued
A new greenhouse can sit on the same base if the dimensions match. Browse our full range of greenhouses or see what is available in our greenhouse sale. If you are not sure what size you need, our what size greenhouse do I need guide will help.
Browse our full range of greenhouses →
|
Matt's pick for replacement: vitavia venus 5000 8x6Best For: Replacing an old 8x6 greenhouse on an existing base Why I Recommend It: Our number one seller. Fits standard 8x6 bases. Toughened safety glass, integral base frame, single sliding door. We install more of these as replacements than any other model. Price: £649 |
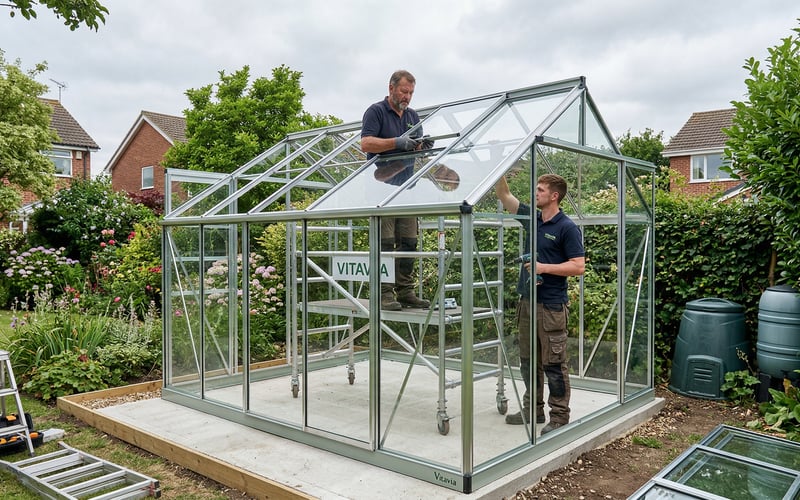
Can you pay someone to dismantle a greenhouse?
Yes. Our greenhouse installation service includes dismantling and removal of the old greenhouse when you buy a replacement from us. We dismantle the old structure, remove it from site, and install the new greenhouse on the same day. The old frame and glass are taken away for recycling.
If you need standalone dismantling without buying a new greenhouse, local handymen and garden clearance companies typically charge £150-£400 depending on size. Check they have waste carrier registration for disposing of the materials legally.
For more on what professional installation involves, see our how to install a greenhouse guide.
Common mistakes when dismantling a greenhouse
- Starting with the frame instead of the glass. Unbolting a frame section with glass still fitted causes panes to fall and shatter. Always remove all glass first.
- Working alone on anything larger than a 6x4. Roof panes are overhead, awkward, and slippery when wet. You need someone to receive the pane from the other side.
- Wearing thin gloves. Standard gardening gloves do not stop glass edges. Use thick leather rigger gloves or cut-resistant work gloves rated at least Level 3.
- Stacking glass flat. Glass panes stacked horizontally flex and crack under their own weight. Always stack vertically, leaning against a wall with cardboard between panes.
- Forcing corroded bolts. Snapping a bolt leaves a stub jammed in the frame that is almost impossible to remove. Apply penetrating oil, wait, try again. Use a socket wrench instead of pliers for better grip.
- Not labelling parts. Every aluminium bar looks the same once it is off. If you plan to reassemble, label everything before you start unbolting.
For more on avoiding problems during greenhouse assembly, read our common installation mistakes guide.
Frequently asked questions
How long does it take to dismantle a greenhouse?
A 6x8 greenhouse takes 2-3 hours with two people. Larger models (8x12 and above) take 4-6 hours. Add extra time if the bolts are heavily corroded. Working solo roughly doubles the time and significantly increases the risk of breakage and injury.
Can I dismantle a greenhouse by myself?
Only on a 6x4 or smaller. Anything larger than that requires two people for safe handling of the roof glass. One person holds the pane from inside while the other receives it outside. Dropping a roof pane is the most common cause of greenhouse dismantling injuries.
What do I do with the old glass?
Take it to your local household waste recycling centre. Most accept flat glass in a separate container from bottles and jars. Wrap cracked or broken panes in newspaper for transport. Do not put greenhouse glass in your kerbside recycling bin.
Is the aluminium frame worth anything as scrap?
Yes. Aluminium scrap is worth £0.80-£1.20 per kg. A typical 8x6 greenhouse frame weighs 30-50kg, so you can expect £25-£50 from a scrap dealer. Remove all glass, plastic, and rubber seals first. Clean aluminium fetches a better price.
Can I reuse the old base for a new greenhouse?
Usually yes, if it is level and the right size. Concrete and paving slab bases last decades. Check with a spirit level that it is still flat (within 5mm tolerance). If the new greenhouse is a different footprint, you may need to extend or pour a new base. Our greenhouse flooring options guide covers what works best.
Should I dismantle or demolish an old greenhouse?
Dismantle if the parts have reuse value. Demolish if the frame is heavily corroded and the glass is cracked. Dismantling takes longer but gives you recyclable aluminium, reusable glass (if intact), and a clear base ready for a new greenhouse. Demolition with a sledgehammer creates a mess of broken glass mixed with aluminium that is harder to recycle and dangerous to clean up.